Table of Contents
Advertisement
User's Manual
USA
BPBIO320/320n User Manual for Measurement Guide and Setup
Thank you for purchasing the BPBIO320/320n. This user's manual describes all the features of
the BPBIO320/320n. Please read before use and keep it in a safe place. By following the manual
instructions, you will be able to use the BPBIO320/320n more safely and effectively.
Advertisement
Table of Contents

Related Manuals for inbody BPBIO320n


Summary of Contents for inbody BPBIO320n
- Page 1 User’s Manual BPBIO320/320n User Manual for Measurement Guide and Setup Thank you for purchasing the BPBIO320/320n. This user’s manual describes all the features of the BPBIO320/320n. Please read before use and keep it in a safe place. By following the manual instructions, you will be able to use the BPBIO320/320n more safely and effectively.
- Page 2 Emergo AUSTRALIA. Level 20, Tower II, Darling Park, 201 Sussex Street, Sydney, NSW 2000, AUSTRALIA InBody Co., Ltd. 15, Heugam-gil, Ipjang-myeon, Seobuk-gu, Cheonan-si, Chungcheongnam-do 31025 KOREA TEL: +82-41-581-3003 FAX: +82-41-581-3103 Website: inbody.com E-mail: info@inbody.com ©2022 InBody Co., Ltd. All rights reserved. IM-ENG-82-L-220629...
- Page 3 Unit 3A-11, Oval Damansara, 685 Jalan Damansara Kuala Lumpur, WP KL 60000 Malaysia TEL : +60-3-7732-0790 FAX: +60-3-7733-0790 Website: inbodyasia.com E-mail: info@inbodyasia.com InBody India [INDIA] InBody India Pvt. Ltd. 57/57 A,1st Floor, Raj Industrial Complex, Military Road, Marol, Andheri (East). Mumbai- 400059, Maharashtra, India TEL : +91 22-6223-1911 Website: inbody.in E-mail: india@inbody.com...
-
Page 5: Table Of Contents
B. Operating Environment C. Installation Instructions D. Loading and Reloading Printer Paper (BPBIO320 only) E. Replacing Cuff Cover F. Setup G. Connecting to InBody H. Precautions for Maintenance II. Blood Pressure Test A. Precautionary Steps B. Test Instructions C. Test Posture III. -
Page 6: Bpbio320/320N Installation
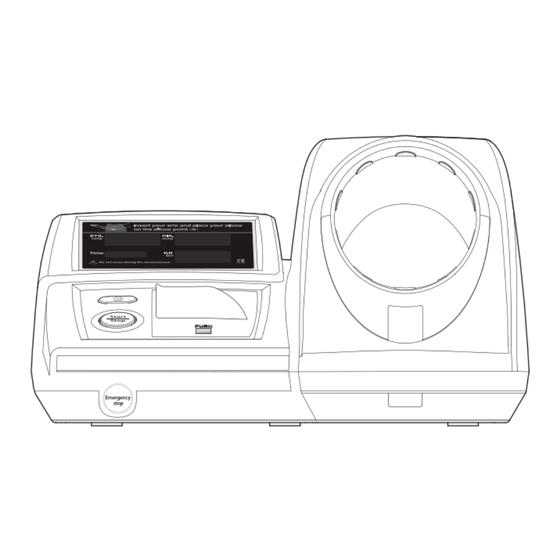
I.BPBIO320/320n Installation A. Product Components The BPBIO320/320n consists of the following components. Make sure the following components are present. * Please check each component of the system for damage prior to installation. Basic Components BPBIO320/320n Power cable 110V or 220V(AC 250V 10A 1.8m) 1 EA Information Panel Two rolls of printing paper (BPBIO320 only) Two cuff covers (One installed) -
Page 7: Installation Instructions
C. Installation Instructions 1. Open the BPBIO320/320n box, and remove the air cushion (small size). Unfold the air cushion (large size) and take out the BPBIO320/320n from the box, and then remove the protective box. Take off the protective vinyl out of the BPBIO320/320n, and remove the packing material. - Page 8 2. Place the equipment on a solid table that can withstand the weight of the BPBIO320/320n (approx. 9kg(20 lb)). If desk for the BPBIO320/320n is available, align the grooves on the bottom of the BPBIO320/320n with the grooves on the desk and secure them with two fi xing screws. * Desk for the BPBIO320/320n sold separately.
- Page 9 Caution If you are not using a power plug type B or F, you must use a 3-prong plug type with a ground pin. • Attention Si vous n'utilisez pas de fiche d'alimentation de type B ou F, vous devez utiliser une fiche à 3 broches avec une •...
- Page 10 5. Use the anti-theft groove to prevent theft. * Theft protection cable is sold separately. 6. Turn the BPBIO320/320n on by pressing the power switch located on the back of the device. Power Switch 7. When the BPBIO320/320n is turned on, the following screen is displayed and a calibration is automatically performed.
-
Page 11: Loading And Reloading Printer Paper (Bpbio320 Only)
D. Loading and Reloading Printer Paper (BPBIO320 only) 1. Loading Printer Paper 1) Cut off the end of the printer paper with scissors. If the end of the paper is ripped, it may cause a paper jam or damage the printer head. Paper cut with scissors Ripped paper 2) Open the cover by pressing ‘PUSH’... - Page 12 5) Insert the end of the paper through the feeder. The printer will automatically pull and cut the paper. 6) Remove the cut paper, and close the printer paper cover. 2. Reloading Printer Paper 1) Open the cover by pressing ‘PUSH’ mark on the bottom center of it while the BPBIO320/320n is turned 2) Press button to remove the remaining paper.
-
Page 13: Replacing Cuff Cover
E. Replacing Cuff Cover The cuff cover of the BPBIO320/320n should be replaced periodically for sanitary purposes. Follow the guide below to replace the cuff cover. 1. Remove the front cover of the BPBIO320/320n by pushing downward. Loosen the screw with a screwdriver. Screws Front Cover 2. - Page 14 5. Secure the new cuff cover onto the grooves on the front and rear of the BPBIO320/320n. 6. Attach the previously removed front and rear rings on the BPBIO320/320n and secure them with screws. Rear ring Front ring 7. Close the front cover of the BPBIO320/320n. Front Cover Note Two cuff covers are provided with the BPBIO320/320n.
-
Page 15: Setup
F. Setup Setup consists of sound settings, motion sensor settings, elbow sensor settings, Automatic printing options, time stamps and Result sheet item(Outputting caution comment, Pulse graph). Note Contents of results sheet output are only applicable to BPBIO320. • Remarque • Le contenu de la sortie de la feuille de résultats ne s’applique qu’à BPBIO320. 1. - Page 16 The following is an example showing how to change a ‘manual output’ Automatic printing options. While on the home screen, press and hold button and button at the same time for 2 seconds. ▼ Press button to move to screen. Press button to select ▼...
- Page 17 One time measurement mode * Automatic printing options ( ) and Result sheet item ( ) are applicable only to BPBIO320, so they do not appear at BPBIO320n. * “QR Code” is registered trademark of DENSO WAVE INCORPORATED.
- Page 18 3. Blood Pressure Evaluation 1) While on the home screen, press and hold button and UP (▲) button at the same time for more than 2 seconds. 2) When 111 is displayed in the systolic blood pressure column, diastolic blood pressure column, and pulse column as shown below, the blood pressure evaluation has been disabled.
- Page 19 4. Displaying test counts 1) While on the home screen, hold the DOWN (▼) button for more than 2 seconds. Test counts for the day will be displayed in the diastolic blood pressure column. Test counts for the day and total test counts are printed.
-
Page 20: Connecting To Inbody
1. Turn off the BPBIO320/320n. * If the BPBIO320/320n is already turned on while being connected to the InBody, the connection may not be smooth. 2. Connect the serial cable to the RS232C (9-pin serial) connection terminal located on the back of the BPBIO320/320n. -
Page 21: Precautions For Maintenance
H. Precautions for Maintenance Caution Never move the equipment while the power is on. • Do not let foreign objects, like dust and liquid to enter the device. Foreign objects can damage electric • components. Clean the exterior of the device gently with a lint-free cloth once a week. Do not scratch the LED screen •... -
Page 22: Blood Pressure Test
Blood Pressure Test A. Precautionary Steps Caution User should rest at least 5 to 10 minutes before the test. • Do not roll up the user’s sleeve, but take off thick clothes. • User should sit up straight in the chair. •... - Page 23 2. Rest for at least 5 minutes prior to taking the test. * If examined in a bit unstable condition, the test result may be incorrect, and generally it will turn up higher than your usual blood pressure. 3. Insert the arm until the elbow is caught in the elbow groove, as shown. groove 4.
- Page 24 Start/Stop button Emergency stop button 6. The cuff is automatically released after completing the test. Wait for the cuff to fully loosen and pull out your arm. 7. Check the results on the screen. * The voice guide will be heard and the Result Sheet will be printed depeneding on settings. * Do not pull the Result Sheet while it is printing.
- Page 25 * The user can check results by using 'Check Blood Pressure Result' at the bottom right of the Information Panel * Consult a physician for accurate diagnosis. Check Blood Pressure Check Blood Pressure Result Result Note Rest for 5 minutes before testing again. •...
-
Page 26: Test Posture
C. Test Posture For correct test results, sit with proper posture while taking the test. Blood Pressure Cuff Adjust the height of the chair so the upper part of the right arm and the heart are horizontal with each other. Sit as as close as possible to the BPBIO320/320n * Be sure to place the elbow in the elbow groove before starting the test. -
Page 27: Transportation And Storage
III. Transportation and Storage A. Cautions during Transportation To transport the BPBIO320/320n safely, two people should keep the equipment parallel to the ground. Caution When transporting the equipment alone, keep the equipment horizontal while transporting. • Attention • Lorsque vous transportez l'équipement seul de façon inévitable, soulevez-le en le maintenant horizontal comme suit. -
Page 28: Repacking Instructions
When repacking the equipment, protective packing materials provided by InBody must be used. • Attention • Lors du reconditionnement de l'équipement, les matériaux d'emballage de protection fournis par InBody doivent être utilisés. C. Transportation and Storage Environment The BPBIO320/320n should be transported or stored under the following conditions. -
Page 29: Faq
The error messages can be displayed on the screen if they occur during the test. Please provide the error code to Product Support. B. Regarding the Equipment If problems cannot be resolved with the information below, please contact InBody. Problem Cause Corrective measures Plug the power cable into a grounded 3-prong outlet. - Page 30 Question Cause Measures Turn off the BPBIO320/320n, and replace the fuse. The fuse socket is located on the back of the device beneath the power plug. Pull the fuse out by using a flathead screwdriver. Replace the fuse with the provided spare fuse. Additonal fuses can be purchased if necessary.
- Page 31 InBody Co., Ltd.. Attention • InBody Co, Ltd se décharge de toute responsabilité en cas de problème si la maintenance et l’inspection de votre appareil ne sont pas effectuées par un technicien accrédité ou un employé de la société.
-
Page 32: Regarding The Test
The user may have tested without sufficient rest. Take the test after resting at • least 5 minutes. Do not talk or move during the test. • * Blood pressure may vary throught the day. InBody recommends testing at diff erent times of the day. - Page 33 Question Answer When should blood Blood pressure may vary throughout the day, as shown below. • • pressure be measured? Blood pressure values Therefore, the best time to test is when users can test regularly on a daily basis. It is recommended to test at the same time each day under the same conditions. How frequently can tests The automatic blood pressure monitor applies pressure to the arm to measure •...
-
Page 34: Others
Others * The BPBIO320/320n was manufactured by the quality control procedures of InBody Co., Ltd. InBody Co., Ltd. complies with ISO9001 and ISO13485 which are international quality management systems. * This equipment complies with IEC60601-1, the international safety standard for electronic medical equipment. This equipment also complies with IEC60601-1-2, the international standard for electromagnetic compatibility. -
Page 35: Safety Information
B. Safety Information Warning If this equipment has been altered, it must be inspected to ensure that it can be used safely. • Results can only be interpreted by experienced healthcare professionals. It cannot be used for diagnosis, • medication, or other treatments performed at the consumer’s discretion without a doctor ̓ s prescription. Avertissement •... -
Page 36: Product Classification
Other Symbols Manufacturer Serial number Authorized representative in the Alternating current EUROPEAN COMMUNTY European conformity Operating instructions NRTL mark (MET) * MET symbols apply to products sold in the United States and Canada C. Product Classifi cation Oscillometric multi-functional electronic blood pressure monitor Type of protection against electric shock: Class 1 device •... -
Page 37: Specifications
Dimensions 19.3 (W) × 16.1 (L) × 11.2 (H) in Weight 9kg (19.84 lb) (BPBIO320n: 8.8 kg (19.40 lb)) Operating environment Temperature 5 ~ 40ºC(41 ~ 104ºF), Humidity 15 ~ 90% RH, Atmospheric pressure 70 ~ 106 kPa Storage environment Temperature -20 ~ 70ºC(-4 ~ 158ºF), Humidity 10 ~ 95% RH, Atmospheric pressure 50 ~ 106 kPa... -
Page 38: Emc Declaration
E. EMC Declaration Test Name IEC 60601- Ref. Standard Ports to Test AC Mains Test Level Required Notes Voltage 4th Edition 100V, 50Hz Mains terminal CISPR 100V, 60Hz Group 1, AC Mains disturbance voltage 11:2015/ 120V, 60Hz Class B AMD2:2019 220V, 60Hz 230V, 50Hz 100V, 50Hz... - Page 39 100V, 50Hz 100V, 60Hz Power-frequancy IEC 61000-4- Enclosure 120V, 60Hz 30 A/m Magnetic Field 8:2009 220V, 60Hz 50 Hz & 60 Hz 230V, 50Hz Battery AT 0°, 45°, 0% UT for 0.5 cycle 90°, 135°, 180°, 225°, 270°, 315° 0% UT for 1 cycle AT 0°, 180°...
- Page 40 Electromagnetic immunity The [Model name] is intended for use in an electromagnetic environment in which radiated RF disturbances are controlled. Portable RF communications equipment should be used no closer than 30 cm (12 inches) to any part of the [Model name]. Otherwise, degradation of the performance of this equipment could result.
- Page 44 1639 ©2022 InBody Co., Ltd. All rights reserved. IM-ENG-82-L-220629...
Need help?
Do you have a question about the BPBIO320n and is the answer not in the manual?
Questions and answers