Table of Contents
Advertisement
Quick Links
Advertisement
Table of Contents

Related Manuals for Keysight Technologies U1732C


Summary of Contents for Keysight Technologies U1732C
- Page 1 Keysight U1731C/U1732C/ U1733C Handheld LCR Meter User’s Guide...
- Page 2 FAR 27.401 or DFAR could result in personal injury or death. 227.7103-5 (c), as applicable in any Do not proceed beyond a WARNING technical data. notice until the indicated conditions are fully understood and met. Keysight U1731C/U1732C/U1733C User’s Guide...
-
Page 3: Safety Symbols
Earth (ground) terminal Caution, hot surface Protective conductor terminal Out position of a bi-stable push control Frame or chassis terminal In position of a bi-stable push control Equipment protected throughout by Equipotentiality double insulation or reinforced insulation Keysight U1731C/U1732C/U1733C User’s Guide... -
Page 4: Safety Considerations
– Line operation is also possible using a 12 V AC to DC adapter. If a power adapter is selected, please be sure it meets the safety requirements of a relevant IEC standard. Keysight U1731C/U1732C/U1733C User’s Guide... - Page 5 – Do not operate the meter with the battery cover or portions of the cover removed or loosened. – To avoid false readings, which may lead to possible electric shock or personal injury, replace the battery as soon as the low battery indicator appears and flashes. Keysight U1731C/U1732C/U1733C User’s Guide...
-
Page 6: Environmental Conditions
0% to 80% RH non-condensing Altitude Up to 2000 meters Pollution degree Pollution degree II The U1731C/U1732C/U1733C Handheld LCR Meter complies with the following NOTE safety and EMC requirements: – IEC61010-1:2001/EN61010-1:2001 (Second Edition) – IEC 61326-1:2005/EN 61326-1:2006 – Canada: ICES/NMB-001:Issue 4, June 2006 –... -
Page 7: Regulatory Markings
This symbol indicates the time period during which no hazardous or toxic substance elements are expected to leak or deteriorate during normal use. Forty years is the expected useful life of the product. Keysight U1731C/U1732C/U1733C User’s Guide... -
Page 8: Waste Electrical And Electronic Equipment (Weee) Directive 2002/96/Ec
To contact Keysight for sales and technical support, refer to the support links on the following Keysight websites: – http://www.keysight.com/handheldlcr (product-specific information and support, software and documentation updates) – www.keysight.com/find/assist (worldwide contact information for repair and service) Keysight U1731C/U1732C/U1733C User’s Guide... -
Page 9: Table Of Contents
........39 Keysight U1731C/U1732C/U1733C User’s Guide... - Page 10 ....... . . 86 Changing the auto power-off and backlight time-outs ..87 Keysight U1731C/U1732C/U1733C User’s Guide...
- Page 11 ....... . .88 Characteristics and Specifications Keysight U1731C/U1732C/U1733C User’s Guide...
- Page 12 THIS PAGE HAS BEEN INTENTIONALLY LEFT BLANK. Keysight U1731C/U1732C/U1733C User’s Guide...
- Page 13 ... .73 Figure 3-4 Changing the power-on secondary parameter and measurement mode for capacitance (C) measurements ...74 Keysight U1731C/U1732C/U1733C User’s Guide...
- Page 14 ....... . . 87 Figure 3-16 Resetting the Setup items ..... . 88 Keysight U1731C/U1732C/U1733C User’s Guide...
- Page 15 ... . .77 Table 3-4 Default user high/low limit values ....80 Keysight U1731C/U1732C/U1733C User’s Guide...
- Page 16 THIS PAGE HAS BEEN INTENTIONALLY LEFT BLANK. Keysight U1731C/U1732C/U1733C User’s Guide...
- Page 17 Keysight U1731C/U1732C/U1733C Handheld LCR Meter User’s Guide Introduction About This Manual Preparing Your LCR Meter Your LCR Meter in Brief Cleaning Your LCR Meter This chapter teaches you how to set up your LCR meter for the first time. An...
-
Page 18: Introduction
Introduction About This Manual The descriptions and instructions in this manual apply to the Keysight U1731C, U1732C, and U1733C handheld LCR meters (hereafter referred to as the LCR meter). The model U1733C appears in all illustrations. Documentation map The following manuals and software are available for your LCR meter. For the very latest version, please visit our website at: http://www.keysight.com/find/hhTechLib. -
Page 19: Preparing Your Lcr Meter
U1731C/U1732C/U1733C Quick Start Guide. 3 For any question or problems, refer to the Keysight contact numbers on the back of this manual. -
Page 20: Figure 1-1 Installing The Batteries
To avoid false readings, which could lead to possible electric shock or WARNING personal injury, replace the battery as soon as the low battery indicator appears. Do not discharge the battery by shorting the battery or reverse the battery polarity. Keysight U1731C/U1732C/U1733C User’s Guide... -
Page 21: Turn On Your Lcr Meter
To power ON your LCR meter, press the power-on button once. The LCR meter powers up in the auto identification (Ai) mode (see page 42) when turned on for the first time. Power-on button Figure 1-2 Power-on button Keysight U1731C/U1732C/U1733C User’s Guide... -
Page 22: Automatic Power-Off (Apo)
– To change the time-out period or completely disable the backlight, refer to NOTE “Changing the auto power-off and backlight time-outs” on page – If an external power adapter is used, the backlight time-out will be disabled. Keysight U1731C/U1732C/U1733C User’s Guide... -
Page 23: Selecting The Range
Range Auto Each additional press of sets the LCR meter to the next higher range, unless it Range Auto is already in the highest range, at which point the range switches to the lowest range. Keysight U1731C/U1732C/U1733C User’s Guide... -
Page 24: Adjusting The Tilt Stand
Introduction Adjusting the tilt stand To adjust the LCR meter to a 60° standing position, pull the tilt-stand outward to its maximum reach. To PC (host) IR-USB cable Figure 1-3 Tilt-stand adjustment and IR cable connection Keysight U1731C/U1732C/U1733C User’s Guide... -
Page 25: Connecting The Ir-Usb Cable
The Keysight GUI Data Logger software and its supporting documents (Quick Start Guide and Help) are available for free download at http://www.keysight.com/find/hhTechLib. You may purchase a U5481A IR-USB cable from a Keysight Sales Office nearest to you. Keysight U1731C/U1732C/U1733C User’s Guide... -
Page 26: Power-On Options
Enters the Setup menu. ZLCR Chapter 3, “Setup Options,” starting on page 65 for more information. Press and hold for more ZLCR than 1 second to exit this mode. [1] The Open/Short CAL requires approximately 1.5 minutes to complete. Keysight U1731C/U1732C/U1733C User’s Guide... -
Page 27: Your Lcr Meter In Brief
Introduction Your LCR Meter in Brief Dimensions Front view 87 mm Figure 1-5 Width dimensions Keysight U1731C/U1732C/U1733C User’s Guide... -
Page 28: Figure 1-6 Height And Depth Dimensions
Introduction Rear and side view 41 mm 184 mm Figure 1-6 Height and depth dimensions Keysight U1731C/U1732C/U1733C User’s Guide... -
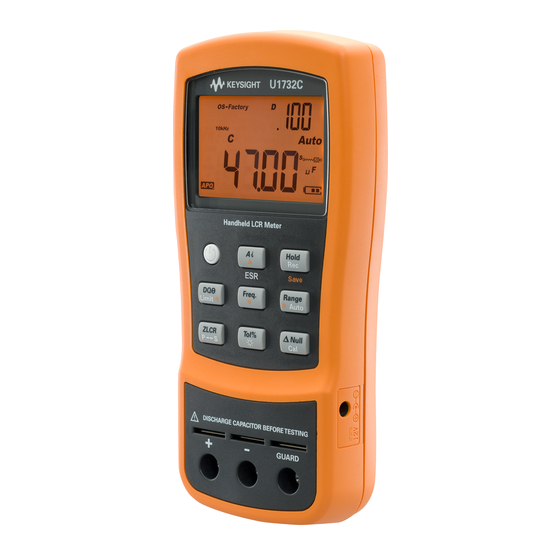
Page 29: Overview
“Learn more” pages in Table 1-3 for more information on each part. Figure 1-7 Front panel Table 1-3 Front panel parts Legend Description Learn more on: Display screen page 34 Keypad page 31 Input terminals and sockets page 38 Keysight U1731C/U1732C/U1733C User’s Guide... -
Page 30: Figure 1-8 Rear Panel
IR communication port page 25 Tilt stand page 24 Battery cover (lift the tilt stand for access) page 19 External power adapter input jack [1] The external power adapter input jack requires an input voltage of +12 VDC. Keysight U1731C/U1732C/U1733C User’s Guide... -
Page 31: Keypad
Introduction Keypad The operation of each key is explained below. Pressing a key enables a function, displays a related annunciator, and emits a beep. Each key operation of the U1731C/U1732C/U1733C keypad (shown in Figure 1-7) is described in Table 1-5. Click the respective “Learn more” pages in Table 1-5 more information on each function. - Page 32 Range Auto Auto available measurement range. page 43 Switches between impedance (Z), inductance (L), page 51 ZLCR Toggles between parallel and series circuit mode. capacitance (C), and resistance (R) measurement. page 53 Keysight U1731C/U1732C/U1733C User’s Guide...
- Page 33 Null measurements. page 62 calibration process. – Press again to cancel the null mode. – The LCR meter will return to normal display Null when the calibration is complete. Keysight U1731C/U1732C/U1733C User’s Guide...
-
Page 34: Display Screen
General display annunciators The general display annunciators of your LCR meter are described in the table below. Each display annunciator of the U1731C/U1732C/U1733C display screen (shown Figure 1-7) is described in Table 1-6. Click the respective “Learn more” pages in Table 1-6 for more information on each annunciator. - Page 35 53 Phase angle of impedance indicator Secondary display Measurement units for the secondary display page 37 Impedance measurement indicator page 51 Inductance measurement indicator page 45 Capacitance measurement indicator page 47 Resistance measurement indicator page 49 Keysight U1731C/U1732C/U1733C User’s Guide...
- Page 36 Reading out of HI limit Reading out of LO limit Auto power-off indicator page 22 Primary display Measurement units for the primary display page 37 Parallel mode indicator page 53 Series mode indicator Battery capacity indicator page 21 Keysight U1731C/U1732C/U1733C User’s Guide...
-
Page 37: Table 1-7 Measurement Units Display
Percentage, unit for tolerance measurement μH, mH, H Henry, units for inductance measurement pF, nF, μF, mF Farad, units for capacitance measurement Ω, kΩ, MΩ Ohm, units for resistance and impedance measurement kHz, Hz Hertz, units for frequency measurement Keysight U1731C/U1732C/U1733C User’s Guide... -
Page 38: Input Terminals
To avoid damaging this instrument, do not exceed the input limit. Do not WARNING apply voltage to input terminals. Discharge the capacitor before testing. Table 1-8 Input terminal/socket connections Input terminal/ Description socket Positive terminal/component socket Negative terminal/component socket GUARD Guard terminal/component socket Keysight U1731C/U1732C/U1733C User’s Guide... -
Page 39: Cleaning Your Lcr Meter
2 Turn the LCR meter over and shake out any dirt that may have accumulated in the terminals. 3 Wipe the case with a damp cloth and mild detergent — do not use abrasives or solvents. 4 Wipe the contacts in each terminal with a clean swab dipped in alcohol. Keysight U1731C/U1732C/U1733C User’s Guide... - Page 40 Introduction THIS PAGE HAS BEEN INTENTIONALLY LEFT BLANK. Keysight U1731C/U1732C/U1733C User’s Guide...
-
Page 41: Features And Functions
Keysight U1731C/U1732C/U1733C Handheld LCR Meter User’s Guide Features and Functions Making Measurements Additional Features This chapter provides detailed information on the features and functions that are available in your LCR meter. -
Page 42: Making Measurements
The default phase angle condition is set to 10°. You can change this angle in the Setup menu from 5° to 45°. See “Changing the Ai function’s phase angle condition” on page 77 for more information. Keysight U1731C/U1732C/U1733C User’s Guide... -
Page 43: Table 2-1 Auto Identification Phase Angle Rules
200 MΩ Parallel Parallel 20 MΩ Parallel Parallel 2000 kΩ Parallel Parallel 200 kΩ Parallel Parallel 20 kΩ Parallel Series 2000 Ω Parallel Series 200 Ω Parallel Series 20 Ω Series Series 2 Ω Series Series Keysight U1731C/U1732C/U1733C User’s Guide... -
Page 44: Table 2-3 Auto Identification Series/Parallel Rules For Capacitance Measurements
Series Series Series Series Parallel Series Parallel Series Parallel Series 2000 μH Series Series Series Series Series Series Parallel Series Parallel Series 200 μH Series Series Series Series Parallel Series 20 μH Series Series Series Series Keysight U1731C/U1732C/U1733C User’s Guide... -
Page 45: Measuring Inductance (L)
3 Insert an inductor into the component socket or connect the test clip to the component leads as required. 4 Press to change the secondary display measurement (D, Q, or θ). Limit 5 Read the displays. Keysight U1731C/U1732C/U1733C User’s Guide... -
Page 46: Figure 2-3 Measuring Inductance
Features and Functions Surface Mount Device (SMD) Inductor Freq. > ZLCR Freq. > U1782B SMD Tweezers Figure 2-3 Measuring inductance Keysight U1731C/U1732C/U1733C User’s Guide... -
Page 47: Measuring Capacitance (C)
3 Insert a capacitor into the component socket or connect the test clip to the component leads as required. 4 Press to change the secondary display measurement (D, Q, or θ). Limit 5 Read the displays. Keysight U1731C/U1732C/U1733C User’s Guide... -
Page 48: Figure 2-5 Measuring Capacitance
Features and Functions Surface Mount Device (SMD) Capacitor Freq. > ZLCR Freq. > U1782B SMD Tweezers Figure 2-5 Measuring capacitance Keysight U1731C/U1732C/U1733C User’s Guide... -
Page 49: Measuring Resistance (R)
ZLCR Figure 2-6 Resistance measurement 3 Insert a resistor into the component socket or connect the test clip to the component leads as required. 4 Read the display. Keysight U1731C/U1732C/U1733C User’s Guide... -
Page 50: Figure 2-7 Measuring Resistance
Features and Functions Surface Mount Device (SMD) Resistor Freq. > ZLCR Freq. > U1782B SMD Tweezers Figure 2-7 Measuring resistance Keysight U1731C/U1732C/U1733C User’s Guide... -
Page 51: Measuring Impedance (Z)
3 Insert a component into the component socket or connect the test clip to the component leads as required. 4 Press to change the secondary display measurement (D, Q, or θ). Limit 5 Read the displays. Keysight U1731C/U1732C/U1733C User’s Guide... -
Page 52: Figure 2-9 Measuring Impedance
Features and Functions Surface Mount Device (SMD) Device-Under-Test (DUT) Freq. ZLCR > U1782B SMD Tweezers Figure 2-9 Measuring impedance Keysight U1731C/U1732C/U1733C User’s Guide... -
Page 53: Measuring Dissipation Factor/Quality Factor/Phase Angle (D/Q/Θ)
Series mode is set as the default setting. You can, however, change this power-on behavior in the Setup menu. See “Changing the initial power-on behavior” page 70 for more information on how to change the default measurement mode (parallel or series) for subsequent power cycles. Keysight U1731C/U1732C/U1733C User’s Guide... -
Page 54: Setting The Standard Reference Tolerance (Tol%)
NOTE the tested capacitance value is below 50 counts. – Tolerance mode is only available in manual ranging; therefore, activation while in autoranging will automatically set the LCR meter to manual ranging. Keysight U1731C/U1732C/U1733C User’s Guide... -
Page 55: Enabling Esr Measurements
1 second to select the DCR measurement. The DCR Freq. measurement measures the resistance of an unknown component by 1 VDC. Figure 2-12 DCR measurement Press for more than 1 second to exit this mode. Freq. Keysight U1731C/U1732C/U1733C User’s Guide... -
Page 56: Additional Features
When the input goes below the recorded minimum value or above the recorded maximum value, the LCR meter beeps and records the new value. The LCR meter also calculates an average of all readings taken since the static recording mode was activated. Keysight U1731C/U1732C/U1733C User’s Guide... -
Page 57: Figure 2-14 Using The Rec Function
LCR meter will not record values below 50 counts in capacitance measurement. – Static recording is only available in manual ranging; therefore, activation while in autoranging will automatically set the LCR meter to manual ranging. Keysight U1731C/U1732C/U1733C User’s Guide... -
Page 58: Setting The High/Low Limit Comparison (Limit)
High limit (H) Low limit (L) 1000 1200 1080 1500 1350 1800 1620 2200 1980 2700 2430 3300 2970 3900 3510 4700 4230 5600 5040 6800 6120 8200 7380 10000 9000 12000 10800 15000 13500 18000 16200 Keysight U1731C/U1732C/U1733C User’s Guide... -
Page 59: Figure 2-15 Using The Limit Function
(H## or L##) will be indicated in the secondary display. >1s Limit Figure 2-15 Using the Limit function While the annunciator is flashing, use the key to select an Freq. appropriate limit set. Keysight U1731C/U1732C/U1733C User’s Guide... -
Page 60: Figure 2-16 High And Low Limit Values
If the reading is within the high and low limits, the meter beeps once and displays in the secondary display. Figure 2-17 nGo and Go indications The limit set used in the comparison is displayed after the indication. Press and hold for more than 1 second to exit this mode. Limit Keysight U1731C/U1732C/U1733C User’s Guide... -
Page 61: Making Relative Measurements (Null)
Null reference value. The LCR meter will then display all subsequent readings relative to the reference value. Null Figure 2-18 Using the Null function Keysight U1731C/U1732C/U1733C User’s Guide... -
Page 62: Performing The Open/Short Cal
The corrections for the are pre-stored in the LCR meter. They are both calibrated at the terminal ends. You can set the LCR meter to start up using the open/ short CAL from the Setup menu (see page 76). Keysight U1731C/U1732C/U1733C User’s Guide... -
Page 63: Figure 2-19 Using The Cal Function
The open/short CAL function is available for fixed measurement ranges. It is highly recommended that open/short CAL be performed before making NOTE precision measurements. >1s Null Figure 2-19 Using the Cal function Figure 2-20 Open calibration and short calibration prompts Keysight U1731C/U1732C/U1733C User’s Guide... - Page 64 The CAL annunciator on the upper right of the display will flash indicating that the correction is in process. 3 After the open/short CAL is completed, the LCR meter will be restored to the normal display and ready for normal usage. Keysight U1731C/U1732C/U1733C User’s Guide...
- Page 65 Keysight U1731C/U1732C/U1733C Handheld LCR Meter User’s Guide Setup Options Using the Setup Menu Setup Menu Summary Setup Menu Items The following chapter describes how to change the preset features of your LCR meter.
-
Page 66: Setup Options
Freq. decrease or increase a numerical value. Hold ZLCR While the menu item is flashing, press to save your changes. Hold While the menu item is flashing, press to discard your changes. ZLCR Save Keysight U1731C/U1732C/U1733C User’s Guide... -
Page 67: Editing Numerical Values
– Press to decrement the digit. Freq. When you have completed your changes, save the new numerical value by pressing . (Or alternatively, if you wish to discard the changes you made press, Hold ZLCR Keysight U1731C/U1732C/U1733C User’s Guide... -
Page 68: Setup Menu Summary
LCR meter powers up in. Default is Ft01. high and low limits for each variable user set. See H01 to H16 or L01 to L16 Set the page 80 0 to 19999 Table 3-4 for the user default values. on page 80 Keysight U1731C/U1732C/U1733C User’s Guide... - Page 69 Set the LCD backlight timeout period from 1 to 99 seconds 01 to 99 s or oFF (1 minute, 39 seconds) or off. Default is 30 seconds. dEFA Reset the LCR meter to its factory default settings. page 88 Keysight U1731C/U1732C/U1733C User’s Guide...
-
Page 70: Setup Menu Items
– auto identification mode (Ai), – impedance measurement (Z), – inductance measurement (L), – capacitance measurement (C), – resistance measurement (R), – equivalent series resistance mode (ESR), or – direct current resistance mode (DCR) for U1733C only Keysight U1731C/U1732C/U1733C User’s Guide... -
Page 71: Figure 3-1 Changing The Power-On Measurement Type
Setup Options The LCR meter will start up in the selected measurement type for subsequent power cycles. Press Press Press Press Press Press Figure 3-1 Changing the power-on measurement type Keysight U1731C/U1732C/U1733C User’s Guide... -
Page 72: Figure 3-2 Changing The Power-On Test Frequency
LCR meter to start up using a test frequency from 100 Hz to 100 kHz. The LCR meter will start up using the selected test frequency for subsequent power cycles. Press Press Press Press Figure 3-2 Changing the power-on test frequency Keysight U1731C/U1732C/U1733C User’s Guide... -
Page 73: Figure 3-3 Changing The Power-On Secondary Parameter And Measurement Mode For Inductance (L) Measurements
The inductance (L) measurement will start up using the selected secondary parameter and measurement mode for subsequent power cycles. Press Press Press Press Press Press Press Press Figure 3-3 Changing the power-on secondary parameter and measurement mode for inductance (L) measurements Keysight U1731C/U1732C/U1733C User’s Guide... -
Page 74: Figure 3-4 Changing The Power-On Secondary Parameter And Measurement Mode For Capacitance (C) Measurements
The capacitance (C) measurement will start up using the selected secondary parameter and measurement mode for subsequent power cycles. Press Press Press Press Press Press Press Press Figure 3-4 Changing the power-on secondary parameter and measurement mode for capacitance (C) measurements Keysight U1731C/U1732C/U1733C User’s Guide... -
Page 75: Figure 3-5 Changing The Power-On Secondary Parameter And Measurement Mode For Resistance (R) Measurements
The resistance (R) measurement will start up using the selected secondary parameter and measurement mode for subsequent power cycles. Press Press Press Press Press Press Press Press Figure 3-5 Changing the power-on secondary parameter and measurement mode for resistance (R) measurements Keysight U1731C/U1732C/U1733C User’s Guide... -
Page 76: Figure 3-6 Changing The Power-On Open/Short Cal
Use this Setup item to change the LCR meter’s initial open/short CAL to either the factory open/short CAL (FACt), or user open/short CAL (USEr). The LCR meter will start up using the selected open/short CAL for subsequent power cycles. Press Press Figure 3-6 Changing the power-on open/short CAL Keysight U1731C/U1732C/U1733C User’s Guide... -
Page 77: Changing The Ai Function's Phase Angle Condition
R measurements selected. Table 3-3 Auto identification phase angle rules Primary d isplay Secondary d isplay Phase angle –Set < θ < +Set θ θ ≥ +Set θ ≤ –Set [1] Where ±Set is the phase angle selected. Keysight U1731C/U1732C/U1733C User’s Guide... -
Page 78: Figure 3-7 Changing The Ai Function's Phase Angle Condition
Setup Options Press Press Press Press Press Press Figure 3-7 Changing the Ai function’s phase angle condition Keysight U1731C/U1732C/U1733C User’s Guide... -
Page 79: Changing The Power-On Limit Category And Set
16) for subsequent power cycles. Parameter Range Defaul t setting – Factory (Ft01 to Ft16) or Ft01 – User (Ur01 to Ur16) Press Press Press Press Press Press Press Press Figure 3-8 Changing the power-on limit and category set Keysight U1731C/U1732C/U1733C User’s Guide... -
Page 80: Changing The User High/Low Limit Values
Table 3-4 Default user high/low limit values High limit (H) Low limit (L) 1000 1200 1080 1500 1350 1800 1620 2200 1980 2700 2430 3300 2970 3900 3510 4700 4230 5600 5040 6800 6120 Keysight U1731C/U1732C/U1733C User’s Guide... -
Page 81: Figure 3-9 Changing The User High/Low Limit Values
8200 7380 10000 9000 12000 10800 15000 13500 18000 16200 Press Press Press Press Press Press Press Press Press Press Press Press Press Press Press Press Press Press Figure 3-9 Changing the user high/low limit values Keysight U1731C/U1732C/U1733C User’s Guide... -
Page 82: Changing The Baud Rate
Logger software to control your LCR meter remotely (page 25). Use this Setup item to change the baud rate for remote communications with a Parameter Range Defaul t setting (9600 or 19200) bits/second 9600 bits/second Press Press Figure 3-10 Changing the baud rate Keysight U1731C/U1732C/U1733C User’s Guide... -
Page 83: Changing The Parity Check
(page 25). Use this Setup item to change the parity check for remote communications with a Parameter Range Defaul t setting nonE, En, or odd nonE Press Press Press Press Figure 3-11 Changing the parity check Keysight U1731C/U1732C/U1733C User’s Guide... -
Page 84: Changing The Data Bits
Use this Setup item to change the number of data bits (data width) for remote communications with a PC. The number of the stop bit is always 1, and this cannot be changed. Parameter Range Defaul t setting 7-bit or 8-bit 8-bit Press Press Figure 3-12 Changing the data bits Keysight U1731C/U1732C/U1733C User’s Guide... -
Page 85: Changing The Beep Frequency
Use this Setup item to change the driving frequency of the beeper. Parameter Range Defaul t setting (2000, 3000, 4000) Hz or oFF 4000 Hz Press Press Press Press Press Press Figure 3-13 Changing the beep frequency Keysight U1731C/U1732C/U1733C User’s Guide... -
Page 86: Locking The Push Buttons
(rendered unoperational) when you exit the Setup menu. Unlock the push buttons again by entering the Setup menu through the power-on options (page 26). Parameter Range Defaul t setting on or oFF Press Press Figure 3-14 Locking the push buttons Keysight U1731C/U1732C/U1733C User’s Guide... -
Page 87: Changing The Auto Power-Off And Backlight Time-Outs
(01 to 99) minutes or oFF 05 minutes (01 to 99) seconds or oFF 30 seconds Press Press Press Press Press Press Press Press Press Press Press Press Figure 3-15 Changing the auto power-off and backlight time-outs Keysight U1731C/U1732C/U1733C User’s Guide... -
Page 88: Figure 3-16 Resetting The Setup Items
The LCR meter will beep once, exit the Setup Hold menu, and return to normal operation. Parameter Range Defaul t setting dEFA dEFA Press Ho ld R ec Figure 3-16 Resetting the Setup items Keysight U1731C/U1732C/U1733C User’s Guide... - Page 89 Keysight U1731C/U1732C/U1733C Handheld LCR Meter User’s Guide Characteristics and Specifications For the characteristics and specifications of the U1731C/U1732C/U1733C Handheld LCR Meter, refer to the datasheet at http://literature.cdn.keysight.com/litweb/pdf/5990-7778EN.pdf.
- Page 90 Characteristics and Specifications THIS PAGE HAS BEEN INTENTIONALLY LEFT BLANK. Keysight U1731C/U1732C/U1733C User’s Guide...
- Page 91 This information is subject to change without notice. Always refer to the Keysight website for the latest revision. © Keysight Technologies 2011-2017 Edition 9, July 1, 2017 Printed in Malaysia *U1731-90077* U1731-90077 www.keysight.com...
Need help?
Do you have a question about the U1732C and is the answer not in the manual?
Questions and answers