Dickey-John GAC 2500 Operator's Manual
Hide thumbs
Also See for GAC 2500:
- Operator's manual (107 pages) ,
- Operator's manual (46 pages) ,
- Quick start manual & mobile app tutorial (31 pages)
Table of Contents
Advertisement
OPERATOR'S MANUAL
Safety Notices ..................................................................................................... 1
Introduction ......................................................................................................... 3
Accessories ....................................................................................................................... 3
Unit Overview .................................................................................................................... 3
Features ............................................................................................................................ 4
Specifications .................................................................................................................... 4
Declaration of Conformity ................................................................................................. 4
External Communication Connections .............................................................................. 5
Printer ............................................................................................................................... 6
Installation ........................................................................................................... 7
Unit Positioning ................................................................................................................. 7
Connecting AC Power ...................................................................................................... 7
Grain Drawer .................................................................................................................... 8
Optional Bottomless Grain Drawer ................................................................................................... 8
Navigation ............................................................................................................ 9
Using External Devices ..................................................................................................... 9
Touch Screen Button Functions ...................................................................................... 10
Home .............................................................................................................................................. 10
Power Off ....................................................................................................................................... 10
Initiate.............................................................................................................................................. 10
Print................................................................................................................................................. 10
Back ................................................................................................................................................ 10
Abort................................................................................................................................................ 10
Enter ............................................................................................................................................... 10
USB ................................................................................................................................................ 10
User ................................................................................................................................................ 10
Instrument Information ................................................................................................................... 11
LCD Display Touch Screen Calibration .......................................................................................... 11
Keypad ........................................................................................................................................... 11
Password Restrictions ..................................................................................... 13
Setup .................................................................................................................. 15
Product ............................................................................................................................ 15
Edit Existing Product ...................................................................................................................... 15
Edit Product .................................................................................................................................... 17
Create Product ............................................................................................................................... 18
Delete Product ............................................................................................................................... 19
Load New Product .......................................................................................................... 20
Administrative Settings ................................................................................................... 22
To Change a Known User Name/Password .................................................................................. 22
To Reset a User Name/Password .................................................................................................. 22
System Setup .................................................................................................................. 23
Printer Setup .................................................................................................................................. 23
GAC® 2500
11001-1505B-201011
/ I
Advertisement
Table of Contents

Related Manuals for Dickey-John GAC 2500


Summary of Contents for Dickey-John GAC 2500
-
Page 1: Table Of Contents
OPERATOR’S MANUAL Safety Notices ..................... 1 Introduction ......................3 Accessories ........................3 Unit Overview ........................3 Features ..........................4 Specifications ........................4 Declaration of Conformity ....................4 External Communication Connections ................5 Printer ..........................6 Installation ......................7 Unit Positioning ......................... 7 Connecting AC Power ...................... - Page 2 OPERATOR’S MANUAL Setup continued ....................25 Printer/Scale Setup ......................25 Printer Setup ........................... 25 Language Settings .......................... 27 Locale Setting ..........................28 Time ..............................29 Result Settings ..........................30 Export Data Format ........................31 Units ............................... 32 Sample Setup ..........................33 Owner Data ............................
-
Page 3: Safety Notices
OPERATOR’S MANUAL SAFETY NOTICES Safety notices are one of the primary ways to call attention to potential hazards. An absence of specific alerts does not mean that there are no safety risks involved. This Safety Alert Symbol identifies important safety messages in this manual. - Page 4 OPERATOR’S MANUAL 2 / SAFETY NOTICES GAC® 2500 11001-1505B-201011...
-
Page 5: Introduction
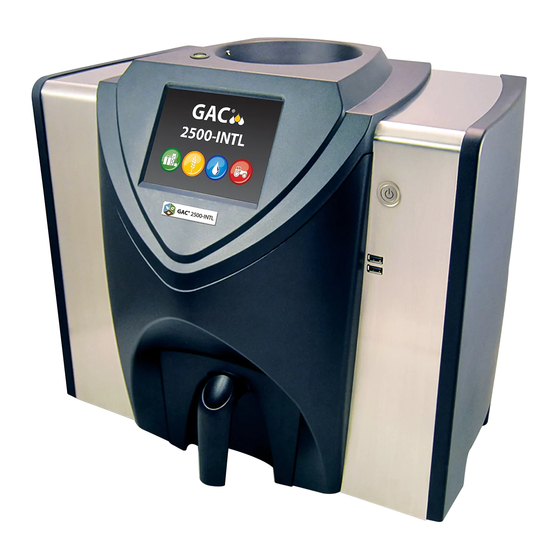
OPERATOR’S MANUAL INTRODUCTION ® The DICKEY-john Grain Analysis Computer GAC 2500 quickly tests grain and automatically calculates moisture content, temperature, and test weight (density) of the sample. The unit prompts for sample loading, tests the sample, and displays the results. -
Page 6: Features
OPERATOR’S MANUAL FEATURES • Color touch screen display guides users through testing and setup • Easy-to-use user interface • Fast, accurate grain analysis • One core calibration for all grains • Alpha/numeric sample identification with the ability to add an optional extended keyboard or bar code reader via USB •... -
Page 7: External Communication Connections
OPERATOR’S MANUAL EMC conformity to EN 61326-1:2006 (Electrical Equipment for Measurement, Control, and Laboratory use) as follows: Immunity • Radiated RF field EN 61000-4-3 (2002) • Conducted RF voltage EN 61000-4-6 (1996) + A1 (2001) • Fast transient/burst EN 61000-4-4 (2004) •... -
Page 8: Printer
OPERATOR’S MANUAL PRINTER An optional printer that is RS232 compatible or a USB printer that supports ® Printer Control Language (PCL) can connect to the GAC 2500 to print test data results to a ticket. The ticket can be setup to include the facility name and address, product, date and time, sample ID, customer ID, grain calibration date, percent moisture, grain temperature, test weight, and errors. -
Page 9: Installation
Unit Dimensions during transit. Save all packing TOP VIEW materials until inspection is 16.2” complete. If damage is found, file a claim with the carrier immediately and notify your DICKEY-john sales representative. 10.5” 18.6” 13.9” 16.9” SIDE VIEW 18.6” FRONT VIEW... -
Page 10: Grain Drawer
GRAIN DRAWER The unit is equipped with a standard grain drawer with handle. An optional bottomless grain drawer is available for purchase from DICKEY-john. OPTIONAL BOTTOMLESS GRAIN DRAWER Part Number: DRAWEROPGAC2500 A bottomless grain drawer is used with a flow-through work counter that allows the tested grain samples to fall through to a larger container below. -
Page 11: Navigation
OPERATOR’S MANUAL NAVIGATION ® The user interacts with the GAC 2500 via the LCD touch screen display. Screen interaction by finger touch or using a dull, pointed object, such as a stylus or pen is recommended. Refer to Maintenance section for cleaning display. Do not use any sharp objects on the display. -
Page 12: Touch Screen Button Functions
OPERATOR’S MANUAL TOUCH SCREEN BUTTON FUNCTIONS HOME Home button is available on most screens and, when pressed, returns to the Main Menu screen. POWER OFF Power Off button turns the system off from the touch screen display. The system must be turned on using the On/Off button located on the front panel but can be turned off from either the screen display or the On/Off button. -
Page 13: Instrument Information
OPERATOR’S MANUAL INSTRUMENT INFORMATION Instrument Information button appears on the Main Menu screen providing details regarding unit service date, serial number, and software version. Typically used for troubleshooting purposes. LCD DISPLAY TOUCH SCREEN CALIBRATION Display Touch Screen Calibration button re-calibrates the display when screen responsiveness does not occur effectively to a finger touch or stylus. - Page 14 OPERATOR’S MANUAL 12 / NAVIGATION GAC® 2500 11001-1505B-201011...
-
Page 15: Password Restrictions
OPERATOR’S MANUAL PASSWORD RESTRICTIONS Setting an Admin user name and password to restrict system settings to be controlled by an administrator are optional. The unit is shipped with an Admin user name and password setting of “GUEST”. Keeping the Admin user name and password as “GUEST” retains the unit in open access mode allowing any user to enter System Settings and modify unit settings. - Page 16 OPERATOR’S MANUAL Figure 8 Password Screen GAC2500 GAC2500 Enter Admin Username Enter Admin Username Please Log In GUEST Enter Admin Username Enter GUEST Password Setup Setup GAC2500 GAC2500 Product Admin Settings System Diagnostics GAC2500 GAC2500 Enter New Password Enter Admin Username Enter Admin FRED Username...
-
Page 17: Setup
OPERATOR’S MANUAL SETUP Setup establishes basic unit operating parameters and allows customization of the user interface by: • Editing an existing product and loading new products (Product button) • Setting administrative levels (Admin Settings button) • Setting system parameters for external devices, language/locale preferences, time/date, sample result output, unit measurement, sample/customer ID’s, and printing formats (System button) •... - Page 18 OPERATOR’S MANUAL To Edit an Existing Product: 1. At the Product Setup screen, press the Edit Existing Product button. 2. At the View Product Setup screen an alphabetical product list appears. Press the Up or Down button to display additional products. Figure 10 Edit Existing Product Screens Product Setup...
-
Page 19: Edit Product
OPERATOR’S MANUAL EDIT PRODUCT A product’s moisture bias, test weight bias, moisture slope, and test weight slope can be changed at this screen. All NTEP calibrations are locked and cannot be modified. A product’s calibrations should only be changed by an authorized user. -
Page 20: Create Product
OPERATOR’S MANUAL CREATE PRODUCT A new product can be created by copying a similar product’s parameters. Creating a new product name and Issue ID prevents an existing product’s parameters from being overwritten. To Create a Product: NOTE: An external keyboard, barcode scanner, or mouse can be used 1. -
Page 21: Delete Product
OPERATOR’S MANUAL DELETE PRODUCT A product and its calibrations can be deleted so that it does not appear on the active user screens. A product and its history is stored in the unit’s database and can still be viewed on the Audit Trail screen after it has been deleted. -
Page 22: Load New Product
4. If a product calibration already exists on the instrument, accept the new calibration by pressing the Replace button or the Skip button to revert to the existing product. Figure 14 NOTE: Contact DICKEY-john Technical Support at 1-800-637-3302 for Load New Product Screen assistance with obtaining... - Page 23 NOTE: Product calibrations are available for download at unit or connect cable to the unit’s USB (B) drive and to the PC. DICKEY-john’s website. 2. At the Product Setup screen, press the Load New Products button to www.dickey-john.com/products/ load all products from the selected directory of the memory device or...
-
Page 24: Administrative Settings
5. The Username and Password will default to GUEST when the Setup screens are accessed. Figure 16 Reset Username and Password GAC2500 GAC2500 DICKEY-john Corporation DICKEY-john Corporation Current User: GUEST Analyze Results Setup GAC2500 GAC2500... -
Page 25: System Setup
OPERATOR’S MANUAL SYSTEM SETUP System Setup allows customization of the unit’s functionality and print settings: • Printer/scale setup • Language selection • Locale selection • Time and date setup • Test result settings (automatic, manual return) • Printing setup (print ticket) •... - Page 26 OPERATOR’S MANUAL 9. Select the line termination style. – CR - Carriage return – CRLF - Carriage return, line feed – LF - Line feed – LFCR - Line feed, carriage return 10. Print CSV Serially Also--Enable this selection when test results are sent to both a printer and a computer.
-
Page 27: Setup Continued
PRINTER/SCALE SETUP PRINTER SETUP The GAC 2500 can be set to print test data results to a ticket via a printer as well as interface with a scale. To interface with a printer and scale certain parameters must be selected on the Printer Setup screen: 1. - Page 28 OPERATOR’S MANUAL 5. Select the output format for the printer. – PRN20 - Standard 20 column printer output – PRN21 - Special 20 column printer output – PRN80 - Standard 80 column printer output (80 characters per line) – PRN81 - Standard 80 column printer output (81 characters per line) –...
-
Page 29: Language Settings
OPERATOR’S MANUAL LANGUAGE SETTINGS The unit is equipped with a set of various languages that displays the user screens in the language selected. Language default is English (US). Available Languages: • English • Additional languages will be available on future releases. Contact Technical Support at 1-800-637-3302 for release dates and available languages. -
Page 30: Locale Setting
OPERATOR’S MANUAL LOCALE SETTING Locale allows selection of a specific region/area by language that will use the calibrations relevant for that region. The active locale setting appears in the header on the Product Selection screen when analyzing grain. Locale default is United States (US). Available Locales: •... -
Page 31: Time
OPERATOR’S MANUAL TIME 1. At the System Setup screen, press the Time button. NOTE: The date can be changed to US or UK format at the Units 2. To select a date, press the Date drop down arrow to display calendar. screen. -
Page 32: Result Settings
OPERATOR’S MANUAL RESULT SETTINGS After performing a grain analysis, the unit can be set to automatically advance back to the Sample ID screen from the Analysis Results screen or manually return to this screen with a button press. The unit default is set to manual return. -
Page 33: Export Data Format
OPERATOR’S MANUAL EXPORT DATA FORMAT Data can be saved for output to a computer in an Excel or CSV format. The unit default is CSV. 1. At the System Setup screen, press the the More button until the Export Format button appears. 2. -
Page 34: Units
OPERATOR’S MANUAL UNITS The Units screen allows selection of: • Date format (UK or Euro) • Temperature (degrees F or C) • Unit measurement for test weight (lb/bu or kg/hl) • Radix point (, or .) • Moisture, test weight, and temperature display resolution (tenths or hundredths) Test Weight defaults to display on the Analysis Results screen but can be removed by disabling at the Sample Setup screen. -
Page 35: Sample Setup
OPERATOR’S MANUAL SAMPLE SETUP A Sample ID, Customer ID, User Name (Login), Grain Temperature, and Test Weight can be enabled so that a grain sample is identified and saved with this information each time a test is performed. 1. At the System Setup screen, press the the More button until the Sample Setup button appears. -
Page 36: Owner Data
Owner Data Screen to enter data. GAC2500 GAC2500 System Setup System Setup Units Sample Setup Owner Data More GAC2500 GAC2500 Owner Data Owner Data DICKEY-john Corp. Name Auburn, IL 62615 Address Phone 217-438-3371 34 / SETUP GAC® 2500 11001-1505B-201011... -
Page 37: Service Data
OPERATOR’S MANUAL SERVICE DATA The Service Data screen provides text entry fields for technicians to enter comments regarding service performed on the unit and service date. – Resettable Counter resets the number of tests to 0. – Total Cycles indicates the number of tests performed over the life of the unit and is not resettable. -
Page 38: Lcd Display Touch Screen Calibration
OPERATOR’S MANUAL LCD DISPLAY TOUCH SCREEN CALIBRATION The LCD display touch screen may not respond as it should with a finger touch or stylus after a period of time or if subjected to extreme temperature changes. The display can be re-calibrated to improve responsiveness. 1. -
Page 39: Startup
OPERATOR’S MANUAL STARTUP ® The GAC 2500 is powered on by pressing the on/off switch located on the front panel (Figure 1). A series of Startup screens load after the system is turned on. A status bar will indicate self checks are occurring and upon completion, the Instrument Information screen is displayed for several seconds before the Main Menu screen displays. -
Page 40: Power Down
OPERATOR’S MANUAL POWER DOWN The unit can be powered down from any screen by pressing the on/off switch located on the front panel. Virtual Power Down A virtual Power Down button is also available on some top level screens and powers off the unit in the same manner as the on/off switch. A Power Down screen must be acknowledged before the unit will shut down. -
Page 41: Analyzing Grain
At the Main Menu screen, three functions are performed: 1. To analyze grain 2. To access test results 3. To setup/customize the unit Figure 32 Main Menu (Home) Screen GAC2500 GAC2500 DICKEY-john Corporation DICKEY-john Corporation Power Current User: UserName Instrument Information Analyze Results... -
Page 42: User Login
OPERATOR’S MANUAL USER LOGIN 1. At the Main Menu screen, press the User button. NOTE: Refer to the System Setup, Sample Setup section to enable 2. GUEST appears as the default User Name and must be replaced with user login. a different user name. - Page 43 OPERATOR’S MANUAL Figure 34 Select Product GAC2500 GAC2500 Select Product Select Product CORN SOYBEANS WHEAT WINTER WHEAT RED More GAC2500 GAC2500 Select Product Select Product Product 2-Row Barley 6-Row Barley Corn Corn-2100 Durum Wheat DOWN Initiate button 3. Press the Up and Down buttons to view grains. 4.
- Page 44 OPERATOR’S MANUAL Figure 35 Sample ID Screen GAC2500 GAC2500 Enter Sample ID Enter Sample ID Product: Corn Issue ID: 070109 Optional- Enable at Sample ID Sample Id: Sample Customer Id: Customer ID Setup Change Product View Last Result GAC2500 GAC2500 Attention Required Attention Required Please Fill Hopper...
- Page 45 OPERATOR’S MANUAL 11. Follow onscreen instructions. 12. Press the Initiate button (green) to begin test. Grain will dump into the measurement cell from the hopper. A test will only perform when the Initiate button is green. 13. The cell fills and the striker arm swings across the top of the test cell to wipe away excess grain.
- Page 46 OPERATOR’S MANUAL 44 / ANALYZING GRAIN GAC® 2500 11001-1505B-201011...
-
Page 47: Results
2. At the Results screen, press the View Results button. Figure 36 NOTE: A momentary pause may occur before test results appear on View Results screen. Do not press any buttons during this time. GAC2500 GAC2500 DICKEY-john Corporation DICKEY-john Corporation Current User: UserName Analyze Results Setup GAC2500 GAC2500 Results... -
Page 48: Refine Query Options
OPERATOR’S MANUAL REFINE QUERY OPTIONS Figure 37 Product Like Criteria Example GAC2500 GAC2500 Refine Query Refine Query Print only last Record All Products Product Like User Like Sample ID like Last GAC2500 GAC2500 View Results View Results Results of Wh Filter 1 of 3 Sample ID... -
Page 49: User Like
OPERATOR’S MANUAL USER LIKE NOTE: User Like and Sample ID Like filter function works the same Allows entry of part or all of the User name to perform a search for similar as the Product Like filter. Refer records within the User field. All records that fit the criteria entered in the (Figure User Like filter search will display. -
Page 50: Data Storage Capacity
OPERATOR’S MANUAL DATA STORAGE CAPACITY The unit is capable of storing 30,000 test results. When the unit has reached its limit of storing test results, a Delete Results screen appears and one of the following actions must be selected: • Delete oldest 100 records •... -
Page 51: Audit Trail
OPERATOR’S MANUAL AUDIT TRAIL Any changes that relate to system functionality and testing are recorded and stored. The Audit Trail provides a log of these changes. To View Audit Trail: 1. At the Results screen, press the Audit Trail button. 2. - Page 52 OPERATOR’S MANUAL Figure 39 Audit Trail GAC2500 GAC2500 Results Results View Results Audit Trail View Products GAC2500 GAC2500 Current Audit Trail Audit Trail Filter All Events Filter 1 of 38 Selected Event Type Descriptio ERROR LOGGED NO_COM PRODUCT DELETE Corn(Issu ERROR LOGGED NO_COM ERROR LOGGED...
-
Page 53: View Products
OPERATOR’S MANUAL VIEW PRODUCTS The Installed Products screen provides an alphabetical table of active products stored on the unit with respective Issue ID. Products can only be viewed and printed at this screen. 1. At the Results screen, press the View Products button. 2. - Page 54 OPERATOR’S MANUAL 52 / RESULTS GAC® 2500 11001-1505B-201011...
-
Page 55: Grain Calibrations
OPERATOR’S MANUAL GRAIN CALIBRATIONS Grain calibration files will be available for download at the DICKEY-john website ® (www.dickey-john.com) for transfer to the GAC 2500 via a USB memory device. These files are also available through DICKEY-john Technical Support Group at 1-800-637-3302. - Page 56 OPERATOR’S MANUAL 54 / GRAIN CALIBRATIONS GAC® 2500 11001-1505B-201011...
-
Page 57: Maintenance
OPERATOR’S MANUAL MAINTENANCE EXTERNAL CLEANING ® The GAC 2500 surface can be cleaned with any cleaner designed for plastic and stainless steel surfaces. INTERNAL CLEANING It is recommended that the internal hopper and testing cell be cleaned periodically. 1. Unplug power cord. 2. -
Page 58: Lcd Display
OPERATOR’S MANUAL Figure 43 Open Cell Unload Door and Clean Cell Unload Door Figure 44 Clean Cell 5. Return unit to its upright position. 6. Replace grain drawer. LCD DISPLAY The LCD display may require periodic cleaning. Use a commercial cleaner for glass lenses to remove dust. -
Page 59: Troubleshooting
OPERATOR’S MANUAL TROUBLESHOOTING If the system locks, press and hold the on/off button on the front of machine until system turns off or unplug instrument power. Wait a few seconds and then power on. ® The GAC 2500 contains a microprocessor to control grain sample measurements and self-checks that determine the integrity of the internal electronics. -
Page 60: Error Messages
OPERATOR’S MANUAL ERROR MESSAGES Error messages display when an abnormal event occurs. An error can be acknowledged by pressing the Initiate button. For any failure that persists, contact DICKEY-john Technical Support at 1-800-637-3302. 58 / TROUBLESHOOTING GAC® 2500 11001-1505B-201011... - Page 61 Internal Power Supply Out of Unit internal voltage is out of specification. Service is required. Contact DICKEY-john Tech Spec Support at 1-800-637-3302. Unable to Predict Moisture A corrupt instrument calibration file or other Dump sample and re-analyze.
- Page 62 OPERATOR’S MANUAL 60 / TROUBLESHOOTING GAC® 2500 11001-1505B-201011...
-
Page 63: Warranty
Europe: DICKEY-john Europe S.A.S, 165, boulevard de Valmy, 92706 – Colombes – France TEL: 33 (0) 1 41 19 21 80, FAX: 33 (0) 1 47 86 00 07 WEB: www.dickey-john.eu Copyright 2010 DICKEY-john Corporation Specifications subject to change without notice.
Need help?
Do you have a question about the GAC 2500 and is the answer not in the manual?
Questions and answers