
Related Manuals for Bticino MP6-Megabreak MP6SH


Summary of Contents for Bticino MP6-Megabreak MP6SH
- Page 1 MP6SH - MP6TH Protection unit MP6-Megabreak® Manuale installatore • Installation manual...
- Page 2 Protection unit MP6-Megabreak® ITALIANO ENGLISH...
-
Page 3: Table Of Contents
Unità di protezione MP6-Megabreak® Indice 1. Introduzione 1.1 Identificazione 1.2 Inserimento/sostituzione batterie 1.3 Attivazione 1.4 Navigazione 2. Segnalazioni luminose stato unità di protezione 3. Visualizzazione pagina iniziale 4. Tasto test 5. Menu principale 6. Menu protezioni 6.1 Conferma e memorizzazione delle regolazioni 7. -
Page 4: Introduzione
1. Introduzione Identificazione Blocco settaggi (piombabile) Tasto accensione (in alimentazione da batteria) -
Page 5: Inserimento/Sostituzione Batterie
Unità di protezione MP6-Megabreak® Inserimento/sostituzione batterie Rimuovere il coperchietto frontale dell’interruttore. Inserire le 4 batterie nella parte bassa dell’unità di protezione rispettando la polarità e la sequenza di montaggio indicate in figura. Il kit batterie viene fornito a corredo in un apposito sacchetto. A fine vita, smaltire / 2 0 / 1 0... -
Page 6: Attivazione
Attivazione Alla prima accensione l’unità di protezione si avvia segnalando il caricamento secondo questa sequenza: 1 led verde acceso 2 cursore lampeggiante in basso a destra 3 pagina di caricamento Dopo circa un minuto compare la pagina iniziale, dove è possibile navigare all’interno dell’unità... -
Page 7: Navigazione
Unità di protezione MP6-Megabreak® Navigazione Le unità di protezione MP6 sono dotate di un display tattile che permette di interagire con le icone visualizzate. a r g d i s / 2 0 / 2 0 / 1 0 / 1 0 . - Page 8 Di seguito vengono riportati i principali pulsanti di navigazione Pulsanti di selezione Pulsanti di navigazione nel menu: permettono di scorrere i menu verso il basso o verso l’alto nel caso in cui le voci presenti siano visualizzate su più schermate Pulsante di ritorno alla schermata precedente: permette di tornare alla schermata di livello superiore Pulsanti di scelta: permettono di confermare o annullare quanto...
-
Page 9: Segnalazioni Luminose Stato Unità Di Protezione
Unità di protezione MP6-Megabreak® 2. Segnalazioni luminose stato unità di protezione 07/10/2009 10.25 LED 1 LED 2 Lo stato dell’unità di protezione viene segnalato attraverso i LED 1 e 2 secondo le com- binazioni descritte in tabella. Protezione Led 1 Led 2 NON ATTIVA Spento... -
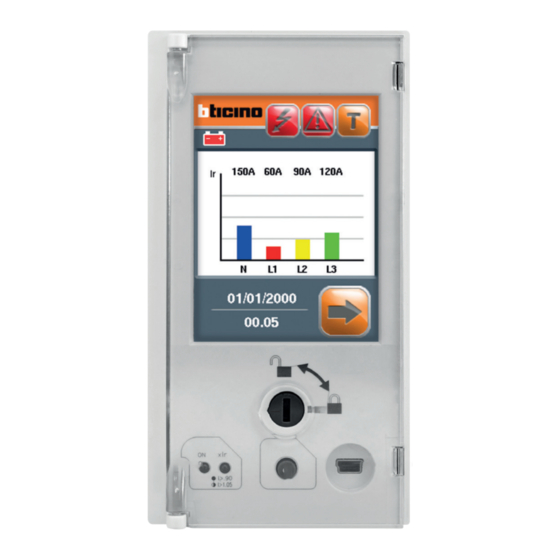
Page 10: Visualizzazione
3. Visualizzazione pagina iniziale Una volta accesa, l’unità di protezione mostra la segente pagina iniziale: “test” “batteria scarica” “allarmi” Corrente di riferimento “interventi” Istogramma delle letture di corrente Fasi “menu Data e ora principale” - la lettura delle correnti è rappresentata tramite istogrammi quotati in % rispetto alla corrente di intervento per sovraccarico e tramite i valori assoluti delle correnti di fase;... -
Page 11: Tasto Test
Unità di protezione MP6-Megabreak® 4. Tasto test Si raccomanda di eseguire la procedura diagnostica di test mediante il pulsante presente nella pagina iniziale al fine di verificare il corretto funzionamento dell’inter- ruttore e dell’unità di protezione. La procedura che porta allo sgancio dell’interruttore (partendo da dispositivo in posizione di chiuso e unità... -
Page 12: Menu Principale
5. Menu principale Tramite la pressione del pulsante di accesso posizionato in basso a destra della pagi- na iniziale, si accede al menu principale nel quale sono presenti 6 pulsanti per l’accesso ai vari sotto-menu ed una freccia che permette il ritorno alla pagina principale. La pressione dei singoli pulsanti permette l’accesso alle rispettive pagine. -
Page 13: Menu Protezioni
Unità di protezione MP6-Megabreak® 6. Menu protezioni Tramite la pressione del pulsante “protezioni” si accede alla schermata in cui è possibile effettuare le varie regolazioni. I pulsanti che permettono di accedere alle regolazioni sono presenti su più pagine, accessibili premendo le frecce di navigazione poste in basso. Parametri Possibili regolazioni... - Page 14 Una volta premuto uno dei pulsanti di regolazione si accede alla schermata di impo- stazione: regolazione regolazione precedente successiva “annulla” “conferma” A schermo è possibile effettuare le regolazioni premendo i pulsanti + e -. Automaticamente il valore impostato verrà mostrato in valore assoluto e porzione di valore nominale.
-
Page 15: Conferma E Memorizzazione Delle Regolazioni
Unità di protezione MP6-Megabreak® Conferma e memorizzazione delle regolazioni Una volta terminate le regolazioni, premendo il tasto si accede alla seguente schermata: “Conferma” “Annulla” Tramite questa schermata è possibile annullare quanto impostato durante tutta la sessione di modifica oppure confermare la memorizzazione delle regolazioni nella scheda di memoria del relè. -
Page 16: Menu Misure
7. Menu misure Tramite la pressione del pulsante “misure” nel menu principale è possibile accedere alla seguente schermata: “correnti” “tensioni” “energie” “potenze” “armoniche” “altre grandezze” Il pulsante “correnti” mostra le misure delle correnti per ogni fase e per neutro e guasto a terra (ove presenti). - Page 17 Unità di protezione MP6-Megabreak® Tramite la pressione dei pulsanti “correnti” , “potenze” , “tensioni” , “ener- gie” , “armoniche” e “altre grandezze” si accede alle rispettive pagine di visualizzazione delle misure. L’ esempio in figura mostra il caso delle misure di corrente: istantaneo medio minimo...
- Page 18 Di seguito il dettaglio delle misure visualizzate secondo la modalità illustrata a pag. 17: Correnti: : corrente sulla fase 1 : corrente sulla fase 2 : corrente sulla fase 3 se è presente il polo di Neutro : corrente sul neutro : corrente per il guasto a terra (solo se presente la relativa protezione) Potenze: * - P: potenza attiva trifase...
- Page 19 Unità di protezione MP6-Megabreak® Tramite la pressione del pulsante “energie” è possibile accedere alla pagina relativa alle misure delle energie: Pagina dell’energia totale (Econsumata - Egenerata) Le energie visualizzate sono: - E(MWh): Energia totale attiva (Mvarh): Energia totale reattiva induttiva (Mvarh): Energia totale reattiva capacitiva Pagina dell’energia consumata * Le energie visualizzate sono:...
- Page 20 Tramite la pressione del pulsante “armoniche” è possibile accedere alla seguente schermata: “armoniche “armoniche delle tensioni” delle correnti” I pulsanti “armoniche delle correnti” e “armoniche delle tensioni” permettono di selezionare nel dettaglio il tipo di armonica che si vuole visualizzare.
- Page 21 Unità di protezione MP6-Megabreak® La generica pagina di visualizzazione delle armoniche si presenta come segue: percentuale armonica selezionata (rispetto alla fondamentale) armonica non armonica selezionata selezionata armoniche armoniche successiva precedente “tasso di distorsione armonica“ La pressione di una delle armoniche permette di visualizzarne l’ampiezza. Tramite la pressione del tasto “THD”...
-
Page 22: Menu Di Configurazione
8. Menu di configurazione Tramite la pressione del pulsante “configurazione” nel menu principale è possibile accedere al seguente menu: “impostazione “impostazione di misura” allarmi” “impostazione “impostazione data e ora” display” “impostazione “impostazione contatti comunicazione” programmabili” Il pulsante “impostazione allarmi” permette di abilitare e regolare gli allarmi. Il pulsante “impostazione di misura”... - Page 23 Unità di protezione MP6-Megabreak® Tramite la pressione del pulsante “impostazione allarmi” è possibile accedere alla seguente schermata: allarme attivo allarme inattivo Qui sono visualizzati tutti gli allarmi impostabili nel dispositivo con i relativi parametri di regolazione (se presenti). In caso di allarme attivo l’icona sarà verde, altrimenti grigia.
- Page 24 Tramite la pressione dei singoli pulsanti, si accede alle varie schermate di impostazione, come ad esempio: disattivazione allarme attivazione allarme (rosso se disattivo) (verde se attivo) regolazione parametro regolazione ritardo “conferma” “annulla” A schermo è possibile effettuare le regolazioni del parametro selezionato e del ritardo associato premendo i pulsanti + e -.
- Page 25 Unità di protezione MP6-Megabreak® Di seguito il dettaglio degli allarmi impostabili: Squilibrio di corrente fra le fasi L1-L2-L3, Squilibrio rispetto al valore medio di corrente Range regolazione = ampiezza 5% - 100% In Ritardo: 1÷20s Squilibrio di tensione (tra le fasi e neutro, con neutro Squilibrio interno/esterno), rispetto al valore medio di tensione...
- Page 26 La pressione del pulsante “impostazione di misura” permette di accedere alla seguente schermata: “impostazione tempo di media” “impostazione verso della corrente” La pressione del pulsante “impostazione tempo di media” permette di accedere alla visualizzazione dell’intervallo di tempo selezionato per il campionamento del valore medio.
- Page 27 Unità di protezione MP6-Megabreak® La pressione del pulsante “impostazione verso della corrente” permette di modificare la convenzione del verso della corrente impostata in fabbrica, al fine di allinearsi alla reale condizione installativa del dispositivo. Corrente entrante dai Corrente entrante dai terminali superiori terminali inferiori e uscente da quelli...
- Page 28 La pressione del pulsante “impostazione display” fa accedere alla seguente pagina dove, tramite la pressione dei tasti di regolazione è possibile aumentare o diminuire la luminosità dello schermo, attivare o disattivare l’audio ed effettuare la calibrazione del touchscreen. audio luminosità calibrazione...
- Page 29 Unità di protezione MP6-Megabreak® La pressione del pulsante “impostazione data e ora” conduce alla seguente schermata. Premendo sui pulsanti “data” e “ora” è possibile modificare le impostazioni attraverso i tasti di regolazione “+” e “-”. data Si consiglia di impostare data/ora prima della messa in servizio per sfruttare al meglio le funzioni di cronologia di interventi e allarmi.
- Page 30 Tramite la pressione del pulsante “impostazione comunicazione” è possibile accedere alla eguente schermata: regolazione indirizzo regolazione velocità regolazione linguaggio regolazione formato Tramite la pressione dei pulsanti si accede alla schermata di regolazione delle impostazioni: - indirizzo #1..- velocità 9600-19200-38400bps - linguaggio - formato NONE-EVEN-ODD...
- Page 31 Unità di protezione MP6-Megabreak® Tramite la pressione del pulsante “regolazione contatti programmabili” è possibile accedere alla seguente schermata: Contatto locale Contatti del modulo esterno (da 1 a 6) Premendo i singoli pulsanti è possibile configurare, verificare e ripristinare i contatti programmabili: “configurazione contatto”...
- Page 32 Tramite la pressione del pulsante “configurazione contatto” si accede alla schermata in cui è possibile selezionare l’evento da associare al contatto. Gli eventi disponibili sono presenti su più pagine, accessibili premendo le frecce di navigazione poste in basso. eventi...
- Page 33 Unità di protezione MP6-Megabreak® In particolare gli eventi impostabili sono i seguenti: Contatto disattivato Intervento per cortocircuito (Isd) Intervento per cortocircuito Interruttore aperto istantaneo (Ii) Intervento per cortocircuito a Interruttore chiuso tempo istantaneo fisso (Icw) Intervento per guasto verso Preallarme sovraccarico 90%Ir terra (Ig) Intervento per sovratemperatura Allarme sovraccarico 105%Ir...
- Page 34 Confermando la regolazione tramite il pulsante “conferma” appare la seguente schermata: Normalmente chiuso Normalmente aperto Temporizzazioni In particolare, è possibile selezionare le seguenti temporizzazioni: - 0 (commutazione istantanea) - ∞ (commutazione mantenuta ininterrottamente) - 1-2-3-5-10-20-30s-1-2-5-10-20-30min (commutazione mantenuta per un ritardo definito) Premendo il pulsante “annulla”...
-
Page 35: Menu Archivi
Unità di protezione MP6-Megabreak® 9. Menu archivi Tramite la pressione del pulsante “archivi” nel menu principale è possibile acce- dere alla seguente schermata: “archivio interventi” “archivio allarmi” Tramite la pressione del pulsante “archivio interventi” si accede al seguente sottomenu: “ultimo “contatore intervento”... - Page 36 Tramite la pressione del pulsante “ultimo intervento” si accede alla schermata in cui vengono indicati gli ultimi interventi memorizzati dal relè. Ultimo intervento Storico interventi La pressione dei pulsanti dei singoli interventi apre la relativa finestra di dettaglio, dove vengono visualizzate tutte le informazioni legate all’ultimo intervento, in termini di tempo, tipo e causa.
- Page 37 Unità di protezione MP6-Megabreak® In particolare verrà visualizzato: I>Ir: in caso di intervento per sovraccarico I >Isd: in caso di intervento per corto circuito ritardabile I >Ii: in caso di intervento istantaneo regolabile I >Icw: in caso di intervento istantaneo fisso a soglia estesa (Isf) I >Ig: in caso di intervento per guasto a terra °C>T:...
- Page 38 Tramite la pressione del pulsante “contatori degli interventi” si accede alla seguente schermata: numero totale di interventi tipologia intervento Tale pagina presenta il totale degli interventi occorsi ed il loro numero suddiviso per tipologia*, dove: - I>Ir: numero di interventi per sovraccarico - I>Isd: numero di interventi per corto circuito - I>Ii:...
- Page 39 Unità di protezione MP6-Megabreak® Tramite la pressione del pulsante “archivio allarmi” si accede alla seguente scher- mata dove è possibile visualizzare la lista degli ultimi 20 allarmi occorsi: tipo di allarme data In particolare vengono elencati sia gli allarmi di sistema (protezione di sovraccarico, cortocircuito...) che gli allarmi evoluti (superamento limite di massima corrente, minima tensione...).
- Page 40 La pressione dei pulsanti dei singoli allarmi apre la relativa finestra di dettaglio dove vengono visualizzate tutte le informazioni legate all’allarme in termini di tempo, tipo e causa: data allarme tipo di allarme valore rilevato valore impostato...
-
Page 41: Menu Informazioni
Unità di protezione MP6-Megabreak® 10. Menu informazioni La pressione del pulsante “menu informazioni” permette di accedere ai dati di targa dell’interruttore e ai dati relativi a firmware e hardware dell’unità di protezione. 10.1 Informazioni interruttore Tramite la pressione del pulsante “i MEGA” verranno visualizzate tutte le informa- zioni relative all’interruttore. -
Page 42: Informazioni Unità Di Protezione
10.2 Informazioni unità di protezione Premendo invece il pulsante “i MP6” verranno visualizzate tutte le informazioni relative all’unità di protezione: Simbologia Versione Simboli Descrizione SW TouchScreen Versione firmware touch screen HW TouchScreen Versione hardware touch screen BL TouchScreen Bootloader touch screen SW Protection Versione firmware protezione HW Protection... -
Page 43: Menu Batteria
Unità di protezione MP6-Megabreak® 11. Menu batteria Premendo sul pulsante “batteria” si accede alla schermata in cui viene indicata la carica residua delle batterie interne all’unità di protezione: Livello batteria NOTA: il livello di carica viene mostrato al 100% quando la tensione delle batterie è maggiore o uguale al valore nominale (12V), mentre risulta completamente scarico (0%) per valori di tensione inferiori a 10.5V, in quanto il funzionamento dell’unità... -
Page 44: Accessori
12. Accessori M8TA - M8TA63 (accessoriamento in fabbrica) Trasformatore di corrente esterno per la protezione “guasto a terra” e del neutro (non sezionato). Si utilizza con gli interruttori tripolari e viene installato sul conduttore neutro, al fine di garantire le seguenti protezioni senza scollegarlo in caso di sgancio dell’interruttore: - protezione del neutro - protezione guasto a terra (con MP4 LSIg e MP6 LSIg). -
Page 45: Classi Di Precisione
Unità di protezione MP6-Megabreak® 13. Classi di precisione Caratteristiche del PMD Tipo de recurso Valore della Altre caratteristiche caratteristica complementari Funzione di valutazione della Qualita dell'Energia Classificazione del pmd Temperatura K 55 Umidità + Altitudine condizioni standard Classe di prestazione delle fun- zioni Energia e Potenza Attiva... - Page 46 Caratteristiche delle funzioni Simboli delle Intervallo di misura Classe di Altre caratteristiche funzioni prestazione complementari della funzione, secondo la norma IEC 61557-12 In DMX I max PDM Ib=In, Un=400V, fn=50Hz Ib=In, Un=400V, fn=50Hz 0…9999 GWh Ib=In, Un=400V, fn=50Hz 0…9999 Gvarh Ib=In, Un=400V, fn=50Hz 50…60 Hz Ib=In, Un=400V, fn=50Hz...
- Page 47 Unità di protezione MP6-Megabreak® Caratteristiche delle funzioni Simboli delle Intervallo di misura Classe di Altre caratteristiche funzioni prestazione complementari della funzione, secondo la norma IEC 61557-12 In DMX I max PDM 88…690V Ib=In, Un=400V, fn=50Hz 110…690V THD-R THD-R Si ricorda che l’unità di protezione non è certificata come strumento di misura e non richiede tarature periodiche.
-
Page 48: Power Control Station
14. Power Control Station Power Control Station è un applicativo software per personal computer dotati di sistema operativo Microsoft Windows® che permette di scambiare dati con l’unità di protezione dell’interruttore di potenza tramite l’apposita porta USB. 1800A 1200A 1500A 1500A 07/10/2009 10.25 Il software supporta il collegamento con l’interruttore di potenza allo scopo di:... - Page 49 Protection unit MP6-Megabreak® Contents 1. Introduction 1.1 Identification 1.2 Batteries and replacement 1.3 Start up 1.4 Browsing 2. Signalling of protection unit state 3. Home page 4. Test button 5. Main menu 6. Protection menu 6.1 Settings confirmation and saving 7.
-
Page 50: Introduction
1. Introduction Identification Settings lock (sealable) Start up button (with battery supply) -
Page 51: Batteries And Replacement
Protection unit MP6-Megabreak® Batteries and replacement Remove the breaker front cover. Insert 4 batteries in the lower part of the protection unit paying attention to positive and negative poles and assembly sequence. The batteries kit is provided in a proper bag. At the end of life cycle, / 2 0 / 1 0... -
Page 52: Start Up
Start up At the beginning the protection unit starts according to this loading sequence: 1. green led on 2. white cursor on bottom right 3. loading page After about one minute the home page appears; here it’s possible to browse in the protection unit. -
Page 53: Browsing
Protection unit MP6-Megabreak® Browsing MP6 protection units have a touch screen display that allows to work with the shown icons. a r g d i s / 2 0 / 2 0 / 1 0 / 1 0 . 2 5 . - Page 54 Find below the main browsing buttons. Selection buttons. Direction arrows: allow to scroll up or down in case the information are shown on different screens Back arrow: allows to go back to the upper level screen Choice buttons: allow to confirm or cancel what has been modified going back to the previous screen Adjust buttons: allow to increase or decrease the selected value...
-
Page 55: Signalling Of Protection Unit State
Protection unit MP6-Megabreak® 2. Signalling of protection unit state 07/10/2009 10.25 LED 1 LED 2 The state of the protection unit is notified through LED 1 and 2, according to the next table: Protection Led 1 note Led 2 note Inactive Switched off Switched off... -
Page 56: Home Page
3. Home page After switching the protection unit on, it shows the following screen: “test” “low battery” “alarm” Reference current “fault” Histogram of the currents Phases “main menu” Date et hour - Currents value: shown by bars in % of regulated current and by value of absolute phase currents;... -
Page 57: Test Button
Protection unit MP6-Megabreak® 4. Test button It is recommended to perform the diagnostic test using the button present on the home page, in order to check the correct behaviour of the breaker and the protection unit. The tripping sequence (starting from the device in “closed position” and protection unit powered up) is: 1. -
Page 58: Main Menu
5. Main menu By pushing the button on the home page bottom right, it’s possible to enter the main menu where there are 6 buttons for the sub menus and the back arrow to go back to the main menu. “Measures”... -
Page 59: Protection Menu
Protection unit MP6-Megabreak® 6. Protection menu By pressing “protection” button , it’s possible to enter in the adjustments page. The buttons that allow to get access the various settings are present on most pages, accessible by pressing the navigation arrows located at the bottom. Parameters Possible settings Parameters... - Page 60 After pushing the setting buttons it’s possible to enter the setting page: Previous Next setting setting “Cancel” “Confirm” It’s possible to adjust the settings by pushing the + or – buttons. Automatically the set value will be shown in absolute value and part of the rated value. “Cancel”: it’s possible to go back to the setting page deleting all the settings done.
-
Page 61: Settings Confirmation And Saving
Protection unit MP6-Megabreak® Settings confirmation and saving Once the settings are over, by pushing the button it’s possible to see this page: “Confirm” “Cancel” It’s possible to cancel or confirm to save the setting on the memory card. NB: to disable the saving of new settings rotate the “setting lock” device in locked position. -
Page 62: Measure Menu
7. Measure menu By pushing the “measure” button in the main menu it’s possible to enter the following page: “Current” “Voltage” “Energy” “Power” “Harmonics” “Other” “Current” button shows the measured currents for each phase, neutral and earth fault (if present). “Voltage”... - Page 63 Protection unit MP6-Megabreak® By pushing the “current” , “power” , “voltage” , “energy” , “har- monics” and “other” buttons, it’s possible to access the corresponding pages of measures. The example in the picture shows the current measures case: Instantaneous Average If the number of measures is more than 6, the rest will be displayed on the following pages.
- Page 64 Following the details of the measures displayed according to the procedure in page 63: Currents: : phase 1 current : phase 2 current : phase 3 current if Neutral is present : neutral current : earth fault current (if any) Powers: * - P: Three-phase active power - Q: Three-phase reactive power...
- Page 65 Protection unit MP6-Megabreak® By pushing the “energy” button it’s possible to enter the following pages: Total energy page (Econsumed - Egenerated) Energies on screen are: - E(MWh): Total active energy (Mvarh): Total reactive inductive energy (Mvarh): Total reactive capacitive energy Energy consumed page * Energies on screen are: - E(MWh):...
- Page 66 By touching the “harmonics” button it’s possible to access the following screen: “Voltage “Current harmonics” harmonics” “Voltage harmonics” and “Current harmonics” buttons allow to display the corresponding details. ...
- Page 67 Protection unit MP6-Megabreak® Following the generic harmonics page: Selected harmonic rate (compared to fundamental) Not selected Selected harmonic harmonic Next Previous harmonics harmonics “Total harmonic distortion” The touch of one of the harmonics allows to display the related amplitude. By touching the “THD” button it’s possible to access the screen of the harmonic distorsion rate.
-
Page 68: Configuration Menu
8. Configuration menu By pushing the “settings” button in the main menu it’s possible to enter the following menu: “Alarms “Measure setting” setting” “Display “Date and time setting” setting” “Communication “Programmable outputs setting” setting” “Alarms setting” button allows to enable and set the alarms. The “Measure setting”... - Page 69 Protection unit MP6-Megabreak® By touching “alarms setting” button it’s possible to access the following screen: active alarm inactive alarm In this screen all the device settable alarms are displayed with the corresponding adjustment parameteres (if any). In case of enabled alarm the icon will be green, otherwise it will be grey...
- Page 70 By pushing icon of each output, it’s possible to enter in its setting menu: disable button enable button (red if disabled) (green if enabled) parameter setting delay setting “confirm” “cancel” It’s possible to adjust the settings of the selected parameter and of the associated delay by pushing the + or –...
- Page 71 Protection unit MP6-Megabreak® Following the details of the adjustable alarms: Unbalanced of current on phases L1-L2-L3, Current in comparison to the average. unbalance Adjustment range = amplitude 5% - 100% In Delay: 1-20s Unbalance of voltage (between phases and neutral, with Volatage internal / external neutral), in comparison to the average unbalance...
- Page 72 By pushing the “Measure setting” button it’s possible to open the following screen: “Average time setting” “Direction current setting” By pushing the “Average time setting” button it’s possible to open the page of the selected time period for the sampling of the average value. It’s possible set and change the value to the screen using “+”...
- Page 73 Protection unit MP6-Megabreak® By pushing the “Direction current setting” button it’s possible to modify the convention of current directions set in factory, in order to match with the real installation conditions of the device: Incoming current from Incoming current from the bottom the upper terminals terminals and and outgoing from...
- Page 74 By pushing the “Display settings” button it’s possible to open the following page where, by pushing the setting buttons it’s possible to increase or decrease the display brightness, enable or disable sound and calibrate the touchscreen. sound brightness calibration...
- Page 75 Protection unit MP6-Megabreak® By pushing the “Date and hour setting” button it’s possible to reach the fol- lowing page. By pushing the “date” and “hour” buttons, is possible to set the values through the buttons “+” and “-“. Date Hour It is recommended to set date/time before put into service the unit of protection to take advantage of the history functions of trips and alarms.
- Page 76 By touching “communication settings” button it’s possible to access the following screen: address setting speed setting language setting format setting By touching the buttons it is possible to access the settings screen: - address #1..- speed 9600-19200-38400bps - language - format NONE-EVEN-ODD Communication option M8COM can be set only in factory.
- Page 77 Protection unit MP6-Megabreak® By pushing “Programmable outputs setting” button it’s possible to enter in the following screen: Local contact Contacts of external module (from 1 to 6) By pushing each buttons it’s possible to configure, check and restore the module program- mable contacts: “contact configuration”...
- Page 78 By pushing the “contact configuration” button , it’s possible to define and set the event associated with a contact. Available events are present on multiple pages, accessible by pressing the navigation arrows located at the bottom. events...
- Page 79 Protection unit MP6-Megabreak® In particular, the settable events, are the following: Short-circuit trip for short Disabled contact time protection (Isd) Short-circuit trip for Circuit breaker open instantaneous protection (Ii) Short-circuit trip for fixed Circuit breaker closed instantaneous protection (Icw) Overload pre-alarm 90% Ir Ground fault trip (Ig) Overtemperature trip Overload alarm 105% Ir...
- Page 80 Confirming settings by means of the button, the following screen appears: Normally closed Normally open Time delay In particular, it’s possible to select the following time delays: - 0 (instantaneous changeover) - ∞ (uninterrupted changeover) - 1-2-3-5-10-20-30s-1-2-5-10-20-30min (time delay changeover) Pushing cancel button all changes done about contact mode and delay won’t be saved.
-
Page 81: Archives Menu
Protection unit MP6-Megabreak® 9. Archives menu By pushing the "archives" button in the main menu, it’s possible to enter the following page: “Trips archive” “Alarms archive” By pushing the “trips archive” button it’s possible to enter the following sub menu: “Last trip”... - Page 82 By pushing the “last trip” button it’s possible to read the last trip stored by the protection unit. Last trip Historical trip Each trips buttons opens its detail window, where displays all the information related to the last trip, in terms of time, type and source:...
- Page 83 Protection unit MP6-Megabreak® The information shown can be: I>Ir: overload I >Isd: short time protection I >Ii: instantaneous I >Icw: fixed instantaneous override (Isf) I >Ig: ground fault °C>T: overtemperature Test: diagnostic trip test...
- Page 84 By pushing the “trips counter” it’s possible to enter the following page: Total number of trips Trip type This page will show the number of occurred trips and the number of trips classified by type*: - I>Ir: number of overload trips - I>Isd: number of short circuit trips - I>Ii:...
- Page 85 Protection unit MP6-Megabreak® By pushing the “alarms archive” button, it’s possible to read the list of last 20 occurred alarms: alarm type date The list includes both the system alarms (protection of overload, short circuit...) and advanced alarms (overcoming limit of overcurrent, undervoltage...).
- Page 86 By pushing the single alarm buttons it’s possible to open the alarm details window where all the information related to the alarm are displayed in terms of time, type, cause : date hour alarm alarm type detected value set value...
-
Page 87: Information Menu
Protection unit MP6-Megabreak® 10. Information menu By pushing the “information menu” button it’s possible to view the information about circuit breaker and firmware and hardware installed on the breaker. 10.1 Circuit breaker information By pushing the “i MEGA” button it’s possible to read all the information related to the circuit breaker customization. -
Page 88: Protection Unit Information
10.2 Protection unit information By pushing the “i MP6” button it’s possible to read all the information relating to the protection unit mounted: Symbology Version Symbol Description SW TouchScreen Touch screen firmware version HW TouchScreen Touch screen hardware version BL TouchScreen Touch screen bootloader SW Protection Protection firmware version... -
Page 89: Battery Menu
Protection unit MP6-Megabreak® 11. Battery menu By pushing the “battery” button it’s possible to access the page that shows the remaining battery inside the protection unit: Battery level NOTE: the charge indicator is full (100%) whenever the voltage of batteries is equal or higher than their rated voltage (12V), while it is totally emptly (0%) for batteries voltage below 10.5V, since the protection unit working by battery supply could be no longer assured. -
Page 90: Accessories
12. Accessories M8TA - M8TA63 (factory assembled) External current trasformer for earth fault and neutral protection (not discon- nected). It’s possible to use it with 3 poles breakers and is installed on the neutral, in order to guarantee the following protections without disconnecting it in case of breaker trip : - neutral protection - earth fault protection (only for version MP4 LSIg and MP6 LSIg) The device M8TA can works with nominal currents up to 4000A (is not available on... -
Page 91: Precision Classes
Protection unit MP6-Megabreak® 13. Precision classes PMD Characteristics Type of characteristic Specification values Other complemen- tary characteristics Power quality assessment function Classification of pmd Temperature K 55 Humidity + Altitude Standard conditions Active power or active energy function performance class... - Page 92 Characteristics of functions Function symbols Measurement range Function per- Other complementary formance class characteristics according to IEC 61557-12 In DMX I max PDM Ib=In, Un=400V, fn=50Hz Ib=In, Un=400V, fn=50Hz 0…9999 GWh Ib=In, Un=400V, fn=50Hz 0…9999 Gvarh Ib=In, Un=400V, fn=50Hz 50…60 Hz Ib=In, Un=400V, fn=50Hz Ib=In, Un=400V, fn=50Hz 88…690V...
- Page 93 Protection unit MP6-Megabreak® Characteristics of functions Function symbols Measurement range Function per- Other complementary formance class characteristics according to IEC 61557-12 In DMX I max PDM Ib=In, Un=400V, fn=50Hz 110…690V THD-R THD-R Remind the protection unit is not certified as a measuring instrument and it doesn’t require periodic calibrations.
-
Page 94: Power Control Station
14. Power Control Station Power Control Station is a software application for personal computers equipped with Microsoft Windows® operating system that allows to exchange data with the protection unit of the power breaker through the appropriate USB port. 1800A 1200A 1500A 1500A 07/10/2009 10.25... - Page 95 Do not open up, dismantle, alter or modify the device except where specifically required to do so by the instructions. All Bticino products must be opened and repaired exclusively by personnel trained and approved by Bticino. Any unauthorised opening or repair completely cancels all liabilities and the rights to replacement and guarantees.
- Page 96 BTicino SpA reserves at any time the right to modify the contents of this booklet and to comunicate in any form and modality, the charges brought to the same.
Need help?
Do you have a question about the MP6-Megabreak MP6SH and is the answer not in the manual?
Questions and answers