Table of Contents
Advertisement
Advertisement
Table of Contents

Related Manuals for Bticino Sfera 352500


Summary of Contents for Bticino Sfera 352500
- Page 1 Sfera Display Module 352500 User and installation manual www.bticino.com...
- Page 2 Sfera Display Module User and installation manual...
-
Page 3: Table Of Contents
Sfera Display Module User and installation manual Contents General information Warnings and recommendations Regulatory warnings Front view Back view Installation Mounting Disassembling Configuration using the keypad Access to the Settings menu Configuration Password Address Book format Language Multiple Call Tune setup Screen LCD Setup Brightness - Contrast... -
Page 4: General Information
User and installation manual General information The Sfera Display Module must be used only on BTicino 2 wires digital systems, paired with the audio or video speaker modules. Devices of the BTicino Sfera series require attractive/functional finishes; BTicino proposes the Sfera New line in 3 colours and the Robur anti-vandal line. -
Page 5: Warnings And Recommendations
Sfera Display Module User and installation manual Warnings and recommendations It is important to read this manual carefully before proceeding with the installation. The warranty becomes automatically void in case of negligence, improper use, tampering by unauthorised personnel. Regulatory warnings Read carefully before use and keep for future reference Touching the units with wet hands is forbidden Using liquid cleaners or aerosols is forbidden... -
Page 6: Front View
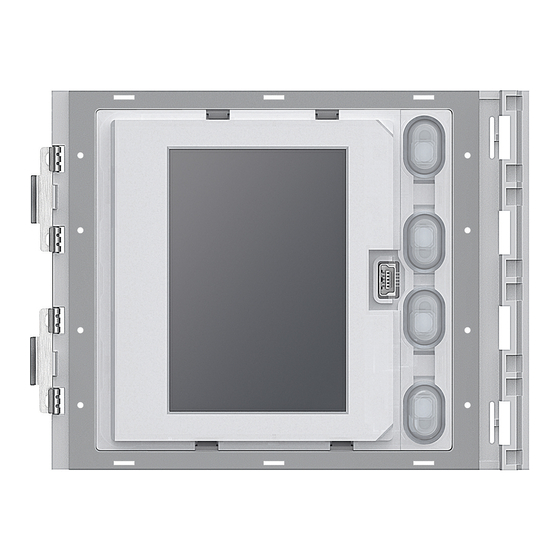
Sfera Display Module User and installation manual Front view 1. Graphic display 4. Residents names scroll pushbutton 2. Mini_USB connector for configuration using 5. Confirmation pushbutton the software (recommended), residents’ – call forwarding address book programming, and firmware 6. Quick scroll pushbutton update 3. -
Page 7: Back View
Sfera Display Module User and installation manual Back view 1. Connector for the connection to 2. Connector for the connection to previous subsequent modules modules... -
Page 8: Installation
Sfera Display Module User and installation manual Installation Mounting Caution: installation, configuration, starting-up and maintenance must be performed exclusively by qualified personnel. - Page 9 Sfera Display Module User and installation manual...
- Page 10 Sfera Display Module User and installation manual...
- Page 11 Sfera Display Module User and installation manual...
-
Page 12: Disassembling
Sfera Display Module User and installation manual Disassembling... - Page 13 Sfera Display Module User and installation manual...
-
Page 14: Configuration Using The Keypad
Sfera Display Module User and installation manual Configuration using the keypad Access to the Settings menu The password allows the installer to access the settings menu. The default password is 12345. We recommend that you change this password to one of your choice to prevent unwanted access. -
Page 15: Configuration
Sfera Display Module User and installation manual Configuration Password Settings Configuration Password Configuration Password LCD settings Add Book form Riser base addr. Language ***** Door codes Multiple call Address book Tune setup Service menu Screen Exit Exit Exit Press OK to access the Configuration menu. Press OK to modify the password. -
Page 16: Address Book Format
Sfera Display Module User and installation manual Address Book format The display module gives the possibility of creating the residents address book in two different formats, Alphanumeric (name, surname, etc.) or Numeric BFA (Block, Floor, Apartment). This setting will define the procedure for entering the corresponding details and the search procedure used by visitors. -
Page 17: Language
Sfera Display Module User and installation manual Language The Display Module is supplied set by default to Italian language. This menu allows to change the setting based on personal needs. Configuration Language Language Password English English Add Book form Français Français Language * Italiano... -
Page 18: Tune Setup
Sfera Display Module User and installation manual Tune setup This menu allows to enable/disable the sound when keys are pressed (the default setting is Tunes ON). Configuration Tune setup Tune setup Password * Tunes ON * Tunes ON Add Book Form Tunes OFF Tunes OFF Language... - Page 19 Sfera Display Module User and installation manual Call from address book - Sfera New finish Aaaa Aaaa Aaaa Bbbb Bbbb Bbbb Cccc Cccc Cccc Dddd Dddd Dddd Eeee Eeee Eeee Call from address book - Sfera Robur finish Aaaa Aaaa Aaaa Bbbb Bbbb...
- Page 20 Sfera Display Module User and installation manual Numeric call - Sfera Robur finish Call using an alphanumerical code - Sfera New finish...
-
Page 21: Lcd Setup
Sfera Display Module User and installation manual LCD Setup Brightness - Contrast LCD settings Brightness Brightness Brightness Contrast ECO Mode Exit Confirm Confirm Exit Exit Use the keys to select the Brightness and/or Contrast function. Press to confirm. Make the adjustment using the keys Press to confirm and return to the previous menu. -
Page 22: Riser Base Address
Sfera Display Module User and installation manual Riser base address Settings Riser base addr. Riser base addr. Configuration No riser LCD settings Riser base addr. Door codes Address book Service menu Exit Enter Enter Use the keys to select the function. Press to confirm. -
Page 23: Set
Sfera Display Module User and installation manual Door codes Door codes Door codes Code 1 Code 3 Code 3 [––] [––] [12345] set code set code Select Select Select Use the keys to select the code to be entered or modified (from 1 to 20). Press to confirm. -
Page 24: Address Book - Alphanumeric Mode
Sfera Display Module User and installation manual Residents can be entered in two ways. The procedure depends on the previous setup (see the Address book Format section); the following paragraphs describe both procedures. Address book – Alphanumeric mode Address book Modify Enter Delete contact... -
Page 25: Enter
Sfera Display Module User and installation manual Enter Enter Enter Enter Name Surname logic code 1234 Use the keys to select the first letter of the name. Touch to confirm Continue until the whole name has been entered. Use the key to correct any errors. -
Page 26: Modify
Sfera Display Module User and installation manual Modify Address book Modify Modify Modify Aaaa Name Enter Delete contact Bcde Delete all Bbbb Exit Cccc Press to access the menu. Use the keys to select the contact to be modified. Touch to confirm Continue to the modification using the keys... -
Page 27: Delete All
Sfera Display Module User and installation manual Delete all Address book Delete Delete address book address book Modify Enter Delete contact Confirm Confirm Delete all Exit Exit Exit ******** Press to access the function. If you want to delete all the contacts in the address book, select “Confirm” using thei keys Press to delete the entire address book. -
Page 28: Address Book - Numeric Bfa Mode
Sfera Display Module User and installation manual Address book – Numeric BFA mode Address book Modify Enter Delete contact In the address book menu, it is possible to enter new contacts Delete all or modify / delete the existing contacts. Exit In Numeric BFA mode, for each resident the following details can be entered: Address Book... -
Page 29: Modify
Sfera Display Module User and installation manual Modify Address book Modify Modify Modify Block Floor Apart. door lock code 0 1 1 1 0 . 0 1 1 1 0 . 1234 Apartment After selecting the Block, Floor and Apartment of the contact to modify. Press to access the menu. -
Page 30: Enter
Sfera Display Module User and installation manual Enter Enter Enter Enter Block Floor Apart. door lock code address 1234 0001 0 1 1 1 0 . Use the keys or the keypad module (if part of the internal unit) to enter the first Block digit. -
Page 31: Delete Contact
Sfera Display Module User and installation manual Delete contact Delete contact Delete contact Address book Delete . . . 1 1 2 1 . . Block Block Confirm Exit Use the keys to select the Block for the contact to be deleted Press to confirm and move to the entering of the Floor. -
Page 32: Configuration Using The Software
Sfera Display Module User and installation manual Configuration using the software The TiSferaDesign software All the configurations can be completed using the TiSferaDesign, available for download at www.homesystems-legrandgroup.com Software configuration is highly recommended as it simplifies and speeds up the whole procedure. -
Page 33: Using The Display Module
Sfera Display Module User and installation manual Using the display module Alphanumeric mode call Aaaa Cccc Cccc Bbbb Cccc Dddd Use the keys to select the name of the resident that you wish to call. key allows quick scrolling of the address book. Every time the key is pressed the cursor moves to the next letter of the address book. -
Page 34: Numeric Bfa Mode Call
Sfera Display Module User and installation manual Numeric BFA mode call Call code 1 1 0 1 . . 1 1 0 1 . . Block Use the keys to select the Block Touch to confirm Repeat for the Floor and the Apartment. After confirming the apartment, the call is forwarded. -
Page 35: Keypad Module Call
Sfera Display Module User and installation manual Keypad module call With units with keypad module, it is possible to use the logic code of the resident or the BFA code to make the call, by entering the code on the keypad. not present Call Enter the code on the keypad... - Page 36 BTicino SpA Viale Borri, 231 21100 Varese www.bticino.com BTicino SpA reserves at any time the right to modify the contents of this booklet and to communicate, in any form and modality, the changes brought to the same.
Need help?
Do you have a question about the Sfera 352500 and is the answer not in the manual?
Questions and answers