Advertisement
Quick Links
USE AND CARE GUIDE
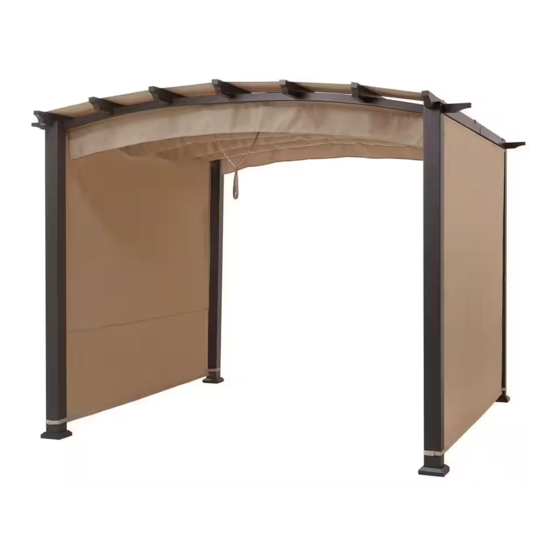
MILLBAY PERGOLA
1-855-HD-HAMPTON
HAMPTONBAY.COM
THANK YOU
We appreciate the trust and conidence you have placed in Hampton Bay through the purchase of this pergola. We strive to continually create quality
products designed to enhance your home. Visit us online to see our full line of products available for your home improvement needs.
Thank you for choosing Hampton Bay!
Advertisement

Related Manuals for HAMPTON BAY MILLBAY GFS60005C


Summary of Contents for HAMPTON BAY MILLBAY GFS60005C
- Page 1 THANK YOU We appreciate the trust and conidence you have placed in Hampton Bay through the purchase of this pergola. We strive to continually create quality products designed to enhance your home. Visit us online to see our full line of products available for your home improvement needs.
-
Page 2: Table Of Contents
Table of Contents Table of Contents Pre-assembly Safety Information Warranty Assembly ....Care and Cleaning Safety Information WARNING: CAUTION CAUTION: WARNING: WARNING: pergola fabric. WARNING: pergola fabric may render the ame resistant properties WARNING: This pergola is made with fabric that meets Warranty... -
Page 3: Pre-Assembly
Pre-Assembly NOTE: NOTE Quantity Part Description 48+1... - Page 4 Pre-Assembly (continued) Quantity Quantity Part Description Part Description...
-
Page 5: Assembly
Assembly ATTACHING THE POST BASE COVERS AND THE POST BASES TO THE POSTS... - Page 6 Assembly (continued) ATTACHING THE HOOKS TO THE POSTS AND SCREWING THE KNOBS TO THE HOOKS Screw the knobs (GG) to the hooks 1 (M1) and the hooks 2 (M2).
- Page 7 Assembly (continued) ATTACHING THE RIGHT CONNECTOR BAR TO THE LEFT CONNECTOR BAR WITH THE MAGNET IRON PLATE...
- Page 8 Assembly (continued) ATTACHING THE RIGHT CONNECTOR BAR TO THE LEFT CONNECTOR BAR...
- Page 9 Assembly (continued) ATTACHING THE RIGHT CONNECTOR BARS AND THE LEFT CONNECTOR BARS TO THE POSTS NOTE bar (B1) and left connector bar (B2) must face the inside of the posts.
- Page 10 Assembly (continued) ATTACHING THE STRAIGHT CONNECTOR BARS Insert the straight connector bar 1 (C1) into the straight connector bar 2 (C2), align the hole and secure with an M6x15 combination bolt (AA), as shown below.
- Page 11 Assembly (continued) ATTACHING THE STRAIGHT CONNECTOR BARS TO THE POSTS NOTE...
- Page 12 Assembly (continued) PLACING THE PLASTIC WHEELS 2 TO THE MIDDLE TOP BAR 1 AND ATTACHING THE MIDDLE TOP BAR 1 TO THE MIDDLE TOP BAR 2 Place four plastic wheels 2 (N2) to the middle top bar 1 (E1).
- Page 13 Assembly (continued) ATTACHING THE MIDDLE TOP BARS TO THE CONNECTOR BARS NOTE...
- Page 14 Assembly (continued) ATTACHING THE SIDE TOP BARS 1 TO THE SIDE TOP BARS 2 Attach the side top bar 1 (D1) to the side top bar 2 (D2) using M6x15 combination bolts (AA), as shown below.
- Page 15 Assembly (continued) PLACING THE PLASTIC WHEELS 1 AND ATTACHING THE SIDE TOP BARS TO THE CONNECTOR BARS Place four plastic wheels 1 (N1) each into the side top bar 1 (D1) and the side top bar 2 (D2). NOTE B2&B1...
- Page 16 Assembly (continued) INSERTING THE SIDE TOP BARS...
- Page 17 Assembly (continued) ATTACHING THE SIDE TOP BARS TO THE CONNECTOR BARS NOTE...
- Page 18 Assembly (continued) INSERTING THE FIXED SHADE RODS INTO THE FABRIC SHADE Unfold the fabric shade (J1), and insert the xed shade rods 1 (G1) into the top slots of the fabric shade (J1), as shown below. NOTE...
- Page 19 Assembly (continued) ATTACHING THE FIXED SHADE RODS TO THE CONNECTOR BARS Attach the xed shade rods 1 (G1) to the right connector bar (B1) and the left connector bar (B2), align the hole and secure with M6x35 combination bolts (CC). NOTE...
- Page 20 Assembly (continued) ATTACHING THE ACTIVITY SHADE RODS with M6x18 countersunk bolts (BB). NOTE...
- Page 21 Assembly (continued) ATTACHING THE PROTECTIVE COVER TO THE SIDE TOP BARS NOTE...
- Page 22 Assembly (continued) ATTACHING THE UPPER SHADE RODS AND THE LOWER SHADE RODS...
- Page 23 Assembly (continued) ATTACHING THE CURTAINS TO THE LOWER SHADE RODS AND THE UPPER SHADE RODS...
- Page 24 Assembly (continued) ATTACHING THE ASSEMBLED THE UPPER SHADE RODS TO THE STRAIGHT CONNECTOR BARS connector bars 2 (C2), align the hole and secure with M6x35 combination bolts (CC). NOTE...
- Page 25 Assembly (continued) TIGHTENING THE KNOBS Roll up the curtain (J3) to the middle of the post 1 (A1) and the post 2 (A2), and place the curtain (J3) on the hook 1 (M1) and the hook 2 (M2). Tighten the knobs (GG) clockwise and place the lower shade rod 1 (H3) and the lower shade rod 2 (H4) on the hook 1 (M1) and the hook 2 (M2) to prevent the curtain (J3) from being blown by the wind.
- Page 26 Assembly (continued) INSERTING THE STAKES Insert the stakes (II) through the post bases (L2) into the ground.
-
Page 27: Care And Cleaning
Care and Cleaning Do not clean with abrasive materials, bleach, or solvents. Store the pergola in a sheltered place when not in use. - Page 28 1-855-HD-HAMPTON HAMPTONBAY.COM...
Need help?
Do you have a question about the MILLBAY GFS60005C and is the answer not in the manual?
Questions and answers