Table of Contents
Advertisement
Advertisement
Table of Contents

Related Manuals for Distech Controls Allure UNITOUCH


Summary of Contents for Distech Controls Allure UNITOUCH
- Page 1 Allure UNITOUCH™ User Guide...
- Page 2 ©, Distech Controls Inc., 2018 - 2020. All rights reserved. While all efforts have been made to verify the accuracy of information in this manual, Distech Controls is not responsible for damages or claims arising from the use of this manual. Persons using this man-...
-
Page 3: Table Of Contents
PERSONIFY App.......................... 8 Settings.............................. 9 Technician Mode ............................ 10 About .............................. 11 CHAPTER 4 Lighting Control .............................. 12 Lighting Groups ............................ 13 CHAPTER 5 Temperature Control ............................ 14 CHAPTER 6 Fan Control.............................. 15 CHAPTER 7 Sunblind Control ............................. 16 Sunblind Groups ............................. 17 CHAPTER 8 Custom Actions .............................. 18 Allure UNITOUCH™... -
Page 4: Introduction
Room Control solution. About This User Guide This user guide shows you how to setup and operate the Allure UNITOUCH (hereon in referred to as UNITOUCH) communicating sensor. This user guide does not provide and does not intend to provide instructions for safe wiring practices. -
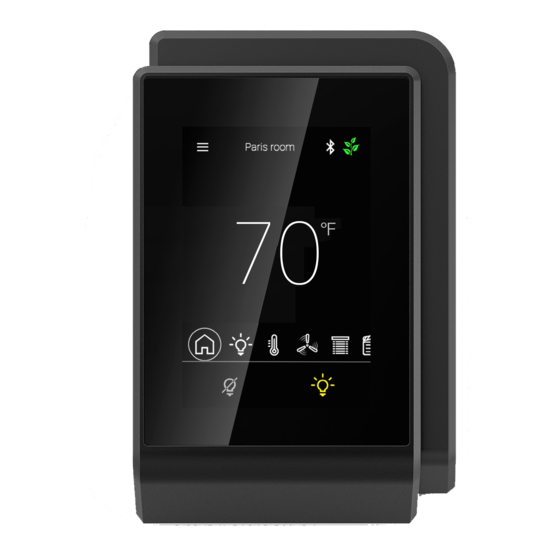
Page 5: Home Screen
The home screen provides a rolling screen of all the information currently set up in the UNITOUCH. Simply tap the icons to access their controls. The Distech Controls logo on the rolling home screen is customizable and can be changed using EC- gfx Program. - Page 6 Tap the custom actions icon to access any configured custom actions. MIN / MAX Tap the light bulb icons to instantly jump to the minimum or maximum intensities that are currently configured. Unoccupied/Occupied Tap the occupancy icon to manually toggle between unoccupied or occupied mode. Allure UNITOUCH™...
-
Page 7: Main Menu
Main Menu CHAPTER 3 Main Menu Tap the menu icon in the top left corner to access the main menu. The Distech Controls logo in the main menu screen is customizable and can be changed using EC- gfx Program. Allure UNITOUCH™... -
Page 8: My Personify App
The QR code is a shortcut download link for the UNITOUCH companion mobile application, my PER- SONIFY. Tap the Show Pin code button to reveal the pin code required to connect the my PERSONIFY app with that specific UNITOUCH. Allure UNITOUCH™... -
Page 9: Settings
Toggle between black or white color themes. Toggles the proximity wake up sensor. The UNITOUCH has a proximity sensor of about 10 cm (4”) to Wake-up sensor detect hand movement which will activate the screen. Advanced settings Advanced settings are not currently used. Allure UNITOUCH™... -
Page 10: Technician Mode
If there are two conflicting devices on the same subnet, or if the UNITOUCH subnet does not match the assigned subnet in EC- gfx Program, you will be presented with a communication error screen. If this is the case, please consult the UNITOUCH Installation Guide for more information. Allure UNITOUCH™... -
Page 11: About
Main Menu About The About screen displays the current device firmware, bootloader, and master version numbers. The master version number is the firmware version of the controller on which the UNITOUCH is connected. Allure UNITOUCH™... -
Page 12: Lighting Control
The Auto icon toggles automatic mode ON. To turn Auto mode OFF, adjust the light intensity slider, or the light bulb MIN / MAX icons. The auto function parameters are configured using EC- gfx Program. See the EC- gfx Program User Guide for more information. Tap the lighting groups icon to access the lighting group controls. Allure UNITOUCH™... -
Page 13: Lighting Groups
Tap the light bulb icons to instantly jump to the minimum or maximum intensities that are configured for that group. Tap the toggle switch to toggle the lights on or off for that group. Using this will override Auto mode. Allure UNITOUCH™... -
Page 14: Temperature Control
The measured carbon dioxide level (in ppm) is indicated here (only available on models equipped with a sensor). The temperature setpoint and heating/cooling mode is displayed here. Depending on the chosen programming, the setpoint offset may be displayed instead. Allure UNITOUCH™... -
Page 15: Fan Control
Auto OFF / ON The Auto icon toggles automatic mode ON. To turn Auto mode OFF, adjust the fan speed slider. The auto function parameters are configured using EC- gfx Program. See the EC- gfx Program User Guide for more information. Allure UNITOUCH™... -
Page 16: Sunblind Control
The Auto icon toggles automatic mode ON. To turn Auto mode OFF, adjust the sunblind slider or the rotational angle. The auto function parameters are configured using EC- gfx Program. See the EC- gfx Program User Guide for more information. Tap the sunblind groups icon to access the sunblind group controls. Allure UNITOUCH™... -
Page 17: Sunblind Groups
Tap and hold the slider icon to adjust the position of the sunblinds. Alternatively, you can tap a position on the slider to jump to that position. Tap to select the desired sunblind rotational angle between 0 and 180 degrees. Allure UNITOUCH™... -
Page 18: Custom Actions
To enable a custom action, simply tap the desired action. Depending on the type of custom action and its configuration in EC- gfx Program, a green checkmark may appear and indi- cate whether a custom action is currently enabled or not. Allure UNITOUCH™... - Page 19 UNITOUCH_UG_13_EN...
Need help?
Do you have a question about the Allure UNITOUCH and is the answer not in the manual?
Questions and answers