Table of Contents
Advertisement
Advertisement
Table of Contents

Related Manuals for Instant Pot Pro 60


Summary of Contents for Instant Pot Pro 60
- Page 1 ® INSTANT POT MULTI-COOKER...
-
Page 2: Table Of Contents
TABLE OF CONTENTS IMPORTANT SAFEGUARDS Special cord set instructions Product specifi cations Product, parts and accessories Get started Initial set up Initial test run (water test) Pressure Cooking 101 Control panel Status messages Settings Pressure control features Cooking Smart Programme overview Pressure Cook and Rice Steam Sauté... -
Page 3: Important Safeguards
FAILURE TO FOLLOW THESE SAFEGUARDS AND INSTRUCTIONS MAY RESULT IN INJURY AND/OR PROPERTY DAMAGE. Use only the Instant Pot Pro lid with the Instant Pot Pro multicooker base. Using any other multicooker lids may cause injury and/or damage. For household use only. Not for commercial use. Do not use the appliance for anything other than its intended use. - Page 4 IMPORTANT SAFEGUARDS The removable inner pot can be extremely heavy when full of ingredients. Care should be taken when lifting the inner pot from the multicooker base to avoid burn injury. • Extreme caution must be used when the inner pot contains hot food, hot oil or other hot liquids.
- Page 5 Refer to Pressure control features: sealing ring. • DO NOT attempt to force the lid off the Instant Pot multicooker base. Refer to Releasing pressure. When cooking meat with skin (e.g. sausage with casing), the skin can swell when heated.
- Page 6 fi re or electric shock. • To reduce the risk of pressure leakage, cook only in an authorised stainless steel Instant Pot inner pot made for this model. • DO NOT use the appliance without the removable inner pot installed.
- Page 7 IMPORTANT SAFEGUARDS Do not store any materials in the multicooker base or inner pot when not in use. Do not place any combustible materials in the multicooker base or inner pot, such as paper, cardboard, plastic, Styrofoam or wood. Do not use the included accessories in a microwave, toaster oven, or outdoor grill.
-
Page 8: Special Cord Set Instructions
This appliance has a 3-prong grounding plug. To reduce the risk of electric shock, plug the power cord into a grounded electrical outlet that is easily accessible. PRODUCT SPECIFICATIONS Model: Pro 60 1000-1200W 220-240V~ 50-60Hz 5.7 Litres 5.9 kg... -
Page 9: Product, Parts And Accessories
PRODUCT, PARTS AND ACCESSORIES Before using your new Instant Pot Pro, make sure everything is accounted for, then see Care, cleaning and storage: Removing and installing parts to fi nd out how everything fi ts together. Top of multicooker lid... - Page 10 PRODUCT, PARTS AND ACCESSORIES Inner pot Easy Grip silicone handles Instant Tip: Stove top and oven-friendly up to 232°C! The inner pot features a cookware-grade Fill line indicators impact bonded tri-ply bottom, which sounds complicated, but really just means you can use it just about anywhere —...
-
Page 11: Get Started
GET STARTED INITIAL SET UP 01 Pull that Instant Pot Pro out of the box! 02 Remove the packaging material and accessories from in and around the multicooker and make sure all the parts are accounted for. See Product, parts and accessories for a full parts breakdown. -
Page 12: Initial Test Run (Water Test)
GET STARTED INITIAL TEST RUN (WATER TEST) Do you have to do the water test? No — but getting to know the ins and outs of your new Pro prepares you for success in the kitchen! Take a few minutes to get to know how this tireless kitchen hero works. - Page 13 DANGER DO NOT attempt to remove the lid while the fl oat valve is up and NEVER attempt to force the lid open. Contents are under extreme pressure. Float valve must be down before attempting to remove the lid. Failure to follow these instructions may result in serious personal injury and/or property damage.
-
Page 14: Pressure Cooking 101
Pressure cooking uses steam to raise the boiling point of water above 100ºC. These high temperatures allow you to cook some foods way faster than normal. Behind the magic curtain When pressure cooking, the Instant Pot goes through 3 stages. Pre-heating What you see What you don’t see... - Page 15 RELEASING PRESSURE You must release pressure after pressure cooking before attempting to open the lid. Follow your recipe’s instructions to choose a venting method, and always wait until the fl oat valve drops into the lid before opening. Pressurised Depressurised WARNING Steam ejected from the steam release Do not cover or obstruct the steam release...
- Page 16 RELEASING PRESSURE Natural release (NR or NPR) Cooking stops gradually. As the temperature within the multicooker drops, the Instant Pot Pro depressurises naturally over time. What to do What to expect Your meal continues to cook even after the Smart After cooking fi...
- Page 17 RELEASING PRESSURE NOTICE Do not use QR when cooking fatty, oily, thick or high-starch foods (e.g., stews, chilis, pasta and congee) or when cooking foods that expand when cooked (e.g., beans and grains). Timed Natural Release The carryover cooking continues for a specifi c amount of time, then stops quickly when you release the remaining pressure.
-
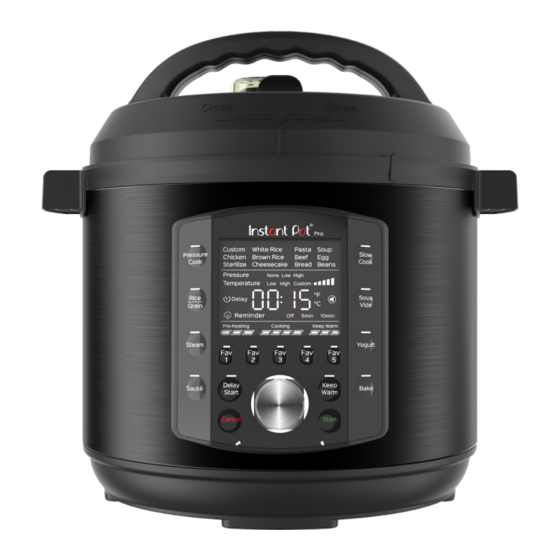
Page 18: Control Panel
CONTROL PANEL • Pressure Cook • Slow Cook • Rice/Grain • Sous Vide • Steam • Yogurt Smart Programmes • Sauté • Bake See Cooking for details. After selecting a Smart Programme, choose from a variety of popular presets. Preset cooking options All preset cooking options are customisable. - Page 19 CONTROL PANEL Shows when the multicooker is in Pre-heating, Cooking and Keep Warm. Cooking progress bar See Control panel: Cooking progress bar for more information. One-touch access to 5 of your favourite recipes. Fav 1 to 5 See Cooking: Fav 5 for more information. Turn the dial to scroll through Smart Programmes, modify status icons, and adjust the time, temperature, and pressure levels.
-
Page 20: Status Messages
STATUS MESSAGES The Pro is in standby mode, ready to make your next favourite meal. The multicooker is Pre-heating. The inner pot has reached the perfect cooking temperature and food can be added. Only applies to Sauté and Sous Vide. The display shows one of the following: •... -
Page 21: Settings
SETTINGS Setting Description In standby, press and hold the dial for 5 seconds. Change displayed When the temperature unit fl ashes, turn the dial to toggle temperature (°C and °F). between °C and °F, then press Start to save the change. In standby, press and hold the dial for 5 seconds. - Page 22 SETTINGS Setting Description When in standby, touch and hold the Smart Programme button you want to reset for 5 seconds. Reset an individual The Smart Programme’s cooking time, pressure level and/ Smart Programme. or temperature are restored to the factory default setting. The Fav 5 programme's cannot be reset individually.
-
Page 23: Pressure Control Features
PRESSURE CONTROL FEATURES See Care, cleaning and storage for installation and removal of parts. MULTICOOKER LID What we love about it What you should know about it When you close the lid (over the handles on the new inner pot!), it automatically The lid is removable during non-pressure sets to Seal for seriously easy pressure cooking so you can taste-test as you go. - Page 24 PRESSURE CONTROL FEATURES QUICKCOOL™ For the fastest Natural Release after pressure cooking, use the QuickCool tray*. What we love about it What you should know about it The metal portion of the lid gets It’s a huge timer saver — you can release extremely hot, so don’t remove the pressure naturally up to 50% faster! protective cover unless you’re using...
- Page 25 PRESSURE CONTROL FEATURES Seal Seal Vent Vent Seal Position Vent Position See Releasing pressure: Venting methods for safe depressurisation techniques. STEAM RELEASE ASSEMBLY The steam release assembly must be fully installed before use. Steam release cover Steam release valve Steam release pipe What we love about it What you should know about it When releasing pressure, steam travels up from the...
- Page 26 DO NOT use it. Replace the sealing ring every 12 to 18 months or sooner, and only use authorised Instant Pot sealing rings. Failure to follow these instructions may cause food to discharge, which may lead to personal injury or property damage.
- Page 27 The fl oat valve and silicone cap work together to seal in pressurised steam. These parts must be installed before use. Do not attempt to operate the Instant Pot without the fl oat valve properly installed. Do not touch the fl oat valve during use.
-
Page 28: Cooking
COOKING The Instant Pot Pro is amazingly versatile in the kitchen. No matter what kind of cooking you want to do, the Pro has you covered. CAUTION Always inspect the lid and inner pot carefully to make sure they are clean and in good working condition before use. -
Page 29: Smart Programme Overview
COOKING SMART PROGRAMME OVERVIEW Smart Cooking presets Pressure Tips Programme levels It is recommended to use timed Pressure Custom, Chicken, Sterilise, Pasta, Natural Release or follow recipes Cook Beef, Soup, Egg, Beans High for the best outcome. Rice/Grain Custom, White Rice, Brown Rice High This is a non-pressure steam programme which is great... - Page 30 Jump start magic! These programmes use pressurised steam to cook food quickly, evenly, and deeply, for delicious results every time! For the best pressure cooking results, always follow an authorised Instant Pot recipe or our tried, tested and true pressure cooking timetables which feature grain-to-water ratios for making a variety of rice and grains.
-
Page 31: Pressure Cook And Rice
COOKING PRESSURE COOK AND RICE Smart Cooking Default Default Time range Programme presets pressure cooking times 10 minutes 1 minute to 8 hours Custom High (00:10) (00:01 to 08:00) 1 minute 1 minute to 1 hour Pasta High (00:01) (00:01 to 01:00) 30 minutes Soup High... - Page 32 COOKING PRESSURE COOK AND RICE 04 When the time fl ashes, turn the dial Stage 3: Releasing pressure to adjust the cook time as directed by When Cooking fi nishes, the display your recipe. shows End if Keep Warm is turned off. Press the dial to confi...
-
Page 33: Steam
COOKING STEAM (NON-PRESSURISED) The Steam programme works in 2 ways: like a regular stovetop steamer, boiling liquid to cook food with hot steam, and, as a sanitisation chamber for glass and plastics. Note: please refer to manufacturer's instruction on the time and temp for sanitisation. Instant tip: When steaming, use the steam rack to keep food out of the boiling liquid. - Page 34 07 When the Smart Programme fi nishes the display shows End. Automatic Keep Warm cannot be used with Steam. The use of the steam rack or other Instant Pot authorised accessories are recommended for steaming. 34 | support@instantpot.com.au | 1800 251 643...
-
Page 35: Sauté
COOKING SAUTÉ Like using a frying pan, griddle, or fl at-top grill, use Sauté to simmer, reduce and thicken liquids, stir-fry meals, and to caramelise vegetables and sear meat before or after using other cooking methods. Instant Tip: If you prefer, you can use the inner pot on any electric, ceramic, gas and induction cooktop. -
Page 36: Deglazing
COOKING DEGLAZING Sautéing meat and vegetables before pressure cooking is the perfect way to boost fl avours, as sugars caramelise from the high heat of the Sauté Smart Programme. Deglazing the inner pot lets you unlock those fl avours in amazing sauces, gravies and more. -
Page 37: Slow Cook
COOKING SLOW COOK The Slow Cook programme is comparable to a traditional slow cooker, so you can keep using all your old family favourites! Default Smart Cooking Default cooking Time range Tips Programme presets temperature times Custom High 4 hours 30 minutes to (04:00) Dishes should cook... -
Page 38: Sous Vide
COOKING SOUS VIDE Sous Vide cooking involves cooking food underwater, in an airtight, food-safe bag, for a long period of time. Food cooks in its own juices and comes out delicious and unbelievably tender. CAUTION Do not overfi ll the inner pot to avoid damage to the multicooker. Total contents (water and food pouches) should leave at least 5 cm of headspace between the water line and the brim of the inner pot. - Page 39 COOKING SOUS VIDE Step 1: Set up the sous vide water bath Step 3: Get food ready 01 Fill the inner pot to the Half Fill mark 01 While the water heats, start by as indicated the pot, then insert it into seasoning your food as desired.
- Page 40 COOKING REVERSE SEARING Searing your meat after slow and precise cooking is the easiest way to boost those already delicious fl avours through the roof without overcooking. Try reverse searing for tender, juicy meat with a beautiful, burnished crust. 01 After sous vide cooking, remove the meat from the cooking pouch and gently pat it dry to remove as much moisture from the exterior of the meat.
- Page 41 COOKING SOUS VIDE COOKING CHART Minimum Maximum Recommended Expected Cooking Food Cooking Cooking Thickness Doneness Temperature* Time* Time* Beef and Lamb Tender Cuts: 2–5 cm Rare 50°C 1 hour 4 hours Tenderloin, Medium-rare 54°C 1.5 hours 4 hours cutlets, sirloin, rib-eye, rump, T-bone, chops Tougher Cuts:...
- Page 42 COOKING SOUS VIDE COOKING CHART Minimum Maximum Recommended Expected Cooking Food Cooking Cooking Thickness Doneness Temperature* Time* Time* Fish and Seafood Soft and 43°C 10 minutes 30 minutes buttery Translucent / 46°C 20 minutes 45 minutes starts to fl ake Fish 2–3 cm Medium-rare...
-
Page 43: Yogurt
COOKING YOGURT Made for easy fermenting dairy and non-dairy yogurt recipes that you can make again and again. Instant Pot size Minimum milk volume Maximum milk volume 5.7 Litres 4 cups (1 L) ~3.8L 8 Litres 6 cups (1.5 L) ~5.7L... - Page 44 Plain yogurt with active cultures can be used as a starter. Follow a trusted Instant Pot yogurt recipe when using yogurt as a starter culture. 03 Place and close the multicooker lid as described in Pressure control features: Multicooker lid.
- Page 45 COOKING YOGURT Tips for yogurt making • The thicker the milk, the thicker the yogurt! • For even thicker yogurt, pasteurise your milk twice before fermenting. • For the thickest yogurt, use a cheesecloth to strain out the liquid whey, and get rich Greek-style yogurt.
-
Page 46: Bake
COOKING BAKE Use Bake with or without pressure to proof dough and create decadent brownies, moist banana bread, and other tasty treats. Default Smart Cooking Default temperature Time range Programme presets cooking time or pressure None, 30 minutes 1 minute to 4 hours Custom 176°C (00:30) -
Page 47: Keep Warm
COOKING 04 If baking with pressure, wait for the 05 Using proper hand protection, fl oat valve to drop, then carefully open remove the inner pot from the and remove the lid as described in multicooker base and carefully Pressure control features: lift out your baking dish. -
Page 48: Using Favourite Programmes
USING FAVOURITE PROGRAMMES Set and save 5 custom programmes as Favourites for one-touch access to recipes. SAVING RECIPES AS FAVOURITES 01 Select any Smart Programme and set it up according to your recipe. 02 When you’re happy with the settings, touch and hold any Fav key for 3 seconds to save the programme. -
Page 49: Care, Cleaning And Storage
CARE, CLEANING AND STORAGE Clean your Instant Pot Pro and its parts after each use. Failure to follow these cleaning instructions may result in property damage and/or personal injury. Always unplug your multicooker and let it cool to room temperature before cleaning. - Page 50 CARE, CLEANING AND STORAGE WARNING The multicooker base contains electrical components. To avoid fi re, electric leakage and/ or personal injury, make sure the multicooker base always stays dry. • DO NOT immerse the multicooker base in water or other liquid or attempt to cycle it through the dishwasher.
- Page 51 CARE, CLEANING AND STORAGE Steam release assembly Anti-block shield Remove the steam release assembly Remove the anti-block shield Remove the steam release cover, then pull Grip the lid like a steering wheel and use the steam release valve up and off the your thumbs to press fi...
- Page 52 CARE, CLEANING AND STORAGE Float valve and silicone cap Condensation collector Remove the float valve from the lid The condensation collector sits at the back of the multicooker base and catches any Place one fi nger on the fl at top of fl oat overfl...
-
Page 53: Troubleshooting
TROUBLESHOOTING Register your Instant Pot Pro today at instantpot.com.au/support/register. If your problem persists of if you have any questions, get in touch with Customer Care by email at support@instantpot.com.au or by phone at 1800 251 643 or (02) 9317 1000. - Page 54 TROUBLESHOOTING Problem Possible reason Try this No sealing ring in the lid. Install a sealing ring. The sealing ring is damaged or Replace the sealing ring. not installed properly. Food debris on the Remove the sealing ring and clean it thoroughly. sealing ring.
- Page 55 TROUBLESHOOTING Problem Possible reason Try this Add thin, water-based liquid to the inner pot Steam gushes according to its size. Not enough liquid in the inner pot. from the steam 5.7L: 1 ½ cups (375 mL) release valve when 8L: 2 cups (500 mL) the quick release Pressure sensor control failure.
-
Page 56: Warranty
WARRANTY Limited Warranty This Limited Warranty is issued by Corelle Brands (Australia) Pty Ltd (Corelle Brands Australia) and is effective for one year from the date of original consumer purchase. Proof of original purchase date and return of your appliance is required to obtain service under this Limited. Return of your appliance to us will be done in accordance with our instructions only. - Page 57 WARRANTY If Corelle Brands Australia confi rms the appliance has not malfunctioned due to defective parts or workmanship, and/or is in working order, or if proof of purchase is not verifi ed, Corelle Brands Australia reserves the right to return the appliance to you at your pre-paid cost.
- Page 58 © 2022 Corelle Brands (Australia) Pty Ltd. Distributed by Corelle Brands (Australia) Pty Ltd. An Instant Brands Company. Sydney Corporate Park Level 1, 184 Bourke Road, Alexandria, NSW, 2015, Australia instantpot.com.au © 2022 Instant Brands LLC. 814-0124-91...
Need help?
Do you have a question about the Pro 60 and is the answer not in the manual?
Questions and answers