
Related Manuals for Anmytek H0030


Summary of Contents for Anmytek H0030
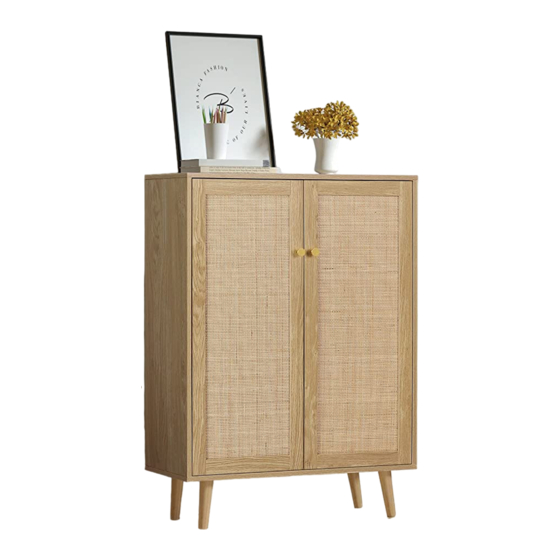
- Page 1 Contact Us: service@anmytek.com H0030 Rattan Two Door Storage Cabinet 它 它 2 x 1 m 1 HOUR 2 PEOPLE...
-
Page 2: Safety Precautions
Item No.: H0030 Contact Us: service@anmytek.com SAFETY PRECAUTIONS PLEASE READ ALL INSTRUCTIONS CAREFULLY BEFORE ASSEMBLING AND USING THE PRODUCT. Please check that all parts are present before you start the assembly of your furniture. A Philips head screwdriver (not included) is required for the assembled of this product. -
Page 3: Assembly Diagram
Item No.: H0030 Contact Us: service@anmytek.com ASSEMBLY DIAGRAM AFTER SALES SUPPORT feel free to If you have any general enquiries or require spare parts for this product, please contact us via the following email: Email: service@anmytek.com You can contact us for support at any time. We'll answer you in 24hrs. - Page 4 Item No.: H0030 Contact Us: service@anmytek.com Ø6x30mm Wooden Dowel Screw Ø6x35mm Ø15x12mm Cam Lock Ø15x12mm Cam Bolt Screw Ø3x12mm Ø6x14mm Bolt Metal Sheet Washer Wall Anchor Safety Strap Plastic Wedge Ø3x14mm Screw Door Hinge Shelf Support Pin Handle Screw Ø3x12mm Bolt Ø6x50mm...
-
Page 5: What You Need
For more help, you can send a message to our customer support email service@anmytek.com in any time. Ready? Ok, let’s get rolling! This should be very easy, just follow our simple instructions... -
Page 6: Assembly Steps
Item No.: H0030 Contact Us: service@anmytek.com ASSEMBLY STEPS STEP 1. Attach 4 x cam bolts (D) to panel (1), 2 x (D) to panel (2), 2 x (D) to panel (3) with a screwdriver. STEP 2. Attach panel (7) to side panels (2), (3) using 4 x cam locks (C) with a screwdriver. - Page 7 Item No.: H0030 Contact Us: service@anmytek.com ASSEMBLY STEPS STEP 3. Slide back side panel (4) into position. STEP 4. Attach the top panel (1) to assembled unit using 4 x cam locks (C) with a screwdriver. Contact Us: service@anmytek.com...
- Page 8 Item No.: H0030 Contact Us: service@anmytek.com ASSEMBLY STEPS STEP 5. Slide back side panel (4) into position as shown. STEP 6. Attach the bottom panel (5) to assembled unit using 4 x wooden dowels (A), 4 x screws (B) with a screwdriver.
- Page 9 Item No.: H0030 Contact Us: service@anmytek.com ASSEMBLY STEPS STEP 7. ×4 Attach 4 x metal sheets (G) to 4 x legs (6) using 8 x bolts (Q) with an Allen key (R). Fix 4 x foot pads (S) to legs.
- Page 10 Item No.: H0030 Contact Us: service@anmytek.com ASSEMBLY STEPS STEP 9. ×4 ×4 Fix 8 x plastic wedges (K) to assembled unit using 8 x screws (L) with a screwdriver. STEP 10. Insert 8 x shelf support pins (N) into the cabinet. Place 2 x shelves (8) over pins as shown.
- Page 11 Item No.: H0030 Contact Us: service@anmytek.com ASSEMBLY STEPS STEP 11. ×2 Fix the handle (O) to door panel (9) using 2 x screws (P). Attach 2 x door hinges (M) to the panel using 4 x screws (P) with a screwdriver.
- Page 12 Item No.: H0030 Contact Us: service@anmytek.com ASSEMBLY STEPS STEP 13. Attach the door panel (9) to assembled unit using 8 x screws (E) with a screwdriver. Is your cabinet door looking crooked or unevenly spaced? Then you’ve come to the right place. Follow the illustrations below to get your cabinet door aligned and ready for action.
- Page 13 Item No.: H0030 Contact Us: service@anmytek.com If the space between your doors is off... Loosen the side-to-side screws, then screw counter-clockwise to make the gap wider or clockwise to close any gaps. If you need to adjust the depth of the doors...
- Page 14 Item No.: H0030 Contact Us: service@anmytek.com ASSEMBLY STEPS STEP 15. Fasten the furniture to wall using 2 x wall anchors (I), 2 x washers (H), 2 x screws (B) with a screwdriver. STEP 16. Final assembly. Contact Us: service@anmytek.com...
- Page 15 Item No.: H0030 Contact Us: service@anmytek.com WALL FIXING GUIDE NOTE: Supplied wall plugs are only suitable for use in masonry walls. If you have any doubts about using the correct plug for your wall, please seek professional advice. Failure of the product due to using incorrect fixings is the responsibility of the installer.
Need help?
Do you have a question about the H0030 and is the answer not in the manual?
Questions and answers