
Related Manuals for KVM-TEC EASYLINE smartEasy


Summary of Contents for KVM-TEC EASYLINE smartEasy
- Page 1 Easy FULL HD - KVM EXTENDER OVER IP Tune in the easy KVM World Tune in the easy KVM World EASYLINE smartEasy Single in copper Dual in copper www.kvm-tec.com MANUAL Check out V102022 our Installation Channel:...
- Page 2 2.5 Removing a CATx cable 12G SDI Scalableline not scalable Full HD 2.6 Best practice for Windows 10 Scalableline scalable 3. Extender settings 3.1 Using the on screen menu 3.2 Viewing the current fi rmware version 2 | kvm-tec kvm-tec | 3...
-
Page 3: Table Of Contents
3.7.7 Lock menu 4.2.11 more features 3.7.8 Mouse speed 4.2.12 frontbridging 3.7.9 Monitor sync strength 4.2.13 System Status Frontbridging 3.8 Update 4.2.14 Change the Frontbridging Layout 3.8.1 Firmware update with Switching Manager WEB 4.2.15 backbridging Demoversion 4 | kvm-tec kvm-tec | 5... - Page 4 The SE2/PC is referred to as Local Unit/ CPU and the SE2/Monitor as Remote Unit/ CON. 11. Notes WARNING The device may only be opened by an authorized technician. Danger of electric shock! 6 | kvm-tec 7 | kvm-tec kvm-tec | 7...
- Page 5 • Prior to connecting to the mains, make sure your local mains voltage matches the rating indicated on the product. • The product must be connected to a permanent and earthed AC wall socket. 8 | kvm-tec kvm-tec | 9...
- Page 6 295 g/0,65 lb Local/CPU / 295g/0,65 lb Remote /CON LED STATUS no active connection Shipment weight: 1005g/2,21 lb per set single yellow no video signal 1895 g / 4,17 lb Dual green everything works MTBF 82 820 calculated hours / 10 years 10 | kvm-tec kvm-tec | 11...
- Page 7 12V1A kvm-link Connection for CAT5/6/7 cable Connection power supply 12V1A LED STATUS no active connection LED STATUS yellow no video signal no active connection green everything works yellow no video signal green everything works 12 | kvm-tec kvm-tec | 13...
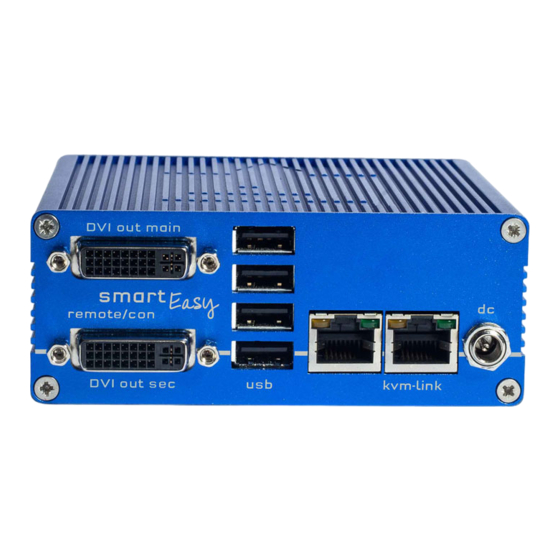
- Page 8 DVI connection to PC USB to PC kvm-link Connection for CAT5/6/7 cable kvm-link Connection for CAT5/6/7 cable Conenction 12V1A power supply LED STATUS no active connection yellow no video signal green everything works 14 | kvm-tec kvm-tec | 15...
- Page 9 1 x USB cable 1,8m/5.9ft 4 x rubber feet Remote / CON Unit 1 x SE2 remote/CON 1 x wall power supply unit 12 V 1A (EU-plug or Int plug) 4 x rubber feet 16 | kvm-tec kvm-tec | 17...
- Page 10 Rackmounting RMK-EASY-F Part Nr. 6232 RMK-FLEX-F The rack mounting kit RMK-EASY- F is for mounting kvm-tec smartEASY single and dual extenders. It consists of a19“ rack shelf and an alu-faceplate. Rackmounting RMK- EASY- FN - T Part-Nr. 6232 RMK- EASY-FN The rack mounting kit RMK-EASY-FN is for assembling kvm-tec smartEASY extenders.
- Page 11 1Gbit/sec. For video sharing the network has to support IGMP snooping. HAVE FUN - your kvm-tec Extender is now in use for many years (MTBF approx 10 years) HAVE FUN - your kvm-tec Extender is now in use for many years (MTBF approx 10 years)
- Page 12 LED lights green. The monitor will displays your computer’s desktop or any open applications. 2.5 REMOVING A CATX CABLE To remove a CATx cable: • Press the latch down and slowly pull the cable out. 22 | kvm-tec kvm-tec | 23...
- Page 13 2. INSTALLATION OF THE EXTENDER 2. INSTALLATION OF THE EXTENDER 24 | kvm-tec kvm-tec | 25...
-
Page 14: Features
Setting local Features Menu The individual menu items are described in more detail in chapter 4 (page 52). Remote Settings Setting remote About Overview Overview Extender With „ESC“ Close the OSD 26 | kvm-tec kvm-tec | 26 kvm-tec | 27... -
Page 15: Diagnosis Menu
“Test OK! If errors occurred during the test, the status displays the sum of all errors that occurred. Additionally you get the CPU temperature information of both units. Another feature is the cable test 28 | kvm-tec kvm-tec | 29... -
Page 16: Ddc Menu
- Press 2 to save the current DDC information. The system uses the same settings after rebooting the extender. - Press 3 to 8 to use a predefined resolution, which will be saved. 3. Press ESC to return to the main menu. 3.5.2 DDC SECOND (DUAL UNITS) 30 | kvm-tec kvm-tec | 31... -
Page 17: Change The Local Settings
The PC can be put into sleep mode and reactivated with any key. View the local or remote Extender settings: - Press the L button to display the Local Setting menu. USB Compatibility Mode Disabled/Enabled USB Remote Wakeup Disabled/Enabled Compatibility with Linux Disabled/Enabled Bandwidth Reduction 32 | kvm-tec kvm-tec | 33... -
Page 18: Compatibility With Linux
Lock Menu Mouse Settings Video Sync Settings Easy Manager Sampling Rate 3.6.5 BANDWIDTH REDUCTION Here the bandwidth can be reduced. The basic setting is 0! You can change the bandwidth with +/- or u/d. 34 | kvm-tec kvm-tec | 35... -
Page 19: Editing A Keyboard Layout
If the Powersave Mode is active, the image output at the video outputs is switched off after the time has elapsed. To reactivate the monitor, any key on the keyboard must be pressed, or a connection to a partner must be established. 36 | kvm-tec kvm-tec | 37... -
Page 20: Hide Status Screen
To use the OSD menu, the keyboard must be identifi ed on the remote device. For most keyboards, use the 0 setting. When using USB, some mice behave like a keyboard. In this case, select fallback mode 1 or 2. 38 | kvm-tec kvm-tec | 39... -
Page 21: Lock Menu
It can be chosen between 0-50 (Standard 30) Password OSD can only be activated by password The mouse speed can be adjusted by pressing the M button. timer disabled, 1min, 5min, 10min, 15min, 30min, 60min 40 | kvm-tec kvm-tec | 41... -
Page 22: Monitor Sync Strength
By clicking the button Send and Update the update will be started. You can see the progress by a blue bar and if a green check mark appears on the right side, the update was successful. 42 | kvm-tec kvm-tec | 43... -
Page 23: Firmware Update With Usb Stick
To enable or disable the USB Memory upgrade: 1. make sure the Features Menu is open. 2. Press the U button. The Options Overview will open and the currently stored USB memory status will change (Enabled or Disabled). 44 | kvm-tec kvm-tec | 45... -
Page 24: About This Device
The link status shows if a connection is possible. Connected shows if the kvm data can currently be transferred. Video and USB show whether data is currently being transferred. show whether data is currently being transferred. show whether data is currently being transferred. single dual 46 | kvm-tec kvm-tec | 47... -
Page 25: Switching Features Menu
(Point to Point excludes itself with Matrix mode) Matrix Switching Mode Disabled/Enabled USB Save Feature (mass storage usable) Disabled/Enabled Freeze last Image (Disabled) Disabled/Enabled USB Emulation Mode (Disabled) Disabled/Enabled Easy Manager Easy Back Bridge Unlock Features Switching Status as EasyManager 48 | kvm-tec kvm-tec | 49... -
Page 26: Point To Point
3. Press ESC to return to the main menu. 4.2.5 USB SAVE FEATURE The kvm-tec feature „USB save“ prevents the intrusion of viruses via the USB interface by deactivating mass storage devices. By pressing the key „S“ you can switch the USB save feature on and off 4.2.6 TO SWITCH BETWEEN PC‘S... -
Page 27: Rename The Devices
As soon as every device in the network is detected, it is advisable to reduce the sampling rate. • F5’ in the switch list (with Easyline Manager) sends a broadcast to request ALL devices at once. 52 | kvm-tec kvm-tec | 53... -
Page 28: Frontbridging
Mode. With only one screen, the key combination 5x Left Control must be moved. FRONTBRIDGING | In frontbridging, one or two monitors can simultaneously display the contents of the PCs with different images and can be operated either right or left. 54 | kvm-tec kvm-tec | 55... -
Page 29: System Status Frontbridging
USB status. The link status indicates whether a connection is possible. Connected shows if the kvm datas can be transferred currently. Video and USB shows if data is currently being transferred dual 56 | kvm-tec kvm-tec | 57... -
Page 30: Backbridging
Since there is only one USB socket on the Local device, only one remote can access the PC at a time. BACKBRIDGING | In backbridging it is possible to share from one dual local extender to two single remote extender. For all applications that require monitoring at different locations 58 | kvm-tec kvm-tec | 59... -
Page 31: System Status Backbridging
Make sure that you are in the main menu. Press the F key to enter the Features menu. The link status indicates whether a connection is possible. Connected shows if the kvm datas can be transferred currently. Video and USB shows if data is currently being transferred single 60 | kvm-tec kvm-tec | 61... -
Page 32: Easy Cross Move - Software Feature
EASY CROSS MOVE Push List both PCs can be operated with one mouse and one keyboard 2 local Units + 1 dual remote Unit = Easy Cross Move with 1 keyboard & 1 mouse Get List 62 | kvm-tec kvm-tec | 63... -
Page 33: Ip Management
In Static-IP mode, the IP addresses can be assigned via the OSD. It is necessary to be connec- The KVM extenders from kvm-tec support three different addressing methods. The IP Manage- ted to a local partner to be able to transmit IP addresses. -
Page 34: Troubleshooting & First Aid
Unit to behaviour another Unit Contact kvm-tec Contact kvm-tec support support We are here for you to answer your questions about installation? Manual download www.kvm-tec.com kvm-tec Installationchannel on our homepage personally +43 2253 81912 66 | kvm-tec kvm-tec | 67... -
Page 35: Maintance & Care
The packaging is made of environmentally friendly materials, which may be disposed through your local recycling facilities. By disposing of the packaging and packaging waste in the proper manner, you help to avoid possible hazards for the environment and public health. fl exible warranty extension 68 | kvm-tec kvm-tec | 69... -
Page 36: Cable Requirements
• The cable should meet one of the following standards: Class D ISO/IEC 11801:2002 between the individual endpoints (local/CPU or remote/CON), as well as with the KVM-TEC Swit- or EN 50173-1:2002. Schema EIA/TIA-568 B. ching Manager, Gateway2Go and API. Sharing of videos is realized via the IGMP function of the •... -
Page 37: Contacts & Phone / Emails
11. NOTES 10. CONTACTS & PHONE / EMAILS 10. ADDRESS & PHONE/EMAIL If you have any questions about our products, please contact kvm-tec or your dealer. kvm-tec electronic gmbh Gewerbepark Mitterfeld 1A 2523 Tattendorf Austria Phone: 0043 (0) 2253 81 912...
Need help?
Do you have a question about the EASYLINE smartEasy and is the answer not in the manual?
Questions and answers