Table of Contents
Advertisement
Quick Links
Advertisement
Table of Contents

Related Manuals for KVM-TEC Ultraline UVX1


Summary of Contents for KVM-TEC Ultraline UVX1
- Page 1 Manual 4K Ultraline DP 1.2 6901 SET COPPER 6901L CPU/LOCAL 6901R CON/REMOTE 4K Ultraline DP 1.2 FIBER UVX - F 6902 SET FIBER 6902L CPU/LOCAL www.kvm-tec.com 6902R CON/REMOTE kvm-tec = C Check out our Installation Channel: connect collaborate communicate control...
-
Page 2: Table Of Contents
4.1.8 Displayport multistream 3. Access main menu 5.Hub splitter 3.1. System status 5.1 Built - in mst hub splitter 3.2. Features menu 6. Downscaling 3.3 update Menu 7. Maintance & care 3.4 Settings 7.1 Extender care 2 | kvm-tec kvm-tec | 3... - Page 3 They contain important information regarding safety, use and disposal for every user 9. cable requirements of the Ultraline UVX1 and UVX1-f KVM Extender. Please familiarise yourself with the information within prior to using your product. Use the product only in the manner as 9.
-
Page 4: Introduction
Modifications in the Please ensure that everyone who uses the product has read and followed these warnings course of technological progress are reserved. In these user instructions the Ultraline UVX1/ and instructions. -
Page 5: Technical Specifications
KVM Extender (local unit-CPU und remote unit-CON) • Use the device with a suitable, properly installed and easily accessible power outlet. Model: 4K Ultraline UVX1/UVX1-F KVM Extender • Unplug the appliance during lightning storms or when not in use. •... -
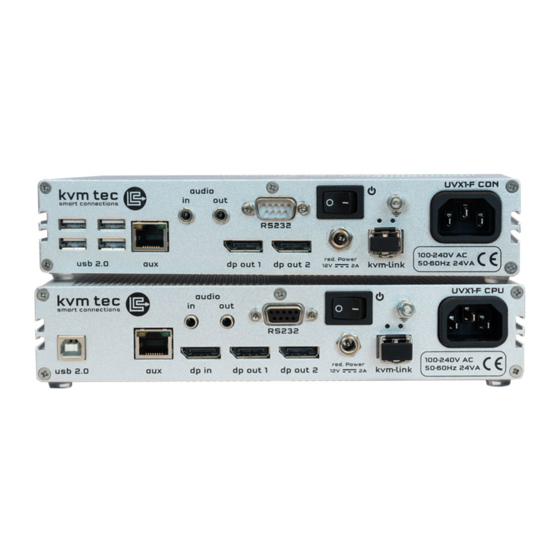
Page 6: Product Elements
Auxilary Gigabit Network Connector USB 2.0 to keyboard /Muse Auxilary Gigabit Network Connector power/status LED Displays the status of the extender USB 2.0 USB 2.0 to PC power/status LED Displays the status of the extender 10 | kvm-tec kvm-tec | 11... -
Page 7: Meaning Of The Led Indicators
V. fast rJ45 socket lEDs * UVX Fiber Yellow 1 x SFP+ Module-Multimode up to 300m/984ft Yellow Slow Green Green V. fast * UVX only ** Rem. Only Table : Meaning of LED indicators 12 | kvm-tec kvm-tec | 13... -
Page 8: Extender Installation
Rack Mounting Kit RMK-F - Part No. 6230 Switching Manager must be installed with a Network Switch, each user can gain quick access to The rack mounting kit RMK-F is for assembling kvm-tec Ultraline UVX1extenders. It consists of any of the required computers. - Page 9 2. USB from keyboard and mouse HAVE FUN - your kvm-tec Extender is now in use for many years (MTBF approx 10 years) Please note that the recommended length of the display port cable should be max. 1.8m,5.9 ft otherwise interference-free 4K transmission may not be guaranteed.
-
Page 10: Start Up
2. Pull the metal latch of the SFP+ module forwards until it is at a right angle. 3. Replace the SFP+ module with the other module. Put the metal latch back in position. Only 2.7 rEMoVInG a fIbEr cablE use SFP+ modules from kvm-tec, or recommended by kvm-tec. To remove a fiber cable: •... -
Page 11: Main Menu & Settings
In the main menu you can make the following settings by selecting the corresponding letters: operate the activated features. Press go to chapter 5 FEATURES system status menu system status/ current status features Menu activated features Update update firmware settings settings about this device Informationen about the unit 20 | kvm-tec kvm-tec | 21... -
Page 12: Update Menu
3.3 UPDaTE MEnU Display of firmware version The current version of the firmware can be downloaded at http://www.kvm-tec.com/ By pressing the „U“ key or by selecting the arrow keys, you reach the update menu, in which the support. Each update file contains a detailed description of the update process. For firmware of the Extender will be displayed and can be updated. - Page 13 The already activated Switching upgrade can be activated from the Switching menu (in the main menu). By pressing „s“, you can access the switching menu and thus activate or de-activate the switching upgrade. In the main menu you can configure the switching system with „s“. 24 | kvm-tec kvm-tec | 25...
-
Page 14: Settings
Press 2 for a fix resolution 1920 x 1080 Press 3 for a fix resolution 2560 x 1440 Press 4 for a fix resolution 3840 x 2160 Press Esc to return to the main menu SCREEN „Settings“ SCREEN „DDC/EDID Settings“ 26 | kvm-tec kvm-tec | 27... -
Page 15: Select Keyboard Layout
(Please note that only a key combination with the keys 1 or F1 is possible with point F.) Use the arrow keys to determine the number of keystrokes required to trigger the shortcut. Then confirm with Enter. SCREEN „Keyboard shortcuts“ 28 | kvm-tec kvm-tec | 29... -
Page 16: Mouse Settings
With the „M“ button you will open the Mouse Settings where you can adjust the speed of the Here you will find the Remote Wakeup setting. mouse with the arrow keys. SCREEN „Local Settings“ SCREEN „Mouse Settings“ 30 | kvm-tec kvm-tec | 31... -
Page 17: Overlay
With this setting, the names are only displayed if the red frame is active. • OFF Rapid rate of regulation No names are displayed with this setting. • MEDIUM - „M“ button Mean rate of regulation • SMOOTH - „S“ button Slow speed of regulation 32 | kvm-tec kvm-tec | 33... -
Page 18: About This Device
SCREEN „About this device“ SCREEN Menü FEATURES Two features are already pre-installed, which can be set by pressing „F“ in the main menu. You can activate either the 4K Multiview Commander or the Mouse Glide & Switch. 34 | kvm-tec kvm-tec | 35... -
Page 19: Multiview Commander
Then confirm the desired source with the Enter key. The selected source appears in the quadrant in which the mouse is located. By pressing the „D“ key, the displayed source can be separated again. The menu can be closed with the ESC key. SCREEN „Multiview Commander“ 36 | kvm-tec kvm-tec | 37... -
Page 20: Mouse Glide & Switch
With the activation, the intrusion of computer viruses can be prevented via USB-mass storage. Data from a connected USB mass storage device cannot be accessed. 4.1.8 DIsPlaYPorT MUlTIsTrEaM By pressing „D“ you access the Displayport Multistream configuration and activate the Multistream functionality. SCREEN „Mouse glide& switch“ 38 | kvm-tec kvm-tec | 39... -
Page 21: Hub Splitter
Both the graphics card and the monitor must comply with the Displayport Standard 1.2. For some monitors the Display port function 1.2 must be activated in the monitor menu. 40 | kvm-tec kvm-tec | 41... -
Page 22: Maintance & Care
Unit the same behaviour Contact kvm-tec Contact kvm-tec support support We are here for you to answer your questions about installation? Manual download www.kvm-tec.com kvm-tec Installationchannel on our homepage personally +43 2253 81912 42 | kvm-tec kvm-tec | 43... -
Page 23: Cable Requirements
Green lED is lighting Different Please contact the kvm-tec support team via e-mail: brown/White in green firmware support@kvm-tec.com or by phone: +43 2253 81912 30 or USB is not brown compatible lEDs different... -
Page 24: Requirements Fiber Cable
10 Gigabit Switch, with a port-to-port transfer rate of 10 Gigabit/second SFP+ module, which allows a transmission distance of up to 300 m /984ft 10. TroUblEsHooTInG • Dedicated fiber optic connection cable type Duplex Multimode with LC plug 46 | kvm-tec kvm-tec | 47... -
Page 25: Recommended Switches
Please, contact us first before returning the product. 11.1 EXTEnDED WarranTY 2 years standard warranty A list of kvm-tec tested and recommended switches can be found on our website at www.kvm-tec.com Products - Switching System - Datasheet -recommended Switche Art Nr 9003 warranty extension to 5 years... -
Page 26: Address & Phone / Emails
13. noTEs 12. aDDrEss & PHonE / EMaIls 12. aDDrEss & PHonE/EMaIl If you have any questions about our products, please contact kvm-tec or your dealer. kvm-tec electronic gmbh Gewerbepark Mitterfeld 1A 2523 Tattendorf Austria Phone: 0043 (0) 2253 81 912 Fax: 0043 (0) 2253 81 912 99 Email: support@kvm-tec.com...
Need help?
Do you have a question about the Ultraline UVX1 and is the answer not in the manual?
Questions and answers