Table of Contents
Advertisement
Quick Links
Advertisement
Table of Contents

Related Manuals for KVM-TEC ECOsmart KT-6035


Summary of Contents for KVM-TEC ECOsmart KT-6035
- Page 1 Die KVM Local Unit for Zero Space in the Rack KVM Extender- Transmitter over IP in DVI-D, VGA,USB in CATx ECOsmart kvm-tec Local Unit im Dongle MANUAL Format Art.Nr. KT-6035 Check out our Installation Channel: www.kvm-tec.com...
-
Page 2: Table Of Contents
3. Main Menu & Settings 3. Using on screen menu 3.1. System status 3.2. Features menu 3.3 Update menu 3.4 Settings 3.4.1 Defining what DDC data your PC uses 3.4.2 Select keyboard layout 3.4.3 Keyboard shortcuts 3.4.4 Mouse Settings kvm-tec | 3... -
Page 3: Introduction
‘product’ or ‘extender‘. The ECOsmart/PC is referred to as the Local unit/CPU 8. Warranty 8.1 extended warranty Use in combination with remote units: 9. Address & phone / emails • Flexline • media4Kconnect 10. Notes • ScalableLine (Ecosmart Local) - can be combined unscaled 4 | kvm-tec kvm-tec | 5... -
Page 4: Safety Intructions
• Prior to connecting to the mains, make sure your local mains voltage matches the rating indicated on the product. 6 | kvm-tec kvm-tec | 7... -
Page 5: Technical Specifications
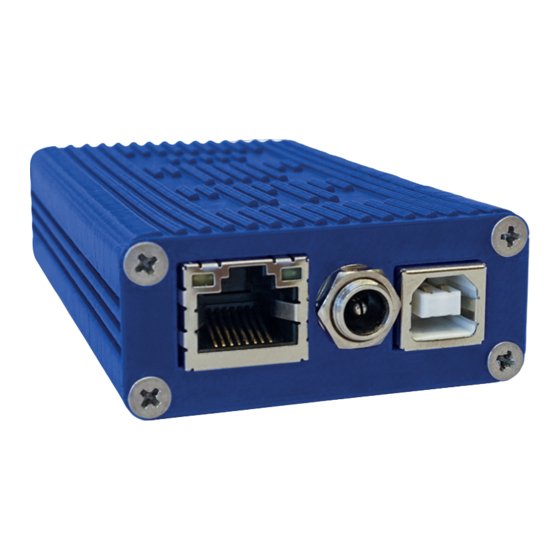
Shipment weight 290g/0.64lb LOC Expected product life 82 820 hours / 10 years Name Function kvm-link Connection Network cable Connection for 12V/2A power supply USB to PC Status LED Extender-Status DVI-Buchse DVI in from PC 8 | kvm-tec kvm-tec | 9... -
Page 6: About The Status Led
Maxflex (Mouse Glide & Switch) • Industryflexline (Mouse Glide & Switch) A detailed error description can be found in chapter First Aid • media4Kconnect - all versions ScalableLine: • Ecosmart can be combined unscalable with ScalableLine remote 10 | kvm-tec kvm-tec | 11... -
Page 7: Installing The Extender
4. Now connect the DVI cable to the DVI socket of the PC and the other end to the DVI socket of the CPU Local Unit (PC-in). Have fun - your kvm-tec Extender is now in use for many years (MTBF approx.10 years) 12 | kvm-tec... -
Page 8: Start Up
3. Connect both extender power cables ( 6 / 20 ) to an earthed wall socket. Switch on both units. Both extenders start an initialization process. The status LED blinks some seconds red and changes to green after a successful connection The monitor will displays your computer’s desktop or any open applications. 14 | kvm-tec kvm-tec | 15... - Page 9 2. EXTENDER INSTALLATION 2. EXTENDER INSTALLATION 16 | kvm-tec kvm-tec | 17...
-
Page 10: Main Menu & Settings
In the main menu you can make the following settings by selecting the corresponding letters: operate the activated features. go to chapter 4 FEATURES Press System status menu system status/ current status Update update firmware Settings settings 18 | kvm-tec kvm-tec | 19... -
Page 11: Update Menu
3.3 UPDATE MENU Display of firmware version The current version of the firmware can be downloaded at http://www.kvm-tec.com/ By pressing the „U“ key or by selecting the arrow keys, you reach the update menu, in which the support . Each update file contains a detailed description of the update process. For firmware of the Extender will be displayed and can be updated. -
Page 12: Settings
Extender settings. SCREEN „ Update“ SCREEN „Settings“ The UPDATE process is now started and takes place in two steps: Erasing flash: erases the memory Updating: the new version is installed 22 | kvm-tec kvm-tec | 23... -
Page 13: Defining What Ddc Data Your Pc Uses
Press 3 for a fix resolution 2560 x 1440 Press 4 for a fix resolution 3840 x 2160 Press 5 for a Fix HDMI 3840 x 2160 Press ESC to return to the main menu SCREEN „DDC/EDID Settings“ 24 | kvm-tec kvm-tec | 25... -
Page 14: Keyboard Shortcuts
(Please note that only a key combination with the keys 1 or F1 is possible with point F.) Use the arrow keys to determine the number of keystrokes required to trigger the shortcut. Then confirm with Enter. SCREEN „Mouse Settings“ SCREEN „Keyboard shortcuts“ 26 | kvm-tec kvm-tec | 27... -
Page 15: Managing Local Settings
SCREEN „Local Settings“ The following modes can be used: • HARD - key „H“ Rapid rate of regulation • MEDIUM - „M“ button Mean rate of regulation • SMOOTH - „S“ button Slow speed of regulation 28 | kvm-tec kvm-tec | 29... -
Page 16: Monitor Power Save Mode
The packaging is made of environmentally friendly materials, which may be disposed through your local recycling facilities. By disposing of the packaging and packaging waste in the proper manner, you help to avoid possible hazards for the environment and public health. 30 | kvm-tec kvm-tec | 31... -
Page 17: Support & First Aid
If it is still not working, plug out/in USB once more Replace the USB cable from PC to Contact kvm-tec the Local LED is lighting The screen Install current fi rmware from our homepage http://www.kvm-tec.com/support support Extender Check if both Check if local and re- in green flikers,... -
Page 18: Cable Requirements
Dedicated fiber optic connection cable type OM4 Duplex Multimode with LC plug The KVM-TEC Matrix Switching System communicates via IP between the individual endpoints (local/CPU or remote/CON), as well as with the KVM-TEC Swit- ching Manager, Gateway2Go and API. Sharing of videos is realized via the IGMP function of the switch via multicast. -
Page 19: Warranty
9. ADDRESS & PHONE/EMAIL 8. WARRANTY If you have any questions about our products, please contact kvm-tec or your dealer. The warranty period is 24 months from the date of purchase. The warranty expires in case of: kvm-tec electronic gmbh •... -
Page 20: Notes
10. NOTES 38 | kvm-tec...
Need help?
Do you have a question about the ECOsmart KT-6035 and is the answer not in the manual?
Questions and answers