
Related Manuals for REED R9920


Summary of Contents for REED R9920
- Page 1 R9920 Indoor Air Quality Meter Instruction Manual www.REEDInstruments.com GlobalTestSupply www. .com Find Quality Products Online at: sales@GlobalTestSupply.com...
-
Page 2: Table Of Contents
Specifications .....................4-5 Instrument Description .................. 6 Display Description ..................6 Operating Instructions ................7-15 Setting up the R9920 ................7 Power ON/OFF ..................7 Main Operating Modes (Live and Data logging) ........7-8 Live Mode ................... 7 Data Logging Mode ................7 Screen Saver Mode ................ -
Page 3: Introduction
Introduction Thank you for purchasing your REED R9920 Indoor Air Quality Meter. Please read the following instructions carefully before using your instrument. By following the steps outlined in this manual your meter will provide years of reliable service. Product Quality... -
Page 4: Included
• Max/Min Display • Internal 16 GB memory stores data points in CSV format • User selectable sampling rate from 1 sec to 24 hrs • Internal time and date stamp • Rechargeable li-ion battery • Built-in desk stand and wall mounting bracket •... - Page 5 General Specifications Display: 7" High-resolution color TFT Display Resolution: 1024 x 600 pixels Adjustable Brightness: Min: Max: Datalogging Capabilities: Real-Time Clock and Date Stamp: Selectable Sampling Rate: Yes (between 1second and 24 hours) Internal Memory: Yes (16 GB) Alarms: Yes (Low and High) Kick Stand: Wall Mountable: Yes (bracket included)
-
Page 6: Instrument Description
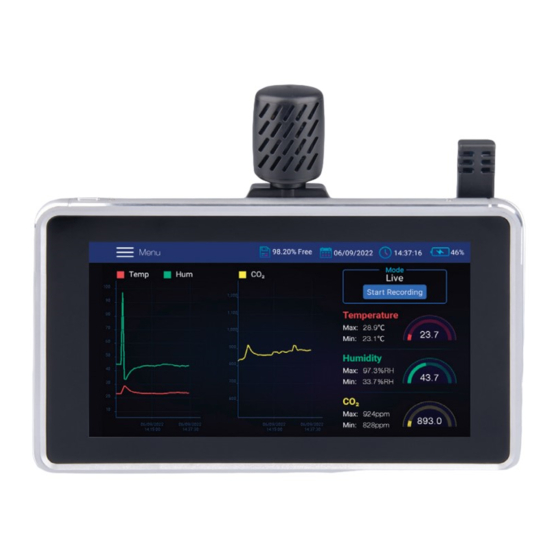
Instrument Description 1. LCD Display 2. Power Button 3. CO Sensor 4. USB Terminal 5. Temperature/ Humidity Probe 6. Kickstand Display Description 1. Menu Function 7. Time and Date Scales 2. Memory Status Indicator 8. Recording Button 3. Date and Time Stamp 9. -
Page 7: Operating Instructions
While the meter is off, slide the temperature and humidity sensor directly onto the cradle jack. Note: The R9920 can be mounted on a wall using the supplied wall mount bracket and screws. Mount the bracket on the wall first and then snap the meter onto the bracket. -
Page 8: Screen Saver Mode
Screen Saver Mode When the R9920 is idle for 60 seconds, the screen saver activates as shown below. Simply tap on the screen to return to the main interface screen. Setup Mode Tap the MENU button on the Main Interface Screen to enter Setup Mode. -
Page 9: General Setup
General Setup Set the required Temperature unit of measure by tapping on the circle next to °F or °C. Set the Alarm ON or OFF by tapping on the toggle switch. To set the HIGH and LOW Alarm thresholds for temperature, humidity and CO , open the numerical keypad by tapping the small arrow to the right of each alarm programming field. - Page 10 To select the maximum number of data points, open the interactive options box by clicking the small arrow to the right of the programming field. Select between 500, 1k, 5k, 10k, 20k or MAX. Note: If MAX is selected, the meter will create multiple 20,000 data point files and recording will continue until you manually stop the recording (by tapping STOP RECORDING on the Main Interface Screen) or until it reaches full internal memory (16GB).
-
Page 11: View Alarms
View Alarms Swipe up or down to scroll through the history of Alarm events (if any). To sort the Alarm events by date, open the interactive calendar by tapping the programming fields next to "Sort by date". To sort the Alarm events by high/low measurement values, open an interactive keypad by tapping on the programming fields next to "Sort by value"... -
Page 12: History
History Scroll up or down to scroll through the list of historical data files. Select a data file by first tapping it (to highlight it) and then tap OPEN or CANCEL. To delete a file, tap the check box located on the right end of the specific data file, and then tap DELETE. -
Page 13: Display
Display To adjust the brightness of the display, drag the Brightness slider to the right or left. Set the screen saver mode ON or OFF by tapping on the toggle switch. To enter the screen saver timeout time, open the interactive time options box by tapping the small arrow to the right of the programming fi eld. -
Page 14: Date & Time
Date & Time To set the Date and Time, open the interactive calendar by tapping the small arrow to the right of the programming field. Scroll up or down to set the applicable Year, Month, Day, Hour, Minute and AM or PM (12 hour format must be enabled). Tap OK to confirm your selections or tap on CANCEL. -
Page 15: Info
Data Upload Connect the R9920 via the included cable to a USB port on your PC, to download the recorded data files. The R9920 saves recorded data to a CSV (Excel) in the RH-T Data folder. Once connected, the PC will recognize the R9920 as a USB storage device. -
Page 16: Charging The Battery
Charging the Battery Connect the R9920 via the included cable to a USB port on your PC or into a wall outlet using the included USB Power Adapter to charge the Li-ion battery. Note: Charge the meter until the battery indicator appears full and remove the charging cable when done. -
Page 17: Product Warranty
REED Instruments guarantees this instrument to be free of defects in material or workmanship for a period of one (1) year from date of shipment. During the warranty period, REED Instruments will repair or replace, at no charge, products or parts of a product that proves to be defective because of improper material or workmanship, under normal use and maintenance. - Page 18 TEST & MEASURE WITH CONFIDENCE CHECK OUT OUR LATEST PRODUCTS! www.REEDInstruments.com GlobalTestSupply www. .com Find Quality Products Online at: sales@GlobalTestSupply.com...
Need help?
Do you have a question about the R9920 and is the answer not in the manual?
Questions and answers