
Subscribe to Our Youtube Channel
Related Manuals for REED R3030: R3100


Summary of Contents for REED R3030: R3100
- Page 1 Rich Black - 20/20/20/100 R3030/R3100 Model Digital Manometer Only if you REALLY need them: Instruction Manual reedinstruments 1-877-849-2127 | info@reedinstruments.com www.reedinstruments.com...
-
Page 2: Table Of Contents
Table of Contents Features ..................3 Specifications ................3-4 Instrument Controls & Indicators ..........4-5 Operating Instructions ..............5-9 Auto Power-Off ................5 Mode Options ................5-7 Calibration Mode ..............7-8 Calibration Point Reference ............8 Manual Zero Setting ..............9 Troubleshooting ................9-10 Battery Replacement ..............10 Maintenance ................ -
Page 3: Features
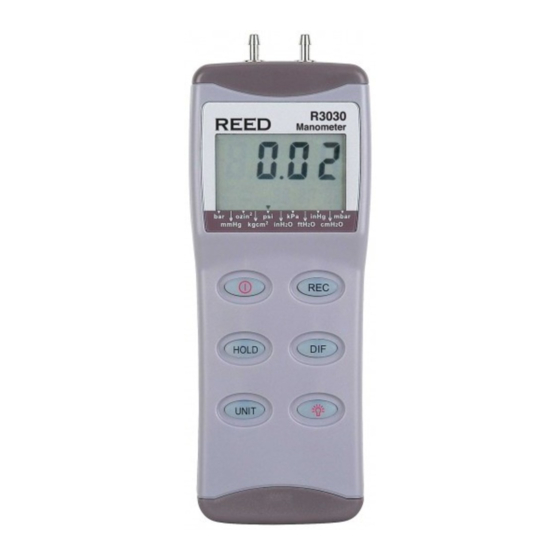
Features • Portable, battery-operated pressure measuring device • Measures gauge pressure (a measure of pressure in psi that is refer- ence to ambient pressure) and differential pressure (a measure of the difference between two pressures) • 11 selectable pressure units: bar, mmHg, ozin , kgcm , psi, inH kPa, ftH... -
Page 4: Instrument Controls & Indicators
Response Time: 0.5 seconds Format: Baud Rate: 2400 bit/sec; Data Bit: 8, Stop Bit: 1 Compensated Temp. Range: 0~50°C Operating Temperature: 0~50°C Operating Humidity: ≤80% RH Storage Temperature: -20~55°C Power Supply: Single 9V battery Dimensions: 72 x 182 x 30 mm Weight: Approx. -
Page 5: Operating Instructions
10. “-” Negative pressure hose connection 11. “+” Positive pressure hose connection 12. HOLD Freezes pressure reading 13. REL Establishes a relative zero for the primary screen information *Record mode does not act as a data logger but will capture single max/min data points Operating Instructions Note: This meter is fitted with two 4.8mm lugs. - Page 6 Press to enter recording. A counter will begin and REC will show up on screen indicating you have begun recording. Press the button again and the Fig. B unit will cycle through the MAX (Fig. C) and MIN (Fig. D) measurements captured during the recording mode.
-
Page 7: Calibration Mode
Fig. G Press momentarily and the unit will cycle through “bar”, “mmHg”, ”ozin ”, ”kgcm ”, O”, ”kPa”, ”ftH O”, ”inHg”, ”psi”, ”inH ”cmH O”, ”mbar” which is indicated on the bottom of the display (Fig. G & H). Press momentarily and the backlight illuminates for approx. -
Page 8: Calibration Point Reference
The meter auto-skips to the negative pressure Fig. K (-) point for the next calibration mode. Follow the same procedure as outlined in Step 4 for the negative pressure calibration point by pressing button, the LCD now displays ”-80.0“ and small ”CA” Fig. -
Page 9: Manual Zero Setting
Manual Zero Setting Fig. M When you set the display to zero (no pressure button applied to the connector), press for 2 seconds, the meter displays “0.0.0.0” from right to left (See Fig.M) and then delete each “0” from left back to right, the LCD display shows a normal mode (See Fig.N). -
Page 10: Battery Replacement
Fig. R • Err.4. When you set zero, ensure you have disconnected the tubing and that no pressure is applied to the connector. If Err.4 appears on the display, it means the sensor or the meter are damaged (See Fig.R). Return the unit to point of purchase for repair. -
Page 11: Maintenance
Maintenance • The meter is factory calibrated before shipping. • To maintain the meter in the good condition for use, we recommend you calibrate the meter after long term continuous use. • When properly maintained, the meter will maintain an accuracy specification, to ensure your meter is performing at its peak, send it to the factory or a qualified instrument calibration facility for annual calibration. - Page 12 ________________________________________________ Blue - 100/80/30/5 34 Blue Yellow - 0/27/100/0 23 Yellow For service on this or any other REED product or information on other Red - 10/100/100/5 85 Red Yellow - 0/27/100/0 23 Yellow REED products, contact REED Instruments at info@reedinstruments.com...
Need help?
Do you have a question about the R3030: R3100 and is the answer not in the manual?
Questions and answers