
Related Manuals for Kramer TOOLS TP-10


Summary of Contents for Kramer TOOLS TP-10
-
Page 1: User Manual
Kramer Electronics, Ltd. USER MANUAL Models: TP-9, Audio / Video Line Transmitter TP-10, Audio / Video Line Receiver... -
Page 2: Table Of Contents
Figure 3: TP-9 Audio / Video Line Transmitter Underside Figure 4: TP-10 Audio / Video Line Receiver Figure 5: TP-10 Audio / Video Line Receiver – Top and Lower Side Panels Figure 6: Connecting the IR Emitter Figure 7: Audio / Video Distribution System up to 300ft (100m) UTP Cable... - Page 3 1 For example: model number AD2512C, part number 2535-000251 – No operator-serviceable parts inside unit. – Use only the Kramer Electronics input power – Disconnect power and unplug unit from wall 2900-9999992...
-
Page 4: Introduction
2 3.5mm to IR Emitter Control Cable (C-A35/IRE-10) 3 A separate power supply is included with each product. As an option, you can purchase the Kramer VA-50P 6 Port Universal 12-Volt Power Supply, enabling you to supply power to up to 6 Kramer devices that require 12VDC 4 Download up-to-date Kramer user manuals from the Internet at this URL: http://www.kramerelectronics.com... -
Page 5: Quick Start
2.1 Quick Start This quick start chart summarizes the basic setup and operation: Video Player Getting Started TP-9 Plasma Display KRAMER: SIMPLE CREATIVE TECHNOLOGY TP-10... -
Page 6: Overview
Overview Using the TP-9 Audio / Video Line Transmitter with the TP-10 Audio / Video Line Receiver constitutes an Audio / Video Line transmitter / receiver system. The TP-9 accepts the audio and video input signals, encodes and sends them to the CAT5 cable. -
Page 7: About The Power Connect Feature
This section describes the: TP-9 Audio / Video Line Transmitter, see section 4.1 TP-10 Audio / Video Line Receiver, see section 4.2 1 CAT5 cable is still suitable for the video/audio transmission, but not for feeding the power at these distances... -
Page 8: Your Tp-9 Audio / Video Line Transmitter
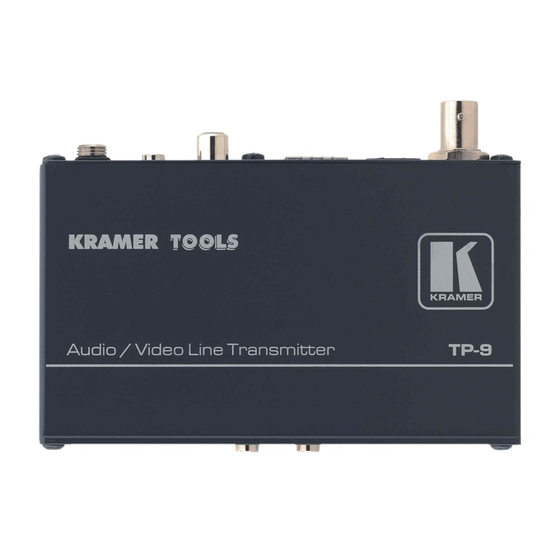
Your Audio / Video Line Transmitter and Line Receiver 4.1 Your TP-9 Audio / Video Line Transmitter Figure 1, Figure 2 and Table 1 define the TP-9 unit: Top Side Panel Lower Side Panel Figure 1: TP-9 Audio / Video Line Transmitter... -
Page 9: Figure 3: Tp-9 Audio / Video Line Transmitter Underside
1 Using a straight pin to pin UTP cable with RJ-45 connectors at both ends (the PINOUT is defined in Table 4 and Figure 8) Connects to the composite video source Connects to the s-Video source Connects to the LINE IN connector on the TP-10 Connects to the digital audio source +12V DC connector for powering the unit... -
Page 10: Your Tp-10 Audio / Video Line Receiver
Figure 4, Figure 5 and Table 3 define the TP-10 unit: Top Side Panel Lower Side Panel Figure 4: TP-10 Audio / Video Line Receiver Top Side Panel Lower Side Panel Figure 5: TP-10 Audio / Video Line Receiver – Top and Lower Side Panels... -
Page 11: Table 3: Features And Functions Of The
1 Using a straight pin to pin UTP cable with RJ-45 connectors at both ends (the PINOUT is defined in Table 4 and Figure 8) 2 If necessary (for example, when using a long cable), the adjustment range may be improved by opening the TP-10 cover... -
Page 12: Connecting An Audio / Video Distribution System
4. On the TP-9 underside, set the VIDEO switch to CV and the AUDIO switch to S/PDIF. 5. On each TP-9 / TP-10 unit, connect a 12V DC power adapter to the power socket and connect the adapter to the mains electricity (see section 3.1). -
Page 13: Figure 7: Audio / Video Distribution System Up To 300Ft (100M) Utp Cable
Connecting an Audio / Video Distribution System Be sure to place the TP-10 in such a way that the IR SENSOR window will be in the line-of-sight of your IR remote controller. You can now operate the video player via its IR remote controller from a distance. -
Page 14: Wiring The Cat 5 Line In / Line Out Rj-45 Connectors
Connecting an Audio / Video Distribution System 5.1 Wiring the CAT 5 LINE IN / LINE OUT RJ-45 Connectors Table 4 and Figure 8 define the CAT 5 PINOUT, using a straight pin-to-pin cable with RJ-45 connectors: Table 4: CAT 5 PINOUT EIA /TIA 568A Wire Color Green / White... -
Page 15: Technical Specifications
1 Specifications for 100m of CAT5 UTP cable, unless otherwise specified 2 Specifications are subject to change without notice Technical Specifications of the TP-9 / TP-10 TP-9: 1 composite video 1Vpp/75 on a BNC connector 1 s-Video 1Vpp/75 [Y], 0.3Vpp/75 [C] on a 4p connector 1 S/PDIF (digital audio) on an RCA connector 1 audio (analog audio) <8dBu on a 3.5mm mini connector... - Page 16 EXCLUSION OF DAMAGES The liability of Kramer for any effective products is limited to the repair or replacement of the product at our option. Kramer shall not be liable for: Damage to other property caused by defects in this product, damages based upon inconvenience, loss of use of the product, loss of time, commercial loss;...
- Page 17 For the latest information on our products and a list of Kramer distributors, visit our Web site: www.kramerelectronics.com, where updates to this user manual may be found. We welcome your questions, comments and feedback. Safety Warning: Disconnect the unit from the power supply before opening/servicing.
Need help?
Do you have a question about the TOOLS TP-10 and is the answer not in the manual?
Questions and answers