
Related Manuals for Kramer 622R


Summary of Contents for Kramer 622R
-
Page 1: User Manual
Kramer Electronics, Ltd. USER MANUAL Models: 622T, Dual Link DVI Optical Transmitter 622R, Dual Link DVI Optical Receiver... -
Page 2: Table Of Contents
Figure 1: 622T Dual Link DVI Optical Transmitter Figure 2: 622R Dual Link DVI Optical Receiver Figure 3: 622T and 622R Dual Link DVI Optical Transmitter and Receiver System Figure 4: Connecting the 622T/622R Dual Link DVI Optical Transmitter/Receiver Figure 5: CAT 5 PINOUT... -
Page 3: Introduction
GROUP 6: Accessories and Rack Adapters; GROUP 7: Scan Converters and Scalers; and GROUP 8: Cables and Connectors 2 When setting up a transmitter / receiver system you can connect the 12V power supplies to the transmitter and to the receiver simultaneously. -
Page 4: Getting Started
Does not require any special memory size, CPU speed and chipsets, when using a computer Is backward-compatible with the DVI 1.0 standard 1 The complete list of Kramer cables is on our Web site at http://www.kramerelectronics.com 2 Extended Display Identification Data 3 High-Bandwidth Digital Content Protection 4 Using DDC (Digital Display Channel), the display can inform the video card about its properties, such as the maximum resolution and the color depth. -
Page 5: Power Connect Feature
(often associated with low quality cables) Avoid interference from neighboring electrical appliances and position your Kramer 622R and 622T away from moisture, excessive sunlight and dust 3.1 Power Connect Feature The Power Connect feature lets you power a transmitter / receiver system by connecting just one power adapter to either the transmitter or the receiver. -
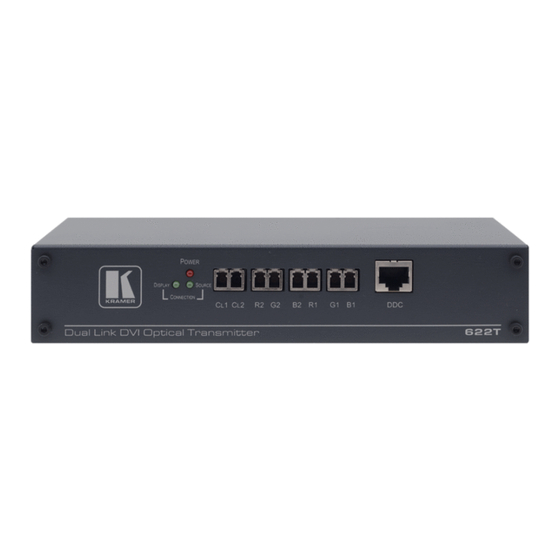
Page 6: Your 622T Dual Link Dvi Optical Transmitter
1 Using a UTP CAT5 cable with RJ-45 connectors at both ends (the PINOUT is defined in Table 3 and Figure 5) Function Lights when a DVI display is connected to the 622R Lights when a DVI source is detected... -
Page 7: Your 622R Dual Link Dvi Optical Receiver
Your Dual Link DVI Optical Transmitter/ Receiver 4.2 Your 622R Dual Link DVI Optical Receiver Figure 2 and Table 2 define the 622R Dual Link DVI Optical Receiver: Figure 2: 622R Dual Link DVI Optical Receiver Table 2: 622R Dual Link DVI Optical Receiver Features... -
Page 8: Using The Dual Link Dvi Optical Transmitter/Receiver
Carefully recheck the polarities and ensure that the duplex connectors are fully engaged. 1 Switch OFF the power on each device before connecting it to your 622T and 622R. After connecting your 622T and 622R, switch on its power and then switch on the power on each device... -
Page 9: Figure 4: Connecting The 622T/622R Dual Link Dvi Optical Transmitter/Receiver
Connect the 12V 2.1A DC power adapter to the power socket of either the 622T or the 622R and connect the adapter to the mains electricity (not shown). Turn the power on the source and the display to ON. Figure 4: Connecting the 622T/622R Dual Link DVI Optical Transmitter/Receiver... -
Page 10: Operating The 622T/622R Dual Link Dvi Optical Transmitter/Receiver
Make sure that your graphic card supports the maximum resolution of the display you are about to connect Avoid “hot plugging” the 622T or 622R. This is not a recommended practice with live digital voltages 5.3 Wiring the CAT 5 LINE IN / LINE OUT RJ-45 Connectors... -
Page 11: Technical Specifications
21.4cm x 10.35cm x 4.36cm (8.4" x 4.07" x 1.71", W, D, H) WEIGHT: 0.7 kg. (1.55 lbs.) approx. ACCESSORIES: Power supply, bracket installation kit, 1 DVI/DVI male to male cable 1 Specifications are subject to change without notice Technical Specifications of the 622T/622R 622R DVI OUT... - Page 12 EXCLUSION OF DAMAGES The liability of Kramer for any effective products is limited to the repair or replacement of the product at our option. Kramer shall not be liable for: Damage to other property caused by defects in this product, damages based upon inconvenience, loss of use of the product, loss of time, commercial loss;...
-
Page 13: Safety Warning
For the latest information on our products and a list of Kramer distributors, visit our Web site: www.kramerelectronics.com, where updates to this user manual may be found. We welcome your questions, comments and feedback. Safety Warning: Disconnect the unit from the power supply before opening/servicing.
Need help?
Do you have a question about the 622R and is the answer not in the manual?
Questions and answers