
Subscribe to Our Youtube Channel
Related Manuals for Apera Instruments SX725


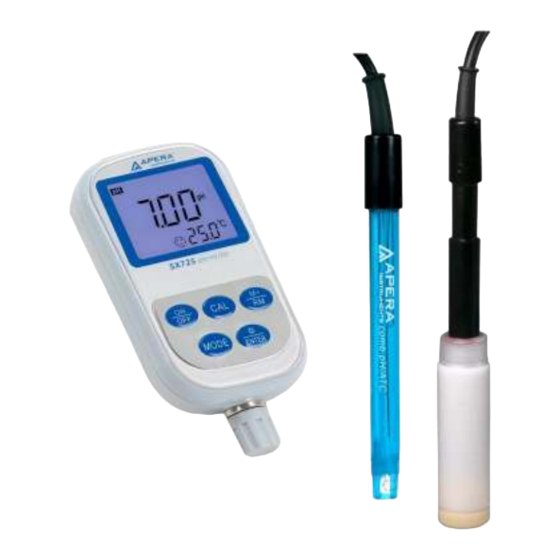
Summary of Contents for Apera Instruments SX725
- Page 1 SX725 Portable pH/DO Meter User Manual APERA Instruments (Europe) GmbH aperainst.de - 1 -...
-
Page 2: Table Of Contents
Table of Contents Brief Instruction ......................- 3 - Technical Specifications ....................- 3 - About the Meter ......................- 5 - What’s in the kit ......................- 6 - Preparation ........................- 7 - pH Measurement ......................- 7 - pH Electrode ...................... -
Page 3: Brief Instruction
Brief Instruction Thanks for purchasing Apera Instruments SX725 Portable pH/DO Meter (will be called “the meter” in short in the following content). Before using the meter, please read this instruction manual carefully in order to help you properly use and maintain it. - Page 4 2.2 ORP (mV) Measurement range (mV/ORP/EH) -1999mV to 0 to 1999mV Resolution Accuracy Meter: ±0.1% FS, Overall: ±15mV 2.3 Dissolved Oxygen Measurement range (0 to 19.99) mg/L (ppm); (0 to 200.0)% Resolution 0.1/0.01 mg/L (ppm) 1/0.1% Accuracy ±0.30 mg/L (ppm), including electrode error Response time ≤30s (25˚C, 90% response) Temp.
-
Page 5: About The Meter
About the Meter 3.1 Screen Display ① —— Parameter icon ② —— Measurement value ③ —— Serial number and icon as measurement to be saved and recalled and indication icon for special states. M+ — measurement value to be saved; RM —... -
Page 6: What's In The Kit
(d) When in mode, hold this key to change DO in turn: mg/L → ppm → %. Release the key when you confirm the selection. 3.2.5. — The key for data saving and recalling (a) When in measurement mode, short press to save the measurement data; Long press to recall the saved data. -
Page 7: Preparation
Preparation What you need in addition to what’s in the kit: Pure water (RO, distilled or deionized water) for rinsing off the electrode. pH Measurement Short press to turn on the meter. Connect 201T-S pH electrode to the meter (See Section 5 for connection tutorial). -
Page 8: Ph Electrode
6.1 pH Electrode The meter comes with the 201T-S 3-in-1 combination electrode with a built-in temperature sensor, which enables automatic temperature compensation. This electrode is only suitable for general water solutions’ pH testing. Please refer to Section 6.5 for ideal pH electrodes to use for other applications. A 3M KCL storage bottle comes with the electrode, which is for storing the electrode when not in use to keep the sensitivity of the probe. -
Page 9: Notes About Ph Calibration
flickering will show up, indicating the 2 point calibration has been finished and the meter is entering the 3 point calibration. 6.2.4. Rinse off the pH electrode in pure water and remove excess water, then insert it into the pH 10.01 buffer solution, make a quick stir and then hold it still. -
Page 10: Sample Test
6.4 Sample Test Power on the meter. Connect the pH electrode and the meter goes to pH measurement mode automatically. Screw off the KCL storage bottle. Rinse the electrode with pure water. Shake off excess water or blot-dry with clean tissue or kimwipe. Stir the electrode for a few seconds after it’s dipped into the sample solution and then hold it still. -
Page 11: Parameter Setting
Strong acid solutions, HF containing solutions (HF LabSen 831 concentration<1%) Strong alkaline solutions LabSen 841 Surface test (skin, paper, carpet, etc.) LabSen 371 TRIS buffer solutions LabSen 213, LabSen 223 Viscous solutions LabSen851-S, LabSen 851-H Wastewater or emulsion LabSen 333 * An 8-pin to BNC convertor (AI7103) is required to connect LabSen pH electrode to this meter. - Page 12 6.6.2 Pure water pH temperature compensation setting (P2) (a) Short press in P1, the meter enters mode P2, see picture (4-3). (b) Press to choose (pure water pH temperature compensation setting) or (c) Press to enter next parameter setting or press to confirm and return to measurement mode.
-
Page 13: Cleaning Ph Electrode
6.6.6 Auto power off time setting (P6) (a) Short press in P5 to enter P6, see picture (4-7). (b) Press to choose the time: 0min, 10min or 20min. The auto power off function will be closed if choosing 0 min. (c) Press to enter next parameter setting or press to confirm... -
Page 14: The Self-Diagnose Information
6.8 The Self-diagnose Information During usage, the following icons may show up on LCD. This is the meter’s self-diagnose information, which can help you understand what may go wrong with the meter or electrode. 4.6.1. The stable icon -2.00 pH or 19.99 pH — this icon appears when the pH value exceeds the measurement range. -
Page 15: Do Measurement
DO Measurement 7.1 Preparation before use 1) Connect the DO electrode (See Section 5 for connection tutorial). Then Press to power on. 2) Choose DO unit: Hold to switch among mg/L, ppm and %. When the desired unit shows up, release the button to confirm the unit selection. -
Page 16: Do Calibration (Saturated Oxygen)
7.2 DO Calibration (Saturated Oxygen) Power on the meter, press , the meter enters calibration mode, CAL will be flashing at the upper- right corner. Insert the DO electrode to the calibration sleeve, and tighten the sleeve cap. Let the electrode sit for 3 to 5 minutes. -
Page 17: Do Electrode Maintenance
b) Temperature has a large impact on DO measurement. When the electrode temperature and water temperature have larger difference, the reading time must be greater than 3 minutes. Otherwise, there could be some large errors. c) Salinity and barometric pressure also affect DO measurement. The meter has automatic salinity compensation and manual barometric pressure compensation. -
Page 18: Zero Oxygen Calibration
d) Add new inner solution (DO502) into a new membrane cap (DO503) slowly and do not let any air bubbles appear. If you found any air bubbles in the cap, carefully flick on the membrane cap to eliminate them. e) Place the membrane cap on the table and put in the electrode vertically, slowly twist in, and then screw on the cap tightly. -
Page 19: Salinity Calibration
7.7 Salinity Calibration Dissolved oxygen is also affected by salinity in water. The meter has automatic salinity compensation, and the salinity electrode is pre-calibrated before leaving the factory. In general, there is no need to perform salinity calibration. Salinity calibration is only needed when replacing a new electrode. - Page 20 7.9.2 Resolution selection (P1) (a) Press to enter P1 mode, see picture (4-2); (b) Press to choose resolution: 0.01 → 0.1; (c) Press to enter the next parameter setting or press return to the measurement mode. 7.9.3 Salinity calibration setting (P2) (a) In P1, short press to enter P2, see picture (4-3).
-
Page 21: Limited Warranty
We warrant this instrument to be free from defects in material and workmanship and agree to repair or replace free of charge, at option of APERA INSTRUMENTS (Europe) GmbH, any malfunctioned or damaged product attributable to responsibility of APERA INSTRUMENTS (Europe) GmbH for a period of THREE YEARS (SIX MONTHS for the electrode) from the delivery. -
Page 22: Appendix
Appendix 9.1 Appendix 1 Content of Saturated Oxygen in Water at Different Temperature Temperature Temperature Temperature °C mg/L °C mg/L °C mg/L 14.64 9.86 7.30 14.22 9.66 7.18 13.82 9.46 7.07 13.44 9.27 6.95 13.09 9.08 6.84 12.74 8.90 6.73 12.42 8.73 6.63... -
Page 23: Appendix 2 Content Of Saturated Oxygen At Different Barometric Pressure
9.2 Appendix 2 Content of Saturated Oxygen at Different Barometric pressure Barometric pressure Dissovled Oxygen Concentration (mg/L) mmHg 15°C 25°C 35°C 100.00 9.94 8.14 6.85 100.13 9.96 8.15 6.86 100.26 9.97 8.16 6.87 100.40 9.98 8.17 6.88 100.53 9.99 8.18 6.89 100.66 10.00... -
Page 24: Appendix 3 Content Of Oxygen At Different Altitude
16000 4878 63.38 5.16 6500 1982 80.03 6.52 17000 5183 62.58 5.10 7000 2134 78.56 6.40 18000 5488 61.79 5.03 APERA INSTRUMENTS (Europe) GmbH Address: Wilhelm-Muthmann-Str.18 42329 Wuppertal, Germany Tel: +49 202 51988998 Email: info@aperainst.de Website: aperainst.de - 24 -...
Need help?
Do you have a question about the SX725 and is the answer not in the manual?
Questions and answers