
Related Manuals for Apera Instruments SX811-PW


Summary of Contents for Apera Instruments SX811-PW
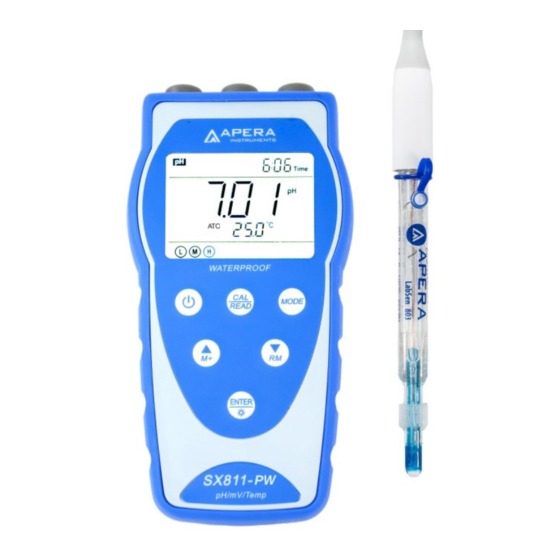
- Page 1 SX811-PW Portable pH Meter for Purified Water Instruction Manual APERA INSTRUMENTS (Europe) GmbH www.aperainst.de - 1 -...
-
Page 2: Table Of Contents
Brief Introduction ......................- 4 - Features ..........................- 4 - Features of the LabSen 803 Glass pH Electrode ..............- 4 - Proper use and maintenance of the LabSen 803 Electrode ............. - 5 - Technical Specifications....................- 6 - Instrument Technical Specs.................... - Page 3 Data processing ........................- 23 - What’s in the box ......................- 23 - Warranty ........................- 24 - Appendix I: Parameter setup and factory default setup ..........- 24 - Appendix II: Abbreviation glossary ................- 25 - Appendix III: Self-diagnosis information ..............- 25 - Recommended pH Electrodes for Other Specific Applications ........
-
Page 4: Brief Introduction
Brief Introduction Thank you for purchasing the Apera Instruments SX811-PW Portable pH Meter kit. This device is an outstanding combination of advanced electrical, sensor technology and software design. The meter is equipped with LabSen 803 pH Electrode, designed for testing pH levels of purified water such as drinking water, RO water, distilled water, deionized water and other low ion-concentration liquid in an accurate and convenient manner. -
Page 5: Proper Use And Maintenance Of The Labsen 803 Electrode
1.3 Proper use and maintenance of the LabSen 803 Electrode 1.3.1 How to Use the Movable Sleeve As shown on the right picture, reference solution flows out of the small hole, seeps through the surface of movable sleeve. You may adjust the degree of firmness when use. -
Page 6: Technical Specifications
reaction of electrode. e) The electrode’s measuring tip should be soaked in the storage bottle containing 3M KCL storage solution to keep the membrane hydrated and junction unblocked. When measuring, please unscrew the bottle cap, pull out the electrode and rinse it with deionized or distilled water. After using, please put the electrode back into the bottle and screw tight the cap. -
Page 7: Electrode Technical Specs
2.3 Electrode Technical Specs Housing Material Lead-free Glass Temperature sensor NTC 30KΩ Junction Movable Sleeve Reference Electrode Silver Ion Trap Electrolyte 3M KCL Shape of glass membrane Cylindrical Range 0 to 11 pH Temperature Range 0 to 80˚C (32 to 176˚F) Connector BNC and RCA Instrument Description... -
Page 8: Keypad
special display mode (10) — Storage and recall icons M+ — Measurement to be stored icon, RM — Reading to be recalled icon (11) — Temperature value and prompts of special display mode (12) — Automatic reading lock-up icon (13) — Temperature compensation icons ATC —... - Page 9 Table – 1 Keypad operations and descriptions Keypad Operations Descriptions Short press ⚫ Press this key to turn on or turn off the meter. Select measurement parameters: Short press → ⚫ pH meter: Long press ⚫ In measurement mode, press this key to enter main menu. ⚫...
-
Page 10: Display Mode
3.3 Display mode 3.3.1 Reading stability display mode When the measuring value is stable, smiley icon appears on LCD, see Diagram – 3. If icon does not appear or flash, please do not get the reading value or make calibration until the measuring value is stable. Diagram - 3 3.3.2 Automatic lock-up display mode Select On from parameter P4.6 to turn on automatic lock-up display... -
Page 11: Ph Measurement
pH Measurement 4.1 Information regarding pH Calibration 4.1.1 Things needed in addition to what’s included in the kit A clean cup, distilled water (8-16oz), and tissue papers for rinsing and drying the probe. 4.1.2 Electrode Connectors The pH electrode has two connectors: the BNC connector connects the pH probe; the RCA connector connects the temperature sensor. - Page 12 4.1.5 3-Point Calibration The meter can adopt 1 to 3 points’ calibration. The 1 point must be using 7.00 pH (or 6.86 pH) buffer solution, and then choose other buffers to do 2 point and 3 point. Please refer to Table-3 for details. In the process of calibration, the slope of acidity range and alkalinity range will be displayed.
-
Page 13: Ph Calibration (Use 3-Point, Usa Standard As An Example)
4.1.8 Check calibration time In this mode, users can see the date and time of last calibration so as to help them determine if there is need to calibrate. For details, please see parameter setting P1.3 (Section 6.3) 4.1.9 Change temperature manually When temperature electrode is not connected, long press , the temperature will flash, and then short press or long press... -
Page 14: Customized Calibration
10.01 pH, stable icon displays on LCD. Press key to calibrate the meter. End icon and electrode slope of alkalinity range display after calibration is done. The meter returns to the measurement mode, displays stable measuring value and calibration guide icons. Please see Diagram–9 for the above calibration process. -
Page 15: Sample Test
4.4 Sample test 1) Rinse pH electrode in distilled water, dry it, and dip it in sample solution. Stir the solution gently and let it stand still in the sample solution until the stable value and icon appears on LCD, get the reading which is pH value of sample solution, please refer to Diagram-12 for calibration and measurement process of pH meter. - Page 16 Chart – 6 Self-diagnosis information of pH measurement mode Display Contents Checking Icons 1.Check whether pH buffer solution is correct. 2.Check whether the meter connects the Wrong pH buffer solution or the buffer electrode properly. solution out of range. 3.Check whether the electrode is damaged. Press key when measuring value is Press...
-
Page 17: Mv Measurement
mV measurement 5.1 ORP measurement Press key, and switch the meter to mV measurement mode. Connect ORP electrode (sold separately) and dip it in sample solution, stir the solution briefly and allow it to stay in the solution until icon appears and get the reading which is ORP value. -
Page 18: Submenu Of Ph Parameter Setup
Main menu of parameter setup Submenu of pH parameter setup P1.1 Select pH standard solution series P1.2 Set calibration due date P1.3 Check date of last calibration P1.4 Set pH measurement of purified water P1.5 Set pH measurement of pure water mixed with ammonia P1.6 Restore to factory default setting Submenu of basic parameter setup... - Page 19 P1.2. – Set due calibration (NO – H00 – D00) 1. When press key, No flashes, then press key, H flashes, then press key, D flashes. 2. When H flashes, press key, 00 flashes. Press key to adjust hours (0-99 hours), press key to confirm.
-
Page 20: Submenu Of Basic Parameter Setup
6.4 Submenu of basic parameter setup (press key or key to switch) P4.1. – Adjust timing storage time 1. In mode P4.0, press key to enter in mode P4.1, refer to the left diagram: “00:”: hours (0-99), “:00”: minutes (0-59). 2. -
Page 21: Usb Communication
P4.6. – Set automatic lock-up function 1. Press key, “Off” flashes, then press key, “On” flashes. When the parameter flashes, press key to confirm. Off: not set, On: set (the > reading is automatically locked when stabilizes 10 seconds.) 2. After confirming the parameter, press key to enter in P4.7 mode or press key to return to the measurement mode. -
Page 22: Load Software
Diagram -13 1 — Meter serial number 2 — Stored value display area 3 — Keys Clear — press this key to clear the data Download — press this key to download the data from the meter to the computer, pH, mV, conductivity and dissolved oxygen are classified in the file. - Page 23 Press “Export” key to export the stored value to Microsoft Excel file and then analyze or print the stored data. What’s in the box Contents Quantity SX811-PW Portable pH Meter LabSen803 Purified Water pH/Temp. Electrode, pH standard buffer (4.00pH/7.00pH/10.01pH /50mL each) One of each 3M KCL Electrode Storage solution (50 ml)
- Page 24 We warrant this instrument to be free from defects in material and workmanship and agrees to repair or replace free of charge, at option of APERA INSTRUMENTS (Europe) GmbH, any malfunctioned or damaged product attributable to responsibility of APERA INSTRUMENTS (Europe) GmbH for a period of two years from the delivery (a six-month limited warranty applies to probes).
- Page 25 11 Appendix II: Abbreviation glossary Code and Modes Prompts Description abbreviation P1.1 Standard buffer solution P1.2 Due for calibration P1.3 P1.0 P1.4 Distilled water Distilled water mixed with P1.5 ammonia P1.6 Factory default setting P4.1 P4.2 P4.3 Backlight P4.0 P4.4 Auto power-off Basic P4.5...
- Page 26 Viscous liquid samples LabSen 223, LabSen851-1 Wastewater or emulsion LabSen 333 * Visit http://www.aperainst.de/ or contact us at info@aperainst.de for more details. APERA INSTRUMENTS (Europe) GmbH Wilhelm-Muthmann-Straße 18 42329 Wuppertal Germany Contact: info@aperainst.de Website: www.aperainst.de Tel. +49 202 51988998 - 26 -...
Need help?
Do you have a question about the SX811-PW and is the answer not in the manual?
Questions and answers