Table of Contents
Advertisement
Available languages
Available languages
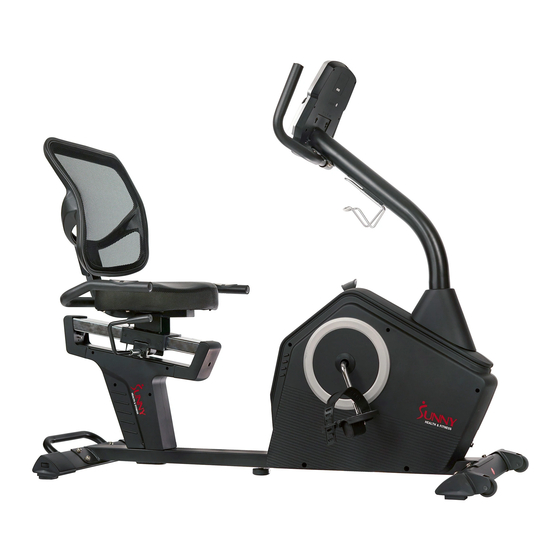
PROGRAMMABLE RECUMBENT BIKE
IMPORTANT! Please retain owner's manual for maintenance and adjustment instructions. Your satisfaction is very
English, Page 11~22
important
support@sunnyhealthfitness.com or 1-877-90SUNNY (877-907-8669).
Español, Page 23~36
¡ IMPORTANTE! Por favor, conserve el manual del usuario para las instrucciones de mantenimiento y ajuste. Su
satisfacció n es muy importante para nosotros, SI AL PRODUCTO LE HACE FALTA PARTES, POR FAVOR NO
LO DEVUELVA HASTA TENER CONTACTO CON NOSOTROS: support@sunnyhealthfitness.com o al
1-877-90SUNNY (877-907-8669).
IMPORTANT! Veuillez conserver le manuel du propriétaire pour les instructions de réglage et d'entretien. Votre
Franç ais, Page 37~50
satisfaction est trè s importante pour nous, VEUILLEZ NE PAS EFFECTUER DE RETOUR AVANT DE NOUS
AVOIR CONTACTÉ : support@sunnyhealthfitness.com ou 1-877-90SUNNY (877-907-8669).
Deutsch, Seite 51~63
SF-RB4850
USER MANUAL
to
us,
PLEASE
WICHTIG! Bitte bewahren Sie das Benutzerhandbuch für Wartungs- und Einstellanweisungen auf. Ihre
Zufriedenheit ist besonders wichtig für uns, BITTE SCHICKEN SIE DAS PRODUKT NICHT ZURÜCK, BEVOR
SIE SICH MIT UNS IN VERBINDUNG GESETZT HABEN: support@sunnyhealthfitness.com oder
1-877-90SUNNY (877-907-8669).
DO
NOT
RETURN
0
UNTIL
YOU
HAVE
CONTACTED
US:
Advertisement
Table of Contents

Related Manuals for Sunny Health & Fitness SF-RB4850


Summary of Contents for Sunny Health & Fitness SF-RB4850
- Page 1 PROGRAMMABLE RECUMBENT BIKE SF-RB4850 USER MANUAL IMPORTANT! Please retain owner’s manual for maintenance and adjustment instructions. Your satisfaction is very English, Page 11~22 important PLEASE RETURN UNTIL HAVE CONTACTED support@sunnyhealthfitness.com or 1-877-90SUNNY (877-907-8669). Español, Page 23~36 ¡ IMPORTANTE! Por favor, conserve el manual del usuario para las instrucciones de mantenimiento y ajuste. Su satisfacció...
-
Page 2: Important Safety Information
IMPORTANT SAFETY INFORMATION We thank you for choosing our product. To ensure your safety and health, please use this equipment correctly. It is important to read this entire manual before assembling and using the equipment. Safe and effective use can only be achieved if the equipment is assembled, maintained, and used properly. -
Page 3: Informations De Sécurité Importantes
INFORMATIONS DE SÉCURITÉ IMPORTANTES Nous vous remercions d’avoir choisi notre produit. Pour votre santé et votre sécurité, veuillez utiliser correctement cet appareil. Il est important de lire entièrement le présent manuel avant d’assembler l’appareil et de l’utiliser. L’utilisation sûre et efficace n’est possible que si l’appareil est correctement assemblé, entretenu et utilisé. -
Page 4: Exploded Diagram
EXPLODED DIAGRAM 1... - Page 5 EXPLODED DIAGRAM 2...
-
Page 6: Parts List
PARTS LIST Description Spec. Qty. Description Spec. Qty. Main Frame Plate Handlebar Post Allen Screw M6X10 Seat Tube Axle Handlebar Flat Washer D12Xd5X1 Front Stabilizer Bottle Holder Rear Stabilizer Adaptor Armrest Extension Wire 2 Adjustment Handle Flat Washer D6XФ12X1 Carriage Bolt M8XL45 Screw M8X20... -
Page 7: Lista De Piezas
Pulse Sensor Sensor Extension Wire 2 Meter Sensor Extension Wire 1 100a Meter Wire A Sensor Seat 100b Meter Wire B Sensor Wire LISTA DE PIEZAS n.° Descripción Especificaciones Cant. n.° Descripción Especificaciones Cant. Estructura Principal Bloque Superior Barral del Manubrio Tubo Vertical Manubrio Rueda... -
Page 8: Liste Des Éléments
Cubierta del Soporte del Caja de Rodamientos 98L/R 1 pr. Asiento Tuerca Sensor de Pulso Arandela Plana Medidor Cable de Tensión 100a Cable del Medidor A Cinta 100b Cable del Medidor B Cable de Extensió n de Tornillo Hexagonal M6X15 Sensor 2 Cable de Extensió... - Page 9 Roulement Boî tier de Roulement Ф12XФ15,5X0,3 Rondelle Ondulé e Écrou Plaque Fixe Rondelle Plate Bloc de Roulements Câble de Tension Rondelle à Ressort Courroie Ressort de Tension Vis Hexagonale M6X15 Boulon M5X60 Clé Tricoise S13,S14,S15 Écrou Hexagonale Clé Allen Roue Libre Clé...
- Page 10 Unterlegscheibe D6XФ12X1 83L/R Kettenabdeckung 1 Paar Kurbelabdeckung Magnetplatinenachse Sechskantmutter D6XФ16X1,5 Unterlegscheibe Beilagscheibe Bolzen Schraubenmutter D10XФ14X1 Unterlegscheibe Kugellager Nylonmutter Lagergehä use Schraube M6X10 Schraubenmutter Schraube M6X8 Unterlegscheibe Stecker Spannkabel Schwungradachse Riemen Schwungrad Sechskantschraube M6X15 Kugellager Schraubenschlü ssel S13,S14,S15 Ф12XФ15,5X0,3 Wellenscheibe Inbusschlü ssel Fixierte Platte Inbusschlü...
-
Page 11: Hardware Package
HARDWARE PACKAGE #41 M6X40 4PCS #21 ST4.2X18 1PC #11 D8XФ16X1.5 4PCS #20 M8X16 4PCS #15 1PC #42 D6XΦ16X1.2 4PCS #96 S5 1PC #95 S13, S14, S15 1PC #97 S6 1PC Ordering Replacement Parts (U.S. and Canadian Customers only) Please provide the following information in order for us to accurately identify the part(s) needed: ✓... - Page 12 ASSEMBLY INSTRUCTIONS We value your experience using Sunny Health and Fitness products. For assistance with parts or troubleshooting, please contact us at support@sunnyhealthfitness.com or 1-877-90SUNNY (877-907-8669). STEP 1: Remove 2 Shipping Tubes (No. D), 8 Screws (No. 20), 8 Spring Washers (No. 12) and 8 Flat Washers (No.
- Page 13 We value your experience using Sunny Health and Fitness products. For assistance with parts or troubleshooting, please contact us at support@sunnyhealthfitness.com or 1-877-90SUNNY (877-907-8669). STEP 3: Remove 4 Screws (No. 20), 4 Spring Washers (No. 12) and 4 Arc Washers (No. 22) from the Main Frame (No.
- Page 14 We value your experience using Sunny Health and Fitness products. For assistance with parts or troubleshooting, please contact us at support@sunnyhealthfitness.com or 1-877-90SUNNY (877-907-8669). STEP 5: Remove 4 Screws (No. 10), 4 Spring Washers (No. 12) and 4 Flat Washers (No. 11) from the Rail (No.
- Page 15 We value your experience using Sunny Health and Fitness products. For assistance with parts or troubleshooting, please contact us at support@sunnyhealthfitness.com or 1-877-90SUNNY (877-907-8669). STEP 6: Remove 2 Screws (No. 19) from the Main Frame (No. 1) using Spanner (No. 95). Then attach 2 Rail Covers (No.
-
Page 16: Adjustment Guide
ADJUSTMENT GUIDE ADJUSTING THE LEVEL If the recumbent bike is not level, turn the dials on the Rear End Caps (No. 32L/R) to adjust. Turn counter-clockwise to raise and turn clockwise to lower. ADJUSTING THE SEAT To move the Seat (No. 38) forward or backward, while seated on the recumbent bike, put your feet on the floor. -
Page 17: Key Functions
IMPORTANT RECUMBENT BIKE INFORMATION WARNING: This recumbent bike requires a power source of 1 amp (100-240V) in order to properly operate. For your safety, as well as the safety of others, please verify that the power source is correct before plugging in the equipment. Any power source above or below this level could cause significant damage to the equipment and/or user. -
Page 18: Workout Parameters
ODO (ODOMETER): Displays the total accumulated distance from 0 to 9999 miles. CAL (CALORIES): Accumulates the calories burned from 0 to 9999. Users can preset the target calories they want to burn. WATT: Displays current watt. HEART RATE: Displays the current heart rate in beats per minute. TARGET HR. - Page 19 PROGRAM OPERATION: MANUAL PROGRAM (P1) Program profile SETTING PARAMETERS FOR MANUAL PROGRAM 1. Select MANUAL PROGRAM (P1) using the UP or DOWN key, then press ENTER key. 2. TIME will flash so the value can be adjusted using the UP or DOWN key. 3.
- Page 20 There are 12 pre-set programs ready for use. All program profiles have 16 levels of resistance. SETTING PARAMETERS FOR PRE- SET PROGRAMS 1. Select one of the PRE- SET PROGRAMS using the UP or DOWN key, then press ENTER key. TIME will flash so the value can be adjusted using the UP or DOWN key.
- Page 21 will flash so Gender can be adjusted using the UP or DOWN key. Press the ENTER key to save gender and move to the next data. “5’8 (inches)” of Height will flash so Height can be adjusted using the UP or DOWN key. Press ENTER key to save the value and move to the next data.
- Page 22 There are 4 selections for target pulse (HR): HRC - 55% TARGET HR= 55% of (220-AGE) HRC - 65% TARGET HR= 65% of (220-AGE) HRC - 75% TARGET HR= 75% of (220-AGE) HRC - 85% TARGET HR= 85% of (220-AGE) SETTING PARAMETERS FOR HEART RATE CONTROL PROGRAMS 1.
-
Page 23: Troubleshooting
TROUBLESHOOTING PROBLEM POSSIBLE CAUSE CHECK SOLUTION Plug in the cables again Check if all the cables are and power on, then well plugged in, or check if The motor couldn’t find press MODE the pins on the cables are E1-1 ENTER buttons at the its start point. -
Page 24: Instrucciones De Montaje
INSTRUCCIONES DE MONTAJE Valoramos su experiencia con los productos de Sunny Health and Fitness. Para obtener ayuda con piezas resolver algún problema, escrí banos dirección correo support@sunnyhealthfitness.com,o llámenos al 1-877-90SUNNY (877-907-8669). PASO 1: Retire 2 Tubos de Enví o (n.° D), 8 Tornillos (n.°... - Page 25 Valoramos su experiencia con los productos de Sunny Health and Fitness. Para obtener ayuda con piezas resolver algún problema, escrí banos dirección correo support@sunnyhealthfitness.com,o llámenos al 1-877-90SUNNY (877-907-8669). PASO 3: Retire 4 Tornillos (n.° 20), 4 Arandelas de Resorte (n.° 12) y 4 Arandelas de Arco (n.° 22) de la Estructura Principal (n.°...
- Page 26 Valoramos su experiencia con los productos de Sunny Health and Fitness. Para obtener ayuda con piezas resolver algún problema, escrí banos dirección correo support@sunnyhealthfitness.com,o llámenos al 1-877-90SUNNY (877-907-8669). PASO 5: Retire 4 Tornillos (n.° 10), 4 Arandelas de Resorte (n.° 12) y 4 Arandelas Planas (n.° 11) de la Barra (n.°...
- Page 27 Valoramos su experiencia con los productos de Sunny Health and Fitness. Para obtener ayuda con piezas resolver algún problema, escrí banos dirección correo support@sunnyhealthfitness.com,o llámenos al 1-877-90SUNNY (877-907-8669). PASO 6: Retire 2 Tornillos (n.° 19) de la Estructura Principal (n.° 1) con la Llave Inglesa (n.° 95). Luego, conecte 2 Cubiertas de Barra (n.°...
-
Page 28: Guí A De Ajustes
GUÍ A DE AJUSTES AJUSTE DEL NIVEL Si la bicicleta no está nivelada, gire los diales de las Tapas de Extremo Trasero (n.° 32L/R) para ajustarla. Gire hacia la izquierda para subir y hacia la derecha para bajar. AJUSTE DEL ASIENTO Para mover el Asiento (n.°... -
Page 29: Instrucciones De Uso
INFORMACIÓN IMPORTANTE SOBRE LA BICICLETA RECLINADA ADVERTENCIA: Esta bicicleta reclinada requiere una fuente de alimentación de 1 amperio (100-240 voltios) para funcionar correctamente. Para su seguridad y para la seguridad de los demá s, verifique que la fuente de alimentación sea la correcta antes de enchufar el equipo. - Page 30 FUNCIONES: SPEED (VELOCIDAD): Muestra la velocidad actual de entrenamiento. La velocidad má xima es de 99,9 MPH. RPM (REVOLUCIONES POR MINUTO): Muestra las revoluciones por minuto actuales. TIME (TIEMPO): Acumula el tiempo de entrenamiento de 0:00 a 99:59. Los usuarios pueden preestablecer el tiempo objetivo que deseen.
- Page 31 Cuando pantalla está configurada 0,00, DISTANCIA cuenta hacia DISTANCIA 0,00~999,0 0,00 ±1,00 adelante. Cuando DISTANCIA establece 1,00~999,0, cuenta hacia atrás hasta 0.00. 1. Cuando la pantalla se establece 0.00, CALORÍ AS cuentan hacia arriba. CALORÍ AS 0.00~9995 0.00 ±5.00 Cuando CALORÍ...
- Page 32 PROGRAMAS PREESTABLECIDOS (P2~P13) Perfil del programa Hay 12 programas preestablecidos listos para usar. Todos los perfiles de programa tienen 16 niveles de resistencia. CONFIGURACIÓN DE PARÁMETROS PARA PROGRAMAS PREESTABLECIDOS 1. Seleccione uno de los PROGRAMAS PREESTABLECIDOS usando el botón UP (ARRIBA) o DOWN (ABAJO), luego presione ENTER (INGRESAR).
- Page 33 PROGRAMA DE CONTROL DE VATAJE (P14) Perfil del programa CONFIGURACIÓN DE PARÁMETROS PARA EL PROGRAMA DE CONTROL DE VATAJE 1. Seleccione el PROGRAMA DE CONTROL DE VATAJE (P14) usando el botón UP (ARRIBA) o DOWN (ABAJO), luego presione ENTER (INGRESAR). 2.
- Page 34 Presione el botón START/STOP (INICIAR/DETENER) para iniciar la medición. Recuerde también agarrar los manubrios de pulso. Después de 15 segundos, la pantalla mostrará el porcentaje de grasa corporal, BMR (tasa metabólica basal), BMI (í ndice de masa corporal) y BODY TYPE (TIPO DE CUERPO).
- Page 35 Hay 4 selecciones para el pulso objetivo (HR): HRC - 55% TARGET HR= 55% de (220-AGE) HRC - 65% TARGET HR= 65% de (220-AGE) HRC - 75% TARGET HR= 75% de (220-AGE) HRC - 85% TARGET HR= 85% de (220-AGE) CONFIGURACIÓN DE PARÁMETROS PARA EL PROGRAMMA DE CONTROL DE FRECUENCIA CARDÍ...
- Page 36 2. TIME (TIEMPO) parpadeará para que el valor se pueda ajustar con el botón UP (ARRIBA) o DOWN (ABAJO). 3. Presione el botón ENTER (INGRESAR) para guardar los valores y pasar al siguiente pará metro por ajustar. NOTA: Si configura el tiempo objetivo para el entrenamiento, el siguiente parámetro de DISTANCIA no se puede ajustar.
-
Page 37: Solución De Problemas
SOLUCIÓN DE PROBLEMAS PROBLEMA POSIBLE CAUSA VERIFICAR SOLUCIÓN Compruebe si todos los cables están bien Enchufe de nuevo los cables enchufados, y enciéndalos, luego pulse motor pudo compruebe si las clavijas botones MODE E1-1 encontrar su punto de de los cables están mal ENTER al mismo tiempo arranque. -
Page 38: Instructions D'assemblage
INSTRUCTIONS D’ASSEMBLAGE Votre expérience d’utilisation des produits Sunny Health and Fitness compte pour nous. Pour obtenir de l’aide avec les pièces et le dépannage, veuillez nous contacter à l’adresse: support@sunnyhealthfitness.com ou au 1-877-90SUNNY (877-907-8669). ÉTAPE 1: Retirer les 2 Tubes d’Expédition (Nº D), les 8 Vis (Nº... - Page 39 Votre expérience d’utilisation des produits Sunny Health and Fitness compte pour nous. Pour obtenir de l’aide avec les pièces et le dépannage, veuillez nous contacter à l’adresse: support@sunnyhealthfitness.com ou au 1-877-90SUNNY (877-907-8669). ÉTAPE 3: Retirer les 4 Vis (Nº 20), les 4 Rondelles à Ressort (Nº...
- Page 40 Votre expérience d’utilisation des produits Sunny Health and Fitness compte pour nous. Pour obtenir de l’aide avec les pièces et le dépannage, veuillez nous contacter à l’adresse: support@sunnyhealthfitness.com ou au 1-877-90SUNNY (877-907-8669). ÉTAPE 5: Retirer les 4 Vis (Nº 10), les 4 Rondelles à Ressort (Nº...
- Page 41 Votre expérience d’utilisation des produits Sunny Health and Fitness compte pour nous. Pour obtenir de l’aide avec les pièces et le dépannage, veuillez nous contacter à l’adresse: support@sunnyhealthfitness.com ou au 1-877-90SUNNY (877-907-8669). ÉTAPE 6: Retirer 2 Vis (Nº 19) du Cadre Principal (Nº 1) à...
- Page 42 GUIDE DE RÉGLAGE RÉGLAGE DU NIVEAU Si le vélo n’est pas de niveau, tourner les cadrans situés sur les Embouts d’Extré mité Arrière (Nº 32L/R) pour le niveler. Tourner dans le sens antihoraire pour élever et dans le sens horaire pour abaisser.
-
Page 43: Instructions D'utilisation
DÉTAILS IMPORTANTS SUR LE VÉLO À POSITION ALLONGÉE AVERTISSEMENT: Ce vélo à position allongée nécessite une alimentation de 1 ampère (100-240V) pour fonctionner correctement. Pour la sécurité de l’utilisateur et celle des autres, il faut vérifier que la source d’alimentation est appropriée avant de brancher l’appareil. Toute source d’alimentation à... - Page 44 Manual (Manuel), Pre-set Programs (Programmes prédé finis), Watt Program (Programme Watt), Body Fat Program (Programme pour graisse corporelle), Target Heart Rate Program (Programme avec choix de la fréquence cardiaque cible), Heart Rate Control Programs (Programmes avec contrôle de la fréquence cardiaque), et User Programs (Programmes utilisateur). FONCTIONS: SPEED (VITESSE): Affiche la vitesse d’exercice actuelle.
-
Page 45: Fréquence Cardiaque
Plus de dé tails sur les paramètres de l’entraî nement Valeur Plage de Incrément/ Terrain Description réglage Décrément défaut 1. Lorsque l’affichage est réglé sur 0:00, la DURÉE est comptée progressivement. 0:00 à DURÉE 0:00 ±1:00 2. Lorsque la DURÉE est définie 99:00 pour être comprise entre 1:00 et 99:00,... - Page 46 FONCTIONNEMENT DU PROGRAMME: PROGRAMME MANUEL (P1) Profil du programme RÉGLAGE DES PARAMÈTRES DU PROGRAMME MANUEL 1. Sélectionner MANUAL PROGRAM (PROGRAMME MANUEL) (P1) à l’aide de la touche UP (HAUT) ou DOWN (BAS), puis appuyer sur ENTER (ENTRÉE). 2. TIME (DURÉE) se mettra à clignoter pour que la valeur puisse être réglée à l’aide de la touche UP (HAUT) ou DOWN (BAS).
- Page 47 Il existe 12 programmes préétablis prêts à être utilisés. Tous les profils de programme comprennent 16 niveaux de résistance. RÉGLAGE DES PARAMÈTRES DES PROGRAMMES PRÉÉTABLIS 1. Sélectionner l’un des PRE-SET PROGRAMS (PROGRAMMES PRÉÉTABLIS) à l’aide de la touche UP (HAUT) ou DOWN (BAS), puis appuyer sur ENTER (ENTRÉE). TIME (DURÉE) se mettra à...
- Page 48 REMARQUE: Une fois que les paramètres de l’entraînement auront entamé le compte à rebours jusqu’à zéro, le système émet un signal sonore et arrête automatiquement l’entraînement. 5. Appuyer sur la touche START (MARCHE) pour poursuivre l’entraînement et atteindre le paramètre d’entraînement non atteint. L’ordinateur règle automatiquement la charge de résistance en fonction de la vitesse pour maintenir la valeur de la puissance électrique constante.
- Page 49 PROGRAMME AVEC CHOIX DE LA FRÉQUENCE CARDIAQUE CIBLE (P16) Profil du programme RÉGLAGE DES PARAMÈTRES DU PROGRAMME AVEC CHOIX DE LA FRÉQUENCE CARDIAQUE CIBLE 1. Sélectionner TARGET HR PROGRAM (PROGRAMME AVEC CHOIX DE LA FRÉQUENCE CARDIAQUE CIBLE) (P16) à l’aide de la touche UP (HAUT) ou DOWN (BAS), puis appuyer sur ENTER (ENTRÉE).
- Page 50 3. Appuyer sur la touche ENTER (ENTRÉE) pour sauvegarder la valeur et passer au paramètre suivant à régler. REMARQUE: Si l’utilisateur définit la durée cible pour l’entraînement, le prochain paramètre de DISTANCE ne peut pas être réglé. 4. Passer en revue tous les paramè tres souhaités en appuyant sur la touche START/STOP (MARCHE/ARRÊT) pour démarrer la séance d’entraînement.
-
Page 51: Dépannage
DÉPANNAGE PROBLÈME CAUSE POSSIBLE VÉRIFICATION SOLUTION Vérifiez tous Rebranchez câbles câbles sont bien mettez-les sous tension, puis Le moteur n'a pas branchés, appuyez simultanément sur les E1-1 trouvé son point de broches des câbles sont boutons MODE et ENTER pour départ. - Page 52 MONTAGEANLEITUNG Wir schätzen Ihre Erfahrung im Umgang mit den Produkten von Sunny Health and Fitness. Für Fragen zu Teilen oder Hilfe bei der Fehlerbehebung kontaktieren Sie uns bitte unter support@sunnyhealthfitness.com oder 1-877-90SUNNY (877-907-8669). SCHRITT 1: Entfernen Sie mit dem Inbusschlüssel (Nr. 97) 2 Versandhülsen (Nr.
- Page 53 Wir schä tzen Ihre Erfahrung im Umgang mit den Produkten von Sunny Health and Fitness. Für Fragen zu Teilen oder Hilfe bei der Fehlerbehebung kontaktieren Sie uns bitte unter support@sunnyhealthfitness.com oder 1-877-90SUNNY (877-907-8669). SCHRITT 3: Entfernen Sie mit dem Inbusschlüssel (Nr. 97) 4 Schrauben (Nr.
- Page 54 Wir schätzen Ihre Erfahrung im Umgang mit den Produkten von Sunny Health and Fitness. Für Fragen zu Teilen oder Hilfe bei der Fehlerbehebung kontaktieren Sie uns bitte unter support@sunnyhealthfitness.com oder 1-877-90SUNNY (877-907-8669). SCHRITT 5: Entfernen Sie mit dem Inbusschlüssel (Nr. 97) 4 Schrauben (Nr.
- Page 55 Wir schätzen Ihre Erfahrung im Umgang mit den Produkten von Sunny Health and Fitness. Für Fragen zu Teilen oder Hilfe bei der Fehlerbehebung kontaktieren Sie uns bitte unter support@sunnyhealthfitness.com oder 1-877-90SUNNY (877-907-8669). SCHRITT 6: Entfernen Sie mit dem Schraubenschlüssel (Nr. Schrauben (Nr.
-
Page 56: Einstellen Des Sitzes
EINSTELLUNGSANLEITUNG NIVELLIEREN Wenn das Fahrrad nicht eben ausgerichtet ist, drehen Sie an den Stellknöpfen an den Hinteren Endkappen (Nr. 32L/R), um es zu justieren. Drehen Sie zum Anheben gegen den Uhrzeigersinn und zum Absenken im Uhrzeigersinn. EINSTELLEN DES SITZES Um den Sitz (Nr. 38) vorwärts oder rückwärts zu bewegen, während Sie auf dem Fahrrad sitzen, stellen Sie Ihre Füße auf den Boden. - Page 57 WICHTIGE INFORMATIONEN ZUM LIEGERAD WARNUNG: Um ordnungsgemäß zu funktionieren, benötigt dieses Liegerad eine Stromversorgung mit 1 Ampere (100–240 V). Bevor Sie das Gerät anschließen, überprüfen Sie zu Ihrer Sicherheit und der Sicherheit anderer, ob die Stromversorgung korrekt ist. Eine Stromversorgung über oder unter diesem Wert kann zu erheblichen Schäden an den Geräten und/oder Verletzungen der Benutzer führen.
- Page 58 FUNKTIONEN: SPEED: Zeigt die aktuelle Trainingsgeschwindigkeit an. Die Höchstgeschwindigkeit beträ gt 99,9 MPH (ca. 160 km/h). RPM: Zeigt die aktuelle Umdrehung pro Minute an TIME (ZEIT): Akkumuliert die Trainingszeit von 0:00 bis 99:59. Benutzer kö nnen die gewü nschte Zielzeit voreinstellen. DIST (DISTANZ): Akkumuliert die zurückgelegte Trainingsstrecke von 0,00 bis 999,9 Meilen (ca.
- Page 59 1. Wenn die Anzeige auf 0.00 eingestellt ist, zä hlen KALORIEN nach oben. KALORIEN 0.00~9995 0.00 ±5.00 2. Wenn die KALORIEN auf 5.00 ~9995 eingestellt sind, wird sie auf 0.00 herunterzählen. Der Benutzer kann den Wattwert WATT 50~250 ±5 nur im Wattsteuerungsprogramm einstellen.
- Page 60 Es stehen 12 voreingestellte Programme zur Verfügung. Alle Programmprofile haben 16 Widerstandsgrade. EINSTELLEN DER PARAMETER FÜR VOREINGESTELLTE PROGRAMME 1. Wählen Sie mit der Taste UP oder DOWN eines der VOREINGESTELLTE PROGRAMME aus und drücken Sie dann ENTER. TIME blinkt, sodass der Wert mithilfe der Tasten UP oder DOWN angepasst werden kann.
- Page 61 EINSTELLEN DER PARAMETER FÜR DAS WATTSTEUERUNGSPROGRAMM 1. Wählen Sie mit der Taste UP oder DOWN die Option WATT CONTROL PROGRAM (P14) aus und drücken Sie dann ENTER. 2. TIME blinkt, sodass der Wert mithilfe der Tasten UP oder DOWN angepasst werden kann. 3.
- Page 62 BMR: Basal Metabolism Ratio (Grundumsatz) BMI: Body-Mass-Index Drücken Sie die Taste START/STOP, um zur Hauptanzeige zurückzukehren. ZIELHERZFREQUENZ-PROGRAMM (P16) Programmprofil EINSTELLEN DER PARAMETER FÜR DIE ZIELHERZFREQUENZ-PROGRAMM 1. Wählen Sie mit der Taste UP oder DOWN die Option TARGET HR. PROGRAM (P16) aus und drücken Sie dann ENTER.
- Page 63 Parameter der DISTANZ nicht eingestellt werden. 4. Fahren Sie mit allen gewünschten Parametern fort und drücken Sie die START/STOP-Taste, um das Training zu beginnen. HINWEIS: Wenn der Puls über oder unter (± 5) der TARGET HR liegt, passt das Messgerät die Widerstandsbelastung automatisch an.
-
Page 64: Fehlerbehebung
FEHLERBEHEBUNG MÖGLICHE PROBLEM ÜBERPRÜFUNG LÖSUNG URSACHE Stecken Sie die Kabel wieder Prüfen Sie, ob alle Kabel ein und schalten Sie das richtig eingesteckt sind, oder Motor konnte Gerät ein. Drücken Sie dann ob die Stifte an den Kabeln E1-1 seinen Startpunkt nicht gleichzeitig die Tasten MODE nicht richtig...
Need help?
Do you have a question about the SF-RB4850 and is the answer not in the manual?
Questions and answers