Keeler ALL PUPIL II Instructions Manual
Hide thumbs
Also See for ALL PUPIL II:
- Instructions manual (8 pages) ,
- Instructions for use manual (39 pages)
Table of Contents
Advertisement
Quick Links
Advertisement
Table of Contents

Subscribe to Our Youtube Channel
Related Manuals for Keeler ALL PUPIL II


Summary of Contents for Keeler ALL PUPIL II
- Page 1 ALL PUPIL II Instructions...
- Page 2 Introduction Thank you for purchasing the Keeler All Pupil II Indirect Ophthalmoscope. We have taken the greatest care in the design, development and manufacture of this product to ensure that you get many years of trouble free service. However, it is important that you...
-
Page 3: Table Of Contents
Cleaning Instructions..........14 Servicing ..............14 Safety..............14 Sandards ..............14 Please contact Keeler for a copy of our booklet “How to use a Binocular Indirect”. As part of our policy for continued product improvement we reserve the right to amend... -
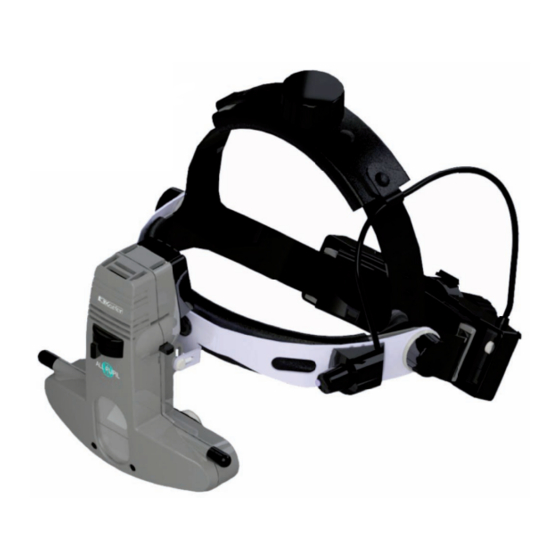
Page 4: Description Of The Product
Description of the Product Headband A Headband Size Adjuster B Headband Height Adjuster C Cushioned Padded Liners D Optics Hinge Adjuster E Brow Bar F Brow Bar Adjuster Optics G Aperture Control Lever H Filter Selector Bar Mirror Height Alignment Control J Viewing Box K Front Window L Interpupillary Distance Adjusters... - Page 5 Description of the Product...
-
Page 6: Using The All Pupil Ii
(F) as shown in fig 3. Fig 3 Position the All Pupil II as close to the eyes as possible for maximum field as shown in fig 4. by using the hinge adjuster (D) as shown in fig 5. - Page 7 Using the All Pupil II Interpupillary Distance Adjusters Because the eyes are dissociated, particular care must be taken to ensure the optics are set properly in front of each eye. Always set the aperture selector to the largest patch of light. The interpupillary distance adjusters are located directly beneath the viewing box.
- Page 8 Using the All Pupil II Adjustment for Mirror Height By adjustment of the mirror alignment control (I) the light beam may be positioned to any vertical height within the viewed area. Select Aperture Control Lever The Aperture Control Lever (G)
- Page 9 Using the All Pupil II Built in Filters Select filter or diffuser by sliding filter selector bar (H) either side of the All Pupil II. Red Free Filter - This filter reduces red light, so blood will appear black, silhouetted against a dark background Diffuser - Providing extra wide beams of light that can be used with all aperture sizes.
-
Page 10: Accessories
Accessories Teaching Mirror The teaching mirror is fitted as follows:- A. Remove the screws from the panel beneath the front window with the screwdriver supplied. (fig 6) 1. Fit the mounting bar with the pin pointing to the right and secure with screws removed in step (A) Fig 6 (fig 7). -
Page 11: B) Eyepiece Caps
To use, simply fit over the eyepieces (Part No. EP39-53799). Plano Lenses The Keeler All Pupil II is supplied with +2D lenses as standard. Plano lenses, if preferred, are available. (Please order Part No. EP39-53748). -
Page 12: Cleaning Instructions
Disconnect the unit by unplugging the connector from the system power source. You can clean your All Pupil II optics and front window with the Keeler cleaning cloth provided. Do not Immerse the instrument in water. The instrument can be cleaned with a damp cloth if preferred. - Page 13 It is well established that exposure of the eye to intense light sources for extended periods of time poses a risk of retinal photic injury. Many ophthalmic instruments illuminate the eye with intense light. The decision about the intensity of light level to use in any procedure must be made on a case by case basis.
- Page 15 75020 Paris France Tel: 00 33 1 44 62 82 82 Fax: 00 33 1 44 62 82 83 DISTRIBUTED BY: Keeler Instruments Inc 456 Parkway Broomall PA 19008, USA Toll Free: 1 800 523 5620 Tel: 610 353 4350...
Need help?
Do you have a question about the ALL PUPIL II and is the answer not in the manual?
Questions and answers