Keeler Vantage Plus Instructions For Use Manual
Indirect ophthalmoscope
Hide thumbs
Also See for Vantage Plus:
- Setup & quick start manual (30 pages) ,
- Instructions for use manual (28 pages) ,
- Instructions manual (25 pages)
Table of Contents
Advertisement
Advertisement
Table of Contents

Related Manuals for Keeler Vantage Plus


Summary of Contents for Keeler Vantage Plus
- Page 1 Vantage Plus and Vantage Plus LED Indirect Ophthalmoscope Instructions for use...
-
Page 2: Table Of Contents
Cautions........... Parts list Safety considerations....... Power conversion........ Wall mounting / charging......5. Setting up and using the Vantage Plus.... Controls and components LED displays.......... Headband adjustment......8. LED / bulb replacement........ Ophthalmoscope alignment 9. -
Page 3: Copyright And Trademarks
As part of our policy for continued product development we reserve the right to make changes to specifications and other information contained in this document without prior notice. Vantage Plus and Vantage Plus LED are a registered trademark of Keeler Ltd 2012 Copyright © Keeler Limited 2012... -
Page 4: Introduction
2. Introduction Thank you for purchasing the Keeler Vantage Plus Indirect Ophthalmoscope. We have taken the greatest care in the design, development and manufacture of this product to ensure that you get many years of trouble free service. However, it is important that you read the descriptions, installation and operating instructions carefully prior to installing or using your new indirect ophthalmoscope. -
Page 5: Symbols
3. Symbols High voltage Trip hazard Optical radiation hazard Hot surface Non-ionizing radiation... -
Page 6: Safety
Route power cords safely to eliminate risk of tripping or damage to equipment Check your Keeler product for signs of transport / storage damage prior to use Bulbs / LED’s can reach high temperatures in use – allow... - Page 7 Care should be taken when handling halogen bulbs. Halogen bulbs can Use only Keeler approved batteries, chargers and power supplies as per shatter if scratched or damaged the accessories listed in section 12...
-
Page 8: Safety Considerations
4. Safety Safety considerations While no visible retinal lesions have been identified for ophthalmic instruments, it is recommended that illumination levels be set to the minimum level necessary to perform the It is well established that exposure of the eye to intense light diagnostic function. -
Page 9: Setting Up And Using The Vantage Plus
5. Setting up and using the Vantage Plus... -
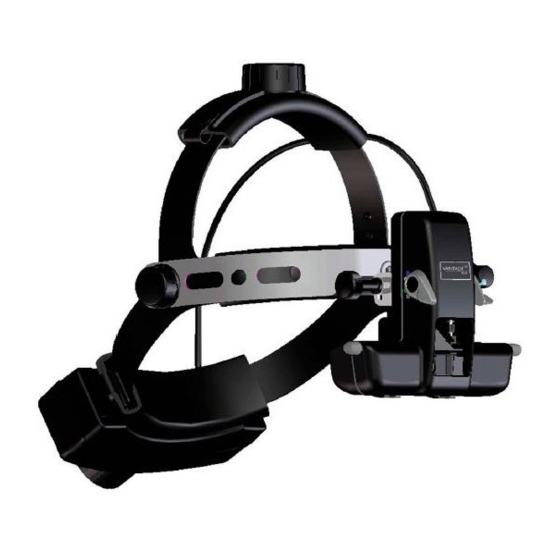
Page 10: Headband Adjustment
5. Setting up and using the Vantage Plus Headband Adjustment Comfortable Fit Adjust the size (A) fig.1 and the height (B) fig.2, so that the instrument is supported comfortably around and on top of the head. Ophthalmoscope Angle Alignment For vertical alignment of the eyepieces and... -
Page 11: Interpupillary Distance Setting Control
5. Setting up and using the Vantage Plus Interpupillary Distance Setting Control (S) Obtaining a fused image Because the eyes are dissociated, particular care must be taken to Ensure that a singular, fused image is obtained as follows: ensure the optics (eyepieces) are set properly in front of each eye. -
Page 12: Setting The Aperture
5. Setting up and using the Vantage Plus... -
Page 13: Selecting Filters
5. Setting up and using the Vantage Plus This unique extra wide beam of diffused light permits a more relaxed technique during more challenging fundus examinations. Beginners may also find this aperture particularly helpful since, in order to achieve a full lens image, the alignment between the headset, the condensing lens and the pupil is not as critical as with the conventional beam. - Page 14 6. Wireless chargers – power supply assembly Set plug Replace the blanking plate with the appropriate mains plug adaptor if required, or use IEC 60320 TYPE 7 connector (not supplied).
-
Page 15: Standard Lithium
6. Wireless chargers – Standard Lithium... -
Page 16: Slimline Lithium Ion
6. Wireless chargers – Slimline Lithium-ion... -
Page 17: Wireless Chargers
6. Wireless chargers... - Page 18 6. Wireless chargers...
- Page 19 6. Wireless chargers Charging Cycle - Standard Lithium The battery attached to the indirect will take approximately 2 hours to fully charge. The battery will last approximately 2 hours on full power. The spare battery will take 4 hours to charge. Charging Cycle - Slimline Lithium ion The battery attached to the indirect will take approximately 1½...
-
Page 20: Wall Mounting
6. Wireless chargers – wall mounting... - Page 21 6. Wireless chargers – wall mounting...
-
Page 22: Smartpack And Wallpack
7. SmartPack and WallPack... -
Page 23: Power Conversion
7. SmartPack and WallPack Set Plug Power conversion Assemble the power supply as per the instructions in section 6. Convert to either WallPack or SmartPack by following the illustration below. -
Page 24: Wall Mounting / Charging
7. SmartPack and WallPack... -
Page 25: Led Displays
7. SmartPack and WallPack... -
Page 26: Led / Bulb Replacement
8. LED / bulb replacement... -
Page 27: Cleaning Instructions
9. Cleaning Only manual non-immersion cleaning as described should be used for this instrument Do not autoclave or immerse in cleaning fluids Always disconnect power supply from source before cleaning Wipe the external surface with a clean absorbent, non- shedding cloth dampened with a water / detergent solution (2% detergent by volume) or water / isopropyl alcohol solution (70% IPA by volume). -
Page 28: Specifications And Electrical Ratings
10. Specifications and electrical ratings Input mains data: 100-240V – 50/60Hz Power supply rating: 12V : 2.5amps Operation: Continuous Classification: Class II equipment Type B protection against shock Transport, storage and operating conditions Transport Storage Operation -40°C -10°C +10°C Temperature to +70°C to +55°C to +35°C... -
Page 29: Annex I - Emc Statement And Guidelines
11. Annex I – EMC statement and guidelines The Keeler Vantage Plus / Vantage Plus LED is a medical electrical instrument. The instrument requires special care concerning electromagnetic compatibility (EMC). This section describes the suitability in terms of electromagnetic compatibility of this instrument. When installing or using this instrument, please read carefully and observe what is described here. - Page 30 11. Annex I – EMC statement and guidelines Guidance and manufacturer’s declaration – electromagnetic immunity The Keeler Vantage Plus LED is intended for use in the electromagnetic environment specified below. The customer or the user should assure that it is used in such an environment.
- Page 31 11. Annex I – EMC statement and guidelines Guidance and manufacturer’s declaration – electromagnetic emissions The Keeler Vantage Plus LED is intended for use in the electromagnetic environment specified below. The customer or user should assure that it is used in such an environment.
- Page 32 11. Annex I – EMC statement and guidelines Guidance and manufacturer’s declaration – electromagnetic immunity The Keeler Vantage Plus LED is intended for use in the electromagnetic environment specified below. The customer or user should assure that it is used in such an environment.
- Page 33 Recommended separation distances between portable and mobile RF communications equipment and the Keeler Vantage Plus LED The Keeler Vantage Plus LED is intended for the use in an electromagnetic environment in which radiated RF disturbances are controlled. The customer or the...
-
Page 34: Spare Parts And Accessories
12. Spare parts and accessories The following accessories are typical of those supplied in the kits as indicated: Vantage Plus Bulb version: Wired (eg. 1204-P-3051) Wireless, with slimline battery and charger (eg. 1204-P-3067) Part Number Description As for 1204-P-3051 example, plus:... - Page 35 12. Spare parts and accessories Vantage Plus LED: Wired (eg. 1205-P-1010) Wireless, with slimline battery and charger (eg. 1205-P-1020) Part Number Description As for 1205-P-1010 example, plus: EP39-53748 Eye Lens Plano (qty 2) Part Number Description EP39-53799 Rubber Eye Cap (qty 2)
- Page 36 12. Spare parts and accessories...
-
Page 37: Warranty
• The instrument and accessories have been used in compliance with these instructions • Proof of purchase accompanies any claim. Please note: The LED for the Vantage Plus LED models is guaranteed for 5 years. Batteries are covered by this warranty statement for 1 year only. -
Page 38: Contact And Disposal Information
14. Contact and disposal information Keeler Limited Keeler Instruments Inc. Clewer Hill Road 3222 Phoenixville Pike Windsor Building #50 Berkshire SL4 4AA PA 19355, USA Freephone: 0800 521251 Toll Free: 1 800 523 5620 Tel: +44 (0)1753 857177 Tel: 610 353 4350...
Need help?
Do you have a question about the Vantage Plus and is the answer not in the manual?
Questions and answers