Table of Contents

Related Manuals for Anest Iwata DPS-90LE


Summary of Contents for Anest Iwata DPS-90LE
- Page 1 取扱説明書 ■ ペイントポンプ DPS-90LE/LEN DPS-90LPE/LPEN DPS-120LB/LBN DPS-120LPB/LPBN この取 扱 説 明 書 は、安 全 にご使 用 いただくために重 要 な警 告 、注 意 事 項 及 び取 扱 方 法 について記 載 しています。 ご使 用 前 に必 ずお読 みになり、十 分 に理 解 してからご使 用 ください。 また、本...
- Page 3 ■ 重要なお知らせ ・ この取扱説明書で扱われている製品は塗装専用の商品です。他の用途には使用しないでください。 ・ 操作や機能を正しくご理解いただくため、この取扱説明書を必ずお読みになり、重要な警告、注意事項およ び取扱方法について、十分に理解された方が使用してください。 ・ 正しい方法にてご使用いただけない場合、死亡や重大な身体上の障害、火災や爆発が起こる可能性があ りますので十分ご注意願います。 この取扱説明書はすぐに確認できる場所に大切に保管してください。 ● 安全性について ・ 本取扱説明書で示す安全事項は、必要最低限のものであります。国や自治体の消防、電気、安全関 連の法規、規則、又それぞれの企業や事業所で規則・規定として守るべき事項に従ってください。 ・ 本文中に次の警告・注意マークで示している箇所は、安全にお使い頂くため、特に重要です。 ・ 絵表示、記号の意味は次のようになっています。 注意喚起の表示 警告 警告内容を怠った場合、人が死亡または重傷を負う可能性が想定される ことを示します。 注意 注意内容を怠った場合、人が傷害を負う可能性、または物理的損害の発 生する可能性が想定されることを示します。 絵表示の例 この記号は『注意すべきこと』を意味しています。 この記号の中や近くに、具体的な注意内容を示します。(左の例は換気に注意) この記号は『してはいけないこと』を意味しています。 記号の中や近くに、具体的な禁止内容を示します。(左の例は接触禁止) この記号は『しなければならないこと』を意味しています。 この記号の中や近くに、具体的な指示内容を示します。(左の例は保護マスクを着用 せよ) ※警告、注意の表示を無視して使用した場合の損害、損傷については、当社では責任を負いかねますので、御了承願います。 ● 補足表示について この記号は機械の性能や機能を十分に発揮してお使いいただくため、守ってい 重要 ただきたい内容を示しています。...
- Page 4 ■目次 重要なお知らせ 1. 安全性について ・・・・・・・・・・・・ 2 2. 現品確認 ・・・・・・・・・・・・ 4 3. 仕様 ・・・・・・・・・・・・ 5 4. 各部の名称と機能 ・・・・・・・・・・・・ 6 5. 作業を始める前に ・・・・・・・・・・・・ 7 6. 塗装の準備 ・・・・・・・・・・・・ 9 7. 塗装作業 ・・・・・・・・・・・・・10 8. 点検と整備 ・・・・・・・・・・・・ 12 9. 故障と対策 ・・・・・・・・・・・・・・12...
- Page 5 ■1 . 安全性について 警告 保護具の着用 ・作業中は、眼鏡、マスク及び手袋などの保護具を必ず着用してください。 塗料や溶剤が目に入ったり、吸い込む危険性があります。 換気に注意 ・換気の良い場所で使用してください。 換気の不十分な狭い場所で使用すると、塗料や溶剤の飛散した揮発溶剤を吸い込み、 有機溶剤中毒を起こすことがあります。 作業中、身体に異常を感じたら、直ちに医師による治療を受けてください。 接触禁止 ・塗料漏れが発生した場合、絶対に手などで押さえず、直ちにボールバルブ(エアー用)を 閉じてポンプを停止し、ボールバルブ(ドレン用)を開いて、塗料圧力を『0MPa』にして ください。 装置の誤用による危険 ・人や動物に向けてスプレーしたり、スプレーガンの空気キャップ先端に指を当てて、スプレー しないでください。 目や口及び皮膚などから直接体内に塗料や溶剤が入った場合、非常に危険です。 直ちに医師による治療を受けてください。 使用液体の制約 ・食品用には使用しないでください。 ポンプの部品は、食品用に適する材料を使用していませんので、部品からの異物混入による 健康障害の危険があります。 火気禁止 ・火気のある場所や火気の近くで絶対に使用しないでください。特に下記のものは着火源となる 可能性があり、非常に危険です。 ...
- Page 6 警告 破裂に注意 ・ダイアフラムポンプは、最高使用塗料圧力以下で必ず使用してください。 最高使用塗料圧力以上で使用すると、ポンプが破損し、非常に危険です。 ・ホースを傷つけないため、半径50mm以下に曲げたり、重いものを載せないでください。 ホースが破損し、非常に危険です。 ・ホースは、漏れや緩みのないように、確実に接続してください。 作業中にホースが外れた場合、塗料の飛び跳ね、ホースの暴れによるけがなど重大な傷害をおよぼす 可能性があります。 ・下記のようなホースは絶対に使用しないでください。作業中にホースが破損する恐れがあり、 非常に危険です。 ・穴が開いている ・傷が付いている ・折れ曲がっている ・つぶれて変形している 重要 ・製品の改造は、絶対にしないでください。 ・部品を交換する場合は、当社純正部品を必ず使用してください。 十分な性能が発揮できないばかりか、故障の原因となります。 ・次のハロゲン化炭化水素系溶剤は使用しないでください。 塩化メチル、塩化エチル、ジクロルメタン、1.2−ジクロルエタン、四塩化炭素、トリクロルエチレン、 1.1.1−トリクロルエタン 化学反応により、本体(アルミニウム部分)にクラック、溶解が発生します。 (特殊な塗料や溶剤などは十分適合性を検討した上でご使用ください。適合性検討のための材質リストを 提出する用意があります) ・ポンプは雨、水のかかる場所に設置又は、保管しないでください。 ポンプの故障の原因となります。...
- Page 7 ■2.現品確認 ご注文の製品かどうか、確認してください。また、輸送中に変形や破損した箇所がないか、確認してくだい。 ・ 形式:DPS−90LE/LEN/LPE/LPEN/−120LB/LBN/LPB/LPBN 付属品一覧 品 名 DPS-90LE/LEN/LPE/LPEN/-120LB/LBN/LPB/LPBN 個数 六角棒スパナ 1 (平径 5mm) 防塵キャップ 2 取扱説明書 1 (本書です) 注意カード 付属 1 ・付属品がすべてそろっているか、確認してください。 欠品、輸送上の破損がある場合は、危険防止のため使用せず、お買い求めになった販売店、 ・ 又は当社支店・営業所・サービス会社までご連絡ください。 - 4 -...
- Page 8 ■3.仕様 セット型式 DPS-90LE/LEN DPS-90LPE/LPEN DPS-120LB/LBN DPS-120LPB/LPBN 390×260×823 410×300×823 390×260×863 410×300×863 全長×全幅×全高mm 17/19 18/21 18/21.5 19/23 質量 kg 395 昇降ストローク mm 4 昇降荷重 kg G1/4B エア供給口 ねじ径 G1/4B 塗料吐出口 ねじ径 50メッシュ 1枚(吸込口) 塗料フィルター 5〜40℃ 使用温度範囲 18 L 20 L 18 L ...
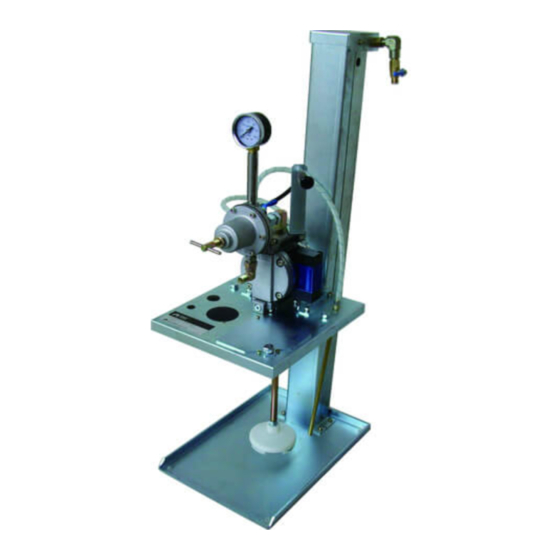
- Page 9 ■4.各部の名称と機能 蓋セット 塗料補給口 鉄製握り ダイアフラムポンプの昇降用 A G1/4B エア入口 塗料減圧弁 塗料圧力調整用 G1/4B 塗料出口 ダイアフラムポンプ 塗料の吸込み・吐出 インデックスプランジャー 最大上昇位置でのロック用 ドレンホースセット 18L缶(DPS-90LE/LEN) (DPS-120LB/LBN) 20L缶(DPS-120LPE/LPEN) (DPS-120LPB/LPBN) (付属せず) 塗料吸込濾過器 - 6 -...
- Page 10 ■5.作業を始める前に 5−1.設置と接続及び点検 警告 ・ホースは、漏れや緩みのないように、確実に接続してください。 作業中にホースが外れた場合、塗料の飛び跳ね、ホースの暴れによるけがなど重大な傷害を及ぼす 可能性があります。 ・ポンプ、スプレーガン、被塗物及び塗料や溶剤を入れる容器は、アースの接続を確実に行ってください。 アースが不十分ですと、静電気のスパークによる爆発や火災の危険性があります。 ・ポンプは、水平な場所に設置してください。 斜めになり昇降内部のばねが作用したり,横転してけがをする可能性があります。 重要 ・ポンプは雨、水のかかる場所に設置又は、保管しないでください。 ポンプの故障の原因となります。 ・供給エアーは、ドライア及びフィルタ(50ミクロンより細かい物)を通した、清浄なエアーを使用 してください。 ポンプの故障や作動不良の原因となります。 ・ポンプは塗料ミスト等のかからない場所に設置してください。 塗料ミストが付着すると、ポンプの故障の原因となります。 ・メタリック塗料や顔料の大きな塗料をご使用の場合は、塗料中間フィルター(別売)を使用し、定期的に内部を洗浄してください。 スプレーガンの詰まり、ブツ等の発生や塗料減圧弁の故障の原因となります。 塗料中間フィルタの選定 スプレーガンの詰まり、ブツ等の防止・・・TF−7(接続ジョイント1/4):塗料減圧弁出口に設置 塗料減圧弁の保護(圧力計の針上り等がある場合)・・・TF−71(接続ジョイント3/8):ポンプ〜減圧弁間に設置 ・ドレンパイプガイドの磁力を用いてドレンホースセットをポンプベースに固定して、ドレンホースセットの飛び出しを予防してください。 塗料ホース スプレーガン 塗料減圧弁の保護 (別売) エアーホース スプレーガンの詰まり、ブツ等の防止 (別売) (圧力計の針上がり等が起こる場合) (別売) TF-7を塗料減圧弁(PR-5B) TF-71を塗料減圧弁(PR-5B)〜 出口に設置 ポンプ(DDP-90E、120B)間に設置...
- Page 11 5−2.作動の確認 重要 ポンプの空運転は、行わないでください。空運転はポンプ故障の原因となります。 ・ 5−3.ダイアフラムポンプ作動の確認 手順1 ボールバルブ(エアー用)が閉じているのを確認 してください。 手順2 ボールバルブ(ドレン用)が閉じているのを確認し てください。 手順3 供給エアー(0.15〜0.7MPa)をポンプに送ります。 手順4 ボールバルブ(ドレン用)を開けます。 手順5 ボールバルブ(エアー用)を開けて、ポンプが 作動するのを確認してください。 手順6 塗料減圧弁のハンドルセットを高側へ締め込 みます。 手順7 ボールバルブ(エアー用)を閉じて、ポンプが 停止するのを確認してください。 - 8 -...
- Page 12 手順1 ボールバルブ(エアー用)が閉じているのを確認 してください。 手順2 鋼製握りを持ち、インデックスプランジャーがカチ ッと音を立てロックするまで持ち上げてください。 下降時 手順3 鋼製握りを持ち、インデックスプランジャーのツマ ミを引き、ロックを解除し、下降させてください。 ■6.塗装の準備 6−1.ポンプの洗浄 注意 ・ ご購入後、初めてお使いになる場合、ポンプ内部を洗浄液(3〜4リットル)にて洗浄してください。 洗浄せずに使用しますと、ポンプ内部の防錆剤により塗装不良が発生する可能性があります。 ワンポイント ・ ポンプの洗浄は、スプレーガンのエアーを止めて行うと洗浄液が飛散せず、スプレーガンから吐出する洗浄液を確 認しやすくなります。 手順1 18リットル缶(DPS-90LE/LEN/-120LB/LBN), 20リットル缶(DPS-90LPE/LPEN/-120LPB/LPBN) (別途ご用意下さい)に洗浄液(3〜4リットル)を入れて、昇 降スタンドにセットします。 手順2 ボールバルブ(ドレン用)を開けます。 手順3 ボールバルブ(エアー用)を開けて、ポンプを作 動します。 手順4 塗料減圧弁のハンドルセットを高側へ締込みます 手順5 ドレンホースセットからエアー及び洗浄液が出てく るのを確認します。 - 9 -...
- Page 13 手順7 スプレーガンの引き金を引き、洗浄液にエアー が混入しなくなるまで吐出します。 手順8 スプレーガンから吐出する洗浄液がきれいにな ったら、昇降部を上昇させ、スプレーガンから洗浄液が 出なくなるまでポンプを作動してください。 ■7.塗装作業 7−1.作業の開始 7−1−1. 塗装条件の設定 手順1 18L缶(DPS-90LE/LEN/-120LB/LBN) 20L(DPS-90LPE/LPEN/-120LPB/LPBN) (別途ご用意ください)に塗料を入れて、 塗料吸込口及びドレンホースセットを 入れます。 手順2 ボールバルブ(ドレン用)を開けます。 手順3 ボールバルブ(エアー用)を開けて、ポン プを作動します。 手順4 塗料減圧弁のハンドルセットを高側へ...
- Page 14 7−1−2. 塗料の補給 手順1 剣形ローレットファスナーのツマミを左右に回 し、ロックを解除します。 手順2 塗料を補給します。 手順3 剣形ローレットファスナーのツマミを押付けて ツマミを左右に回し、ロックします。 7−2.作業の中断と終了 7−2−1. 作業の中断 重要 ・作業を30分以上中断する場合は、ボールバルブ(エアー用)を閉じて、ポンプの作動を停止して、 ボールバルブ(ドレン用)を開けて、ポンプの内部の圧力を0MPaにしてください。 7−2−2. 作業の終了 手順1 ポンプの洗浄を行ってください。 (6−1ポンプの洗浄を参照してください。) 手順2 塗料吸込濾過器の濾過網を取り外し、洗浄 してください。 - 11 -...
- Page 15 ■8.点検と整備 重要 次表の③項の処置は、お買いあげの販売店又はお近くの当社支店、営業所・サービス会社にご依頼ください。 正しい処置が行われない場合、十分な性能が発揮できなくなります。 ・次表を参照して、点検と整備を行ってください。 No. 時 期 点検、整備内容 ①...
- Page 16 No. 現 象 原 因 対 策 ③ 塗料に気泡が入る ①塗料吸込濾過器、ロングニップルの緩み ①締増しを行い、確実に接続する ②アダプター下の緩み ②締め増しを行う ③ダイアフラムの破損 ③分解、点検、交換 ☆ ④分解、点検、締付又は交換 ☆ ④ダイアフラム押え用ナットの緩み及び、 Oリングの破損 ⑤シート部パッキンの変形、破損 ⑤分解、点検、交換 ☆ 塗料が漏れる ①各部の取付不良 ①再組立を行う ☆ ④ ②分解、点検、交換 ☆ ②シート部パッキンの変形、破損 ...
- Page 17 ■10.分解と組立 重要 ・分解と組立は、必ずお買いあげの販売店又は、お近くの当社支店、営業所・サービス会社にご依頼ください。 正しい処置が行われない場合、十分な性能が発揮できなくなります。 ・製品の改造は、絶対にしないでください。 ・部品を交換する場合は、当社純正部品を必ず使用してください。 十分な性能が発揮できないばかりか、故障の原因となります。 ・下記の手順に従って、分解を行ってください。また、組立は、原則として分解の逆の手順で行ってください。 10−1.ダイアフラムポンプの取り外し方法 手順1 最大昇降位置で、インデックスプランジャーを ロックします。 手順2 塗料吸込濾過器、ロングニップルを取り外しま す。 手順3 ドレンホースセットを取り外します。 手順4 塗料減圧弁を取り外します。 手順5 ウレタンチューブを外します。 手順6 ポンプの下部にある座金組込みボルト×2個 を外し、ポンプをベースから取り外します。 10−2.ダイアフラムポンプの分解と組立 10−2−1. ポンプ本体 重要 各部品を取り付ける場合、六角穴付きボルトは対角線上の順番に、均等に締め付けてください。 ・ 締付トルク アダプター 90Eシリーズ:7.5N・m 120Bシリーズ : 9N・m ...
- Page 18 10−2−2.エアー操作バルブ 重要 エアー操作バルブの後面の小さな穴(4個)は排気穴ですので、 ・ 塗料や溶剤などを付着させないでください。 ポンプの故障の原因となります。 ・エアー操作バルブの両サイドブロックの内部にはφ 0.9 の排気穴が開いていますので、ふさがないようにしてく ださい。排気穴がふさがると、ポンプの作動不良の原因となります。 ・ エアー操作バルブをオーバーホールする際は、下記のグリスをご用意ください。 排気穴 【推奨グリス】出光興産製 ダフニーポリレックス NO.2 手順1 六角穴付ボルト(M5)x2個を外し、エアー操 作バルブ及びOリングを取り外します。 Oリング 六角穴付ボルト (M5) 手順2 エアー操作バルブ側面の六角穴付きボルト (M4)X4個を外し、両サイドのブロックを取り外しま す。 エア操作バルブ 六角穴付ボルト(M4) エアー操作バルブの中から次の部品を取 手順3 り外します 1-1 スプールパッキンx12ケ 1-2 スプールx2ケ ...
- Page 19 10−2−3.ダイアフラム部 手順1 ダイアフラムの両側にある六角ナットを、両側か ら同時に緩めます。 どちらか一方のナットが取り外せます。 手順2 六角ナットが外れた側の下記の部品を、ロッドより ダイアフラム押え 順番に取り外します。 ダイアフラム内(黒 ① ばね座金 ×1個 ダイアフラム外(白 ② ダイアフラム押え外 ×1個 ③ Oリング ×1個 ④ ダイアフラムセット ×1個 ダイアフラム押え...
- Page 20 10−2−5.吸込弁、吐出弁部 重要 ・吸込弁及び吐出弁を取り付ける場合、Oリングを必ず取り付けてください。 Oリングが正しく取り付けられていない場合、塗料漏れが発生します。 手順1 吸込弁を外す場合、蓋の塗料室側からマイナス ドライバーなどで鋼球を押すと、鋼球と吸込弁が同時に 取り外せます。 手順2 吐出弁を外す場合、吐出弁の内部に指を入れ、 引き出します。 10−3.塗料減圧弁の分解と組立 重要 ・塗料減圧弁の分解と組立は、ダイアフラムポンプ又はスタンドから取外して行ってください。 ・本体〜立ち上がりパイプ〜圧力計を分解した場合、各ねじ部にシール剤を塗布し、機密性を保ってください。 圧力計に塗料が入り、それが固まって圧力計が作動不良になります。 ・超硬ボール,超硬シートを分解した時は,摩耗やキズの有無を必ず確認してください。 摩耗やキズがある場合は,そのまま使用せず,新しい部品に交換してください。 10−3−1.分解 手順 1 ハンドルセットを十分に緩めてから、六角穴付ボ ルトを外し、ダイアフラムキャップ、ばね受け、調整ばね、ダ イアフラム部を外します。 手順 2 ジャミナットを緩めてからジョイントを外し、バル ブばね、超硬ボール、超硬シート、パッキンを外します。 手順 3 ダイアフラムボルトの六角部を固定し、六角ナット を外し、ばね座金、ダイアフラム押え、Oリング、ダイアフラ ム、ダイアフラム受けを外します。 手順 4 ジョイントに組込まれているOリングにキズ、変 形等が見られた場合、ジョイントよりOリングを外し ま す。 - 17 -...
- Page 21 10−3−2.組立 重要 ・超硬シートは、テーパー側に超硬ボールが組まれるよう本体に取付けてください。その際、パッキンを入れ忘れないように 注意してください。 正しく組み立てられない場合、シート洩れによる圧力計の針上りが発生し十分な性能が発揮 できません。 ・ジョイントを取付ける場合、締付トルクに注意してください。 強く締め付け過ぎると本体が破損する場合があります。 ジョイント締付トルク 14.7N・m 手順 1 各部品にキズ、破損、異物の付着がないか、 確認します。 手順 2 ダイアフラムボルトにダイアフラム受け、ダイアフラム Oリング、ダイアフラム押え、ばね座金を取付け 六角ナットを締込みます。 六角ナット締付トルク 9.8N・m 手順 3 手順2でセットしたダイアフラム部、調整ばね、 ばね受け、ダイアフラムキャップを本体にのせ、 ...
- Page 22 ■11.構成部品 DPS−90LE/LEN/LPE/LPEN,−120LB/LBN/LPB/LPBN ご注文の際は、形式をご指定の上、下記部品Noをご連絡ください。 ・○印の部品は、消耗品です。 ・※印の部品の詳細は、後頁をご覧ください。 品名 個数 品名 個数 ※ 1 ダイアフラムポンプ 1 エルボユニオン 1 ○ 2 ウレタンチューブ 1 パッキン 1 3 エルボユニオン 1 座金組込ボルト 2 4 座金組込みねじ 6 インデックスプランジャ 1 5 ポンプベースセット ...
- Page 23 No.1 ダイアフラムポンプ DDP−90E/EN,−120B/BN ※2 部分 ※1 部分 DDP-120B/BN 構成部品 DDP-120B/BN 構成部品 - 20 -...
- Page 24 ■11.構成部品 ☆ 印の部品は消耗品です。 ○ 印または、●印の部品は形式で共通部品です。 No. 品名 個数 90E 90EN 120B 120BN 1 本体 1 ○ ● 2 蓋 2 全ての形式で異なります 3 アダプター上 1 ○ ● ○ ● 4 六角穴付プラグ 5 ○ ● ○ ● ...
- Page 25 4-1 キャップ(1)x1 ケ 4-3 復帰ボタンセット x2 ケ 4 キャップボタンセット 1 式 4-2 キャップ(2)x1 ケ 5 六角穴付ボルト 4 M4×20L 塗料減圧弁 PR−5B・5BN 塗料減圧弁の形式 PR-5B :DPS-90LE/90LPE/120LB/120LPB用 PR-5BN :DPS-90LEN/90LPEN/120LBN/120LPBN用 ☆印の部品は消耗品です。 ○印の10-8本体は、PR-5Bはアルミ仕様、PR-5BNはSUS仕様となります。 No. 品名 個数 No. 品名 個数 10-1 ジョイント 1 ...
- Page 26 スライダーセット 品名 個数 ナイロン戸車 4 十字ねべ小ねじ 8 スライダー 2 六角ボルト 3 高ナット 3 歯付座金 3 定トルクばね 1 六角ナット 2 なべ子ねじ 2 8-10 受けゴム 12 8-11 なべ小ねじ 6 8-12 ナイロンナット 6 8-13 連結金具 3 吸上げパイプセット 品名 個数 ※ 1 ...
- Page 27 ■ 12.保証と修理サービス 12−1 保証について 保 証 書(保証規定) お買上げの商品を本取扱説明書にしたがって、正常のご使用状態で万一故障が起こりました時は、 本保証書の記載内容により無償修理いたします。 形式 DPS−90LE/LEN/LPE/LPEN 品名 ペイントポンプ DPS−120LB/LBN/LPB/LPBN 御社名 お お名前 客 ご住所 〒□□□-□□□□ 様 TEL( ) - FAX( ) - 保証...
- Page 28 Instruction manual ■Diaphragm Pump DPS-90LE/LEN DPS-90LPE/LPEN DPS-120LB/LBN DPS-120LPB/LPBN This instruction manual contains IMPORTANT WARNINGS, CAUTIONS and INSTRUCTIONS. Read and understand this instruction manual before use and retain for reference. - 25 -...
- Page 29 ■ Important information - Safety precautions - Equipment in this instruction manual is exclusively for coating purposes. Do not use for other purposes. - Read and understand this instruction manual. The operator shall fully understand the requirements stated within the instruction manual including important warnings, cautions, operation and correct handling. - Incorrect operation or mishanding can cause serious bodily, death, fire or explostion.
-
Page 30: Table Of Contents
■Contents Important information-Safety precautions 1. Safety precautions ・・・・・・・・・ 28 2. Check the products ・・・・・・・・・ 30 3. Specifications ・・・・・・・・・・・・ 31 4. Name of each section and function ・・ 32 5. Before operation ・・・・・・・・・・・ 33 6. Preparation for painting ・・・・・・・ 35 7. Painting job ・・・・・・・・・・・・・ 36 8.... -
Page 31: 1. Safety Precautions
• Securely ground pump, spray gun, workpieces and containers containing paint or solvent. Be sure to use Anest iwata designated urethane air (EAHU type) hose with built-in ground wire to have continuous grounding between pump and spray gun or connect grounding separately. Insufficient grounding will cause explosion or fire if exposed to a spark of electricity. - Page 32 ■1. Safety precautions Be careful about explosion. • Be sure to use paint pump at less than max. fluid operating pressure. Usage at more than max. fluid operating pressure can cause explosion of pump resulting in great danger. • Never bend hose with a radius of less than 50mm. Never put heavy things on it (in order not to damage the hose).
-
Page 33: 2. Check The Products
■2. Check the products • Check to make sure the products are as ordered, and they have not been distorted or damaged during transportation. Model : DPS-90LE/LEN DPS-90LPE/LPEN DPS-120LB/LBN DPS-120LPB/LPBN List of accessories Names of products Q’ty DPS−90LE/LEN/LPE/LPEN/−120LB/LBN/LPB/LPBN hex. bar spanner 1... -
Page 34: 3. Specifications
■3. Specifications Items Specification Model name DPS-90LE/LEN DPS-90LPE/LPEN DPS-120LB/LBN DPS-120LPB/LPBN Dimensions (L×W×H) 390×260×823 410×300×823 390×260×863 410×300×863 17/19 18/21 18/21.5 19/23 Mass kg Elevating stroke Elevating load kg G1/4B Air Inlet G1/4B Fluid outlet 50 mesh 1pc.(intake port) Fluid Filter 5〜40℃... -
Page 35: 4. Name Of Each Section And Function
■4. Name of each section and function - 32 -... -
Page 36: 5. Before Operation
■5. Before operation 5−1. Installation, connection and inspection ・Securely connect hose to avoid leaks and looseness. If hose is disconnected during operation, haz- ardous hose movement and paint ejection will cause severe bodily injury. ・Securely ground pump, spray gun, workpiece and containers containing paint or solvent. Insufficient grounding will cause explosion or fire by spark of static electricity. - Page 37 5-2. Check operation ・Do not idle pump operation. Idle operation can cause pump failure. 5-3. Check operation of diaphragm pump Job 1 Check that ball valve (for air) is closed Job 2 Check that ball valve (for drain) is closed Job 3 Send supply air (0.15〜0.7MPa) to pump Job 4 Tighten handle set of fluid regulator toward “high”...
-
Page 38: 6. Preparation For Painting
■6. Preparation for painting 6−1. Cleaning pump ・When you use the product for the first time after purchasing it, clean the inside of pump with cleaning liquid (3〜4 liters). Usage without cleaning can cause painting failure due to rust preventives inside of pump. -
Page 39: ■7.Painting Job
■7.Painting job 7−1.Starting job 7−1−1. Painting conditions Job1 Pour paint into 18 liter container (prepare at your side) and put intake hose set and drain hose set into it. Job2 Open ball valve (for drain). Job3 Open ball valve (for air) and operate pump. - Page 40 7−2. Interruption and stoppage of job 7−2−1. Interruption of job ・When you stop job for over 30 minutes, close ball valve (for air), stop pump operation, open ball valve (for drain) and reduce pressure in pump down to 0 MPa. 7−2−2.
-
Page 41: 8. Inspection And Maintenance
■8. Inspection and maintenance Regarding ③ in the chart below, consult our distributor or the shop which sold it to you. If it is done properly, it can cause poor performance. ・Refer to the chart below to do the inspection and maintenance. Time Inspection and maintenance ①... - Page 42 Problems Causes Remedies ①Intake filter and long nipple are loose. ①Tighten and secure connection. ③ Paint contains air. ②Lower adaptor is loose. ②Tighten. ③Diaphragm is damaged. ③Disassemble, inspect, replace ☆ ④Nut to hold diaphragm is loose or ④Disassemble, inspect, replace ☆ O ring is damaged.
-
Page 43: 10 Disassembly And Assembly
Disassembly and Assembly ■10 •Be sure to ask our distributor or the shop which sold it to you about disassembly and assembly.If it is not done correctly, it can cause poor performance. •Never alter equipment. •W hen replacing parts, be sure to use our genuine parts. If not, it can cause poor performance and failure. - Page 44 10−2−2.Air operating valve •As small holes on the back of air operating valve are exhaust holes, not allow paint or solvent to adhere. If it done, it can cause failure of pump. • Do not clog Ø0.9 exhaust hole inside of blocks on both sides of air operating valve.
- Page 45 Job 2 Remove the following parts Diaphragm holder in Diaphragm(Black) beginning with the rod from the side where hex. nut is removed: Diaphragm(white) ①Spring washer ×1pc. ② Diaphragm holder-out ×1pc. ③O ring ×1pc. Rod ④ Diaphragm set ×1pc. Diaphragm (white) Spring washer Diaphragm (Black) ⑤...
- Page 46 10-3. Disassembly and assembly of fluid regulator 10-3-1 disassembly First remove the fluid regulator from diaphragm pump (DPS-90LE, 90LPE,120LB) and then disassembly and as- semble it. When you disassemble pressure gauge from main body〜rising pipe, apply sealing compound to each thread ・...
- Page 47 10-3-2 assembly Fit tungsten carbide seat to main body so that tungsten carbide ball fits tapered side of the seat. ・ Do not forget to fit packing. Incorrect assembling can cause paint to leak from seated section, resulting in higher actual pressure than pressure shown in pressure gauge. Pay attention to tightening torque when fitting joint to main body.
-
Page 48: 11. Parts List
■11. Parts list DPS−90LE/LEN/LPE/LPEN/−120LB/LBN/LPB/LPBN When ordering parts, designate model and the following parts Nos. and parts names. ・○ marked parts are consumable parts. ・Refer to the following pages for details of ※ marked parts. Part name Part name Diaphragm pump Elbow union... - Page 49 No.1 Diaphragm pump DDP−90E/EN/-120B/BN ・ ○Marked parts are consumable parts. ※2 Part DDP-120B/BN complete parts. ※1 Part DDP-120B/BN complete parts. - 46 -...
- Page 50 ☆ marked parts are consumable parts ・ ○ or ● marked parts differ among DDP-90E, DDP-120B respectively ・ consumables 90EN 120B 120BN Part name ○ ● Main body Differ all model Adopter upper ○ ● ○ ● ○ ● ○ ●...
- Page 51 NO.⑭ Air operating valve № Parts name Qt y Notice 1-1 Spool packing x12pcs 1-3Packing spacer x4pcs 1 Spare parts set 1set 1-2 Spool x2pcs 1-4 Piston set x4pcs 2 O ring 1set S-7x2pcs S-4x2pcs 3 Spacer set 1set 10pcs 4-1 Cap(1)x1pc 4-3 Button setx2pcs 4 Cap button set 1set 4-2 Cap(2)x1pc 5 Hex socket head bolt 4 M4×20L Fluid regulator PR-5B/BN ○...
- Page 52 Slider set Parts name Nylon door wheel Screw Slider Bolt Washer Spring Screw 8-10 Packing 8-11 Screw 8-12 Nylon nut 8-13 Interlock fitting ※Intake pipe set ○marked parts are consumable parts Parts name Intake filter set ※ Pipe bush ※Intake filter set Parts name Intake filter body 1...
- Page 54 〒223-8501 横浜市港北区新吉田町 3176 3176, Shinyoshida-cho, Kohoku-Ku, Yokohama 223-8501, Japan 取説 No.T228-05 コード No. 04425626 - 1 -...
Need help?
Do you have a question about the DPS-90LE and is the answer not in the manual?
Questions and answers