Table of Contents
Advertisement
Quick Links
Advertisement
Table of Contents

Subscribe to Our Youtube Channel
Related Manuals for Thecus N5200B PRO


Summary of Contents for Thecus N5200B PRO
- Page 1 Thecus N5200B PRO N5200BR PRO User’s Manual...
-
Page 2: Copyright And Trademark Notice
About This Manual All information in this manual has been carefully verified to ensure its correctness. In case of an error, please provide us with your feedback. Thecus Technology Corporation reserves the right to modify the contents of this manual without notice. -
Page 3: Safety Warnings
Safety Warnings For your safety, please read and follow the following safety warnings: Read this manual thoroughly before attempting to set up your N5200PRO. Your N5200PRO is a complicated electronic device. DO NOT attempt to repair it under any circumstances. In the case of malfunction, turn off the power immediately and have it repaired at a qualified service center. -
Page 4: Table Of Contents
Dual Mode Support ................9 Superior Power Management..............9 Package Contents..................9 Front Panel..................10 Hard Disk Trays ...................11 Rear Panel (N5200B PRO) ..............11 Rear Panel (N5200BR PRO) ..............12 Chapter 2: Hardware Installation ..........13 Overview .....................13 Before You Begin.................13 Hard Disk Installation .................13 Cable Connections ................14... - Page 5 Product Information ................23 System/Service Status ................. 23 System Information ................24 Printer Status..................24 UPS Settings ..................25 Power Management................26 Storage Management ................27 Disks Information ................27 S.M.A.R.T. Information ................27 RAID Information ................28 RAID Configuration ................29 RAID Level .....................
- Page 6 Setting Up an Nsync Target on an Nsync Device ........... 70 Setting Up an Nsync Target on Another Device ..........70 Designating N5200PRO as an Nsync Target ..........71 Thecus Backup Utility ................71 Windows XP Data Backup ..............72 Apple OS X Backup Utilities..............72 Chapter 7: Tips and Tricks ............
- Page 7 Appendix C: RAID Basics ............81 Overview .....................81 Benefits ....................81 Improved Performance ................. 81 Data Security ..................81 RAID Levels..................81 RAID 0 ....................81 RAID 1 ....................82 RAID 5 ....................82 RAID 6 ....................82 RAID 10 ..................... 82 JBOD....................
-
Page 8: Chapter 1: Introduction
Chapter 1: Introduction Overview Thank you for choosing the Thecus N5200PRO IP Storage Server. The Thecus N5200 is an easy-to-use storage server that allows a dedicated approach to storing and distributing data on a network. Data reliability is ensured with RAID features that provide data security and recovery—over one Terabyte of storage is... -
Page 9: Multiple Raid
Multiple RAID N5200PRO supports multiple RAID volumes on one system. So, you can create RAID 0 for your non-critical data, and create RAID 5 for mission-critical data. Create the RAID levels depending on your needs. To configure RAID modes on the N5200, refer to Chapter 4: System Management >... -
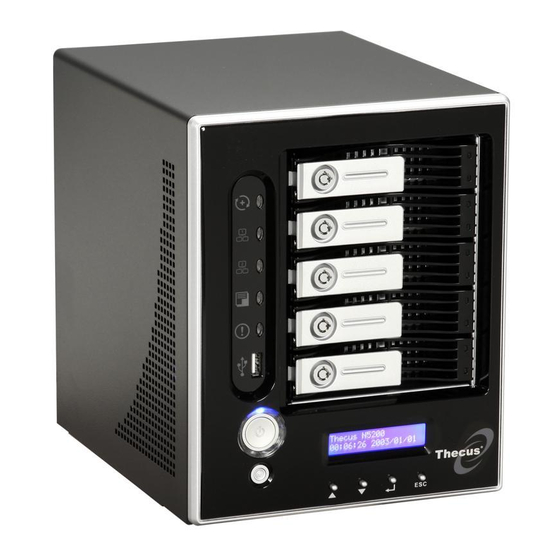
Page 10: Front Panel
Front Panel The Thecus N5200PRO’s front panel has the device’s controls, indicators, and hard disk trays: Front Panel Item Description DOM LED Solid orange: system is being upgraded WAN LED Solid green: network link Blinking green: network activity LAN LED ... -
Page 11: Hard Disk Trays
Blinking green: system is accessing data on the hard disk Blinking red: a hard disk error has occurred Rear Panel (N5200B PRO) The Thecus N5200B PRO’s rear panel features ports and connectors. N5200B PRO Back Panel Item Description eSATA Port ... -
Page 12: Rear Panel (N5200Br Pro)
Rear Panel (N5200BR PRO) The Thecus N5200BR PRO’s rear panel features ports and connectors. N5200BR PRO Back Panel Item Description eSATA Port eSATA port for high-speed storage expansion USB Port USB 2.0 port for compatible USB devices, such as digital... -
Page 13: Chapter 2: Hardware Installation
Chapter 2: Hardware Installation Overview Your N5200PRO is designed for easy installation. To help you get started, the following chapter will help you quickly get your N5200PRO up and running. Please read it carefully to prevent damaging your unit during installation. Before You Begin Before you begin, be sure to take the following precautions: 1. -
Page 14: Cable Connections
Cable Connections To connect the N5200PRO to your network, follow the steps below: 1. Connect an Ethernet cable from your network to the WAN port on the back panel of the N5200PRO. 2. Connect the provided power cord into the universal power socket on the back panel. -
Page 15: Checking System Status
Checking System Status After making connections on the N5200PRO and powering up, check whether the system status is normal or has trouble by observing indicators on the front panel and hard disk trays. System Status Normal The system status is normal if: The WAN and LAN LEDs glow green (assuming both are connected). -
Page 16: Chapter 3: First Time Setup
N5200PRO so that it is accessible to your network users. There are two ways to set up your N5200PRO: using the Thecus Setup Wizard or the LCD display. Follow the steps below for initial software setup. - Page 17 6. Name your N5200PRO and configure the network IP address. If your switch or router is configured as a DHCP Server, configuring the N5200PRO to automatically obtain an IP address is recommended. You may also use a static IP address and enter the DNS Server address manually.
-
Page 18: Lcd Operation
The Thecus Setup Wizard is designed for installation on systems NOTE running Windows XP/2000 or Mac OSX or later. Users with other operating systems will need to install the Thecus Setup Wizard on a host machine with one of these operating systems before using the unit. -
Page 19: Usb Copy
IP address and netmask of your WAN ports. LAN Setting IP address and netmask of your LAN ports. Link Agg. Setting Select Load Balance or Failover. (N5200B PRO only) Change Admin Passwd Change administrator’s password for LCD operation. Reset to Default Reset system to factory defaults. -
Page 20: Step 2: Raid Creation
Step 2: RAID Creation Next, administrators can configure their preferred RAID setting and build their RAID volume. You can access RAID settings from the menu bar of the Web Administration Interface by navigating to Storage > RAID. For more information on configuring RAID, see Chapter 4: System Management >...
Need help?
Do you have a question about the N5200B PRO and is the answer not in the manual?
Questions and answers