Table of Contents
Advertisement
Quick Links
Advertisement
Table of Contents

Subscribe to Our Youtube Channel
Related Manuals for Thecus N5200B, N5200BR


Summary of Contents for Thecus N5200B, N5200BR
- Page 1 Thecus N5200B N5200BR User’s Manual...
-
Page 2: Copyright And Trademark Notice
About This Manual All information in this manual has been carefully verified to ensure its correctness. In case of an error, please provide us with your feedback. Thecus Technology Corporation reserves the right to modify the contents of this manual without notice. -
Page 3: Safety Warnings
Safety Warnings For your safety, please read and follow the following safety warnings: Read this manual thoroughly before attempting to set up your N5200. Your N5200 is a complicated electronic device. DO NOT attempt to repair it under any circumstances. In the case of malfunction, turn off the power immediately and have it repaired at a qualified service center. -
Page 4: Table Of Contents
Checking System Status ..............15 System Status Normal................. 15 System Trouble .................. 15 Chapter 3: First Time Setup ............16 Overview ..................... 16 Thecus Setup Wizard ................16 LCD Operation ..................18 LCD Controls..................18 Display Mode ..................18 USB Copy....................19 Management Mode ................ - Page 5 Power Management ................28 Storage Management ................29 Disks Information ................29 S.M.A.R.T. Information................29 RAID Information ................30 RAID Configuration ................31 RAID Level ....................31 RAID Settings ................... 32 Creating a RAID ..................32 Expanding a RAID ..................33 Migrating a RAID ..................
- Page 6 Setting Up an Nsync Target on an Nsync Device..........67 Setting Up an Nsync Target on Another Device ..........67 Designating N5200 as an Nsync Target ............67 Thecus Backup Utility ................67 Windows XP Data Backup ..............69 Apple OS X Backup Utilities ..............69 Chapter 7: Tips and Tricks ............
- Page 7 Overview ..................... 81 What is Active Directory? ..............81 ADS Benefits..................81 Appendix E: UPS Compatibility List..........82 Appendix F: Licensing Information ..........85 Overview ..................... 85 Source Code Availability ..............85 CGIC License Terms................. GNU General Public License..............86...
-
Page 8: Chapter 1: Introduction
Chapter 1: Introduction Overview Thank you for choosing the Thecus N5200 IP Storage Server. The Thecus N5200 is an easy-to-use storage server that allows a dedicated approach to storing and distributing data on a network. Data reliability is ensured with RAID features that provide data security and recovery—over one Terabyte of storage is available... -
Page 9: Package Contents
want to conserve energy. Wake-On-LAN enables administrator to remotely turn on the system without even leaving their own seat. To schedule system on and off, refer to Chapter 4: System Management > System Settings > Reboot and Shutdown System > Scheduled Power On/Off. -
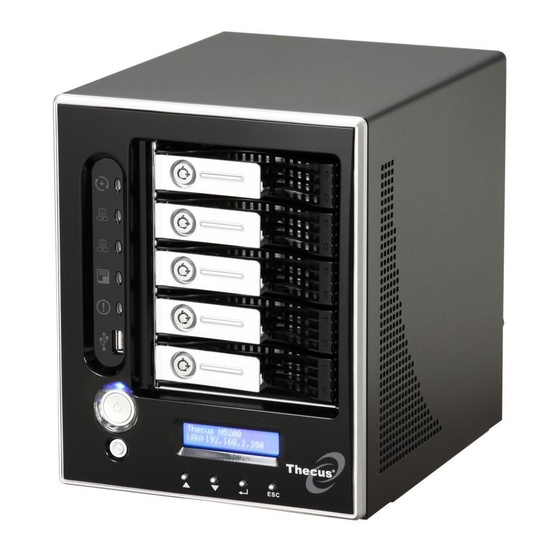
Page 10: Front Panel
Front Panel The Thecus N5200’s front panel has the device’s controls, indicators, and hard disk trays: Front Panel Item Description 1.DOM LED • Solid orange: system is being upgraded or system startup; data currently inaccessible 2.WAN LED • Solid green: network link •... -
Page 11: Hard Disk Trays
• Solid blue: hard disk is powered on HDD Access/Error • Blinking green: system is accessing data on the hard disk Rear Panel (N5200B) The Thecus N5200B’s rear panel features ports and connectors. N5200B Back Panel Item Description 1.eSATA Port •... -
Page 12: Rear Panel (N5200Br)
Rear Panel (N5200BR) The Thecus N5200BR’s rear panel features ports and connectors. N5200BR Back Panel Item Description 1.eSATA Port • eSATA port for high-speed storage expansion 2.USB Port • USB 2.0 port for compatible USB devices, such as USB disks, and USB printers 3.USB Port(target) -
Page 13: Chapter 2: Hardware Installation
Chapter 2: Hardware Installation Overview Your N5200 is designed for easy installation. To help you get started, the following chapter will help you quickly get your N5200 up and running. Please read it carefully to prevent damaging your unit during installation. Before You Begin Before you begin, be sure to take the following precautions: 1. -
Page 14: Cable Connections
Cable Connections To connect the N5200 to your network, follow the steps below: 1. Connect an Ethernet cable from your network to the WAN port on the back panel of the N5200. 2. Connect the provided power cord into the universal power socket on the back panel. -
Page 15: Checking System Status
Checking System Status After making connections on the N5200 and powering up, check whether the system status is normal or has trouble by observing indicators on the front panel and hard disk trays. System Status Normal The system status is normal if: The WAN and LAN LEDs glow green (assuming both are connected). -
Page 16: Chapter 3: First Time Setup
N5200 so that it is accessible to your network users. There are two ways to set up your N5200: using the Thecus Setup Wizard or the LCD display. Follow the steps below for initial software setup. - Page 17 6. Name your N5200 and configure the network IP address. If your switch or router is configured as a DHCP Server, configuring the N5200 to automatically obtain an IP address is recommended. You may also use a static IP address and enter the DNS Server address manually. 7.
-
Page 18: Lcd Operation
The Thecus Setup Wizard is designed for installation on systems NOTE running Windows XP/2000 or Mac OSX or later. Users with other operating systems will need to install the Thecus Setup Wizard on a host machine with one of these operating systems before using the unit. -
Page 19: Usb Copy
RAID Current RAID status. System Fan Current system fan status. CPU Fan Current CPU fan status 2006/06/16 12:00 Current system time. The N5200 will rotate these messages every one-two seconds on the LCD display. USB Copy The USB Copy function enables you to copy files stored on USB devices such as USB disks and digital cameras to the N5200 with a press of a button. -
Page 20: Step 1: Network Setup
Step 1: Network Setup From the Web Administration Interface, you can configure the network settings of the N5200 for your network. You can access the Network menu from the menu bar. For details on how to configure your network settings, refer to Chapter 4: System Management >... - Page 21 File Transfer Protocol (FTP) Media Server Printer Server...
-
Page 22: Chapter 4: System Management
Chapter 4: System Management Overview The N5200 provides an easily accessible Web Administration Interface. With it, you can configure and monitor the N5200 anywhere on the network. Web Administration Interface Make sure your network is connected to the Internet. To access the N5200 Web Administration Interface: 1. -
Page 23: Language Selection
N5200. Network Information and settings for network connections, as well as various services of the N5200. Accounts Allows configuration of users and groups. System Various N5200 system settings and information. Language Choose your preferred language here. Moving your cursor over any of these items will display the dropdown menu selections for each group. -
Page 24: Status Menu
Status Menu The Status Menu on the menu bar allows you to see various aspects of the N5200. From here, you can discover the status of the N5200, and even find out other details like firmware version and up time. Product Information Once you login, you will first see the basic Product Information screen providing... -
Page 25: System Information
Service Status Item Description AFP Status The status of the Apple Filing Protocol server. NFS Status The status of the Network File Service Server. SMB/CIFS Status The status of the SMB/CIFS server. FTP Status The status of the FTP server. Media Server The status of the Media Server Nsync Status... -
Page 26: Ups Settings
Printer Status Item Description Manufacturer Displays the name of the USB printer manufacturer. Model Displays the model of the USB printer. Status Displays the status of the USB printer. Remove document Click to remove all documents from printer queue from Queue Restart Printer service Click to restart printer service If a corrupt print job is sent to a printer, printing may suddenly fail. -
Page 27: Wake-Up On Lan (Wol)
Wake-Up On Lan (WOL) The N5200 has the ability to be awoken from sleep mode via WAN port. From the Status menu, choose the WOL item, and the Wake-up On Lan Configuration screen appears. From here, you can Enable or Disable. Wake-up On Lan Configuration Item Description... -
Page 28: Power Management
Power Management Using the N5200’s Power Management, you can save energy and money by scheduling the N5200 to turn itself on and off during certain times of the day. From the Status menu, choose the Power Mgmt item and the Schedule Power On/Off screen appears. -
Page 29: Storage Management
Storage Management The Storage Menu displays the status of storage devices installed in the N5200, and includes storage configuration options such as RAID and disk settings, folder configuration, and Nsync settings. Disks Information From the Storage menu, choose the Disks item and the Disks Information screen appears. -
Page 30: Raid Information
S.M.A.R.T. Information Item Description Tray Number Tray the hard disk is installed in. Model Model name of the installed hard disk. Power ON Hours Count of hours in power-on state. The raw value of this attribute shows total count of hours (or minutes, or seconds, depending on manufacturer) in power-on state. -
Page 31: Raid Configuration
RAID Information Item Description RAID Level Shows the current RAID configuration. Status Indicates status of the RAID. Can read either Healthy, Degraded, or Damaged. Disks Used Hard disks used to form the current RAID volume. Total Capacity Total capacity of the current RAID. Data Capacity Indicates the used capacity and total capacity used by user data. -
Page 32: Raid Settings
failed disks. If the administrator improperly removes a hard disk that should not be WARNING removed when RAID status is Degraded, all data will be lost. RAID Settings Using RAID Settings, you can select stripe size, choose which disks are RAID disks or the Spare Disk, as well as enter a name for each disk. -
Page 33: Expanding A Raid
Building a RAID storage space may take time, dep ending on the size of NOTE hard drives and RAID mode. Creating RAID destroys all data in the current RAID volume. The data is WARNING unrecoverable. With a RAID 1, RAID 5, RAID 6, or RAID 10 volume, you can also add a spare disk after the RAID is created. -
Page 34: Migrating A Raid
Migrating a RAID Once a RAID volume has been created, you may want to move it to other physical drives or change the RAID array all together. To migrate a RAID 0, RAID 1, or RAID 5 volume, follow the steps below: 1. -
Page 35: Space Allocation
Space Allocation You may specify the space allocated for Target USB volumes. To do this, under the Storage menu, click RAID and the RAID List window appears. Select the RAID volume you wish to reallocate by clicking on its radio button, and click Space Allocation. -
Page 36: Folder Management
Folder Management From the Storage menu, choose Folder, and the Folder screen appears. This screen allows you to create and configure folders on the N5200 volume. Folder Item Description Folder name Displays the name of the folder. Description Provides a description of the folder. NFS Share Press NFS Share to configure which hosts on the network are allowed to access this folder using NFS. -
Page 37: Editing Folders
Add Folder Item Description Folder Name Enter the name of the folder. Description Provide a description the folder. Browseable Enable or disable users from browsing the folder contents. If Yes is selected, then the share folder will be browseable. Public Admit or deny public access to this folder. -
Page 38: Nfs Share
NFS Share To allow NFS access to the share folder, enable the NFS Service, and then set up hosts with access rights by clicking Add. NFS Share Item Description Hostname Enter the name or IP address of the host Privilege Host has either read only or writeable access to the folder. -
Page 39: Folder Access Control List (Acl)
Folder Access Control List (ACL) On the Folder screen, press the ACL button, and the Access Control List screen appears. This screen allows you to configure access to the specific folder for users and groups. Select a user or a group from the left hand column and then choose Deny, Read Only, or Writable to configure their access level. -
Page 40: File System Check
2. From the drop down select the group you would like to search for the user 3. Click Search. The system will list up to 1,000 users from the chosen category. To NOTE narrow your search, enter a search term in the blank provided. File System Check The File System Check allows you to perform a check on the integrity of your disks’... - Page 41 Click Start to begin the file system check. Click Back to return to the previous screen. Click Reboot to reboot the system. When the file system check is run, the system will show 20 lines of information until it is complete. Once complete, the results will be shown at the bottom. The system must be rebooted before the N5200 can function normally.
-
Page 42: Network Management
Network Management Use the Network menu to make network configuration settings as well as service support settings. WAN Configuration From the Network menu, choose WAN, and the WAN Configuration screen appears. This screen displays the network parameters of the WAN connection. You may change any of these items and press Apply to confirm your settings. -
Page 43: Lan Configuration
Most Fast Ethernet (10/100) Switches/Routers do not support Jumbo WARNING Frame and you will not be able to connect to your N5200 after Jumbo Frame is turned on. If this happens, turn off the N5200. Then, power on the N5200 and immediately press and hold the Reset button on the back of the unit for 10 seconds. -
Page 44: Wlan Configuration
WLAN Configuration When a compatible wireless USB dongle is installed on the N5200, the N5200 will become an access point, and the Network dropdown menu will contain a WLAN menu item. From the Network menu, choose WLAN, and the WLAN Configuration screen appears. -
Page 45: Wan Lan Exchange
Users should obey the international RF regulatory rules as they set up the wireless RF channel on the N5200. The RF operating channels for different regions have been specified as following. Thecus has no responsibility for users attempting to violate the international RF regulation. -
Page 46: Afp (Apple Network Setup)
find the IP address of the N5200. AFP (Apple Network Setup) From the Network menu, choose the AFP item, and the AFP Configuration screen appears. This screen displays the configuration items for the Apple Filing Protocol. You can change any of these items and press Apply to confirm your settings. -
Page 47: User And Group Management
User and Group Management The N5200 has built-in user database that allows administrators to manage user access using different group policies. From the Accounts menu, you can create, modify, and delete users, and assign them to groups that you designate. Local User Configuration From the Accounts menu, choose the Users item, and the Local User... -
Page 48: Modifying Users
Modifying Users 1. Select an existing user from the Local User Configuration screen. 2. Click on the Modify button, and Local User Setting screen appears. 3. From here, you can enter a new password and re-enter to confirm, or use the <<... -
Page 49: Modifying Groups
5. Select users to be in this group from the Users List by adding them to the Members List using the << button. 6. Click the Apply button to save your changes. Modifying Groups 1. On the Local Group Configuration screen, select a group name from the list. -
Page 50: Ads/Nt Configuration
ADS/NT Configuration If you have a Windows Active Directory Server (ADS) or Windows NT server to handle the domain security in your network, you can simply enable the ADS/NT support feature; the N5200 will connect with the ADS/NT server and get all the information of the domain users and groups automatically. - Page 51 AD Domain Example Item Information Work Group / Domain domain Name ADS Support Enable ADS Server Name Computer1 ADS/NT Realm Domain.local Administrator ID Administrator Administrator *********** Password Confirm Password *********** • The DNS server specified in the WAN configuration page should be NOTE able to correctly resolve the ADS server name.
-
Page 52: System Settings
System Settings The System menu gives you a wealth of settings that you can use to configure your N5200’s system administration functions. You can set up system notifications, view system logs, and even upgrade firmware from this menu. System Notifications From the System menu, choose the Notification item, and the Notification Configuration screen appears. -
Page 53: Time And Date Settings
System Logs Item Description Truncate All Log File Clear all log files. |<< < > >>| Use the forward ( > >>| ) and backward ( |<< < ) buttons to browse the log pages. INFO Provides all log information including warning messages and error messages. -
Page 54: System Configuration Backup And Restore
System Configuration Backup and Restore From the System menu, choose the Config Mgmt item and the System Configuration Download/Upload screen appears. From here, you can download or upload stored system configurations. See the following table for a detailed description of each item. System Configuration Download/Upload Item Description... -
Page 55: Reset To Factory Default Settings
• The beeper only beeps if it is enabled in the System Notification NOTE menu. • Check Thecus website for the latest firmware release and release notes. Do NOT turn off the system during the firmware upgrade process. This WARNING... -
Page 56: Change Administrator Password
Change Administrator Password From the System menu, choose the Administrator Password item and the Change Administrator Password screen appears. Enter a new password in the New Password box and confirm your new password in the Confirm Password box. Press Apply to confirm password changes. See the following table for a detailed description of each item. -
Page 57: Chapter 5: Additional Feature Setup
Chapter 5: Additional Feature Setup Overview The N5200 can also act as an FTP Server, allowing employees and clients to transfer files using their favorite FTP programs. The integrated Print Server allows you to share a single USB printer will all users on the network. The following section shows you how. -
Page 58: Media Server
Media Server With the built-in Media Server capability, the N5200 provides media streaming service to stand-alone networked home media adapters that support the UPnP AV protocol or are Digital Living Network Alliance (DLNA) standard compliant. With the N5200’s built-in media server capability, you can share digital media such as music, pictures, and movies with any compatible device throughout your entire... - Page 59 b. Some DMAs are wireless enabled. You can connect the DMA to a wireless router. For instructions on how to connect your DMA to a wireless router, please refer to your DMA’s user manual. 2. Connect your DMA’s video output to video input of your TV set. 3.
-
Page 60: Printer Server
“Default Printer”. Select Yes and all your print jobs will be submitted to this printer by default. Click Next. 9. Click Finish. • Not all USB printers are supported. Please check Thecus website for NOTE a list of supported printers. -
Page 61: Windows Vista
Windows Vista To set up the Printer Server in Windows Vista, follow the steps below: 1. Open Printer Folder from the Control Panel. 2. Click the right mouse button in anywhere on the Printers folder and then select Add Printer. 3. - Page 62 4. Select The printer that I want isn’t listed. You can press The printer that I want isn’t listed to go into next page without waiting for Searching for available printers to finish. 5. Click Select a shared printer by name. Type http://<Thecus_NAS>:631/printers/usb-printer in the box, where <Thecus_NAS_IP>...
- Page 63 If your printer model is not listed, please contact your printer manufacturer for help. 7. Windows will attempt to connect to the printer. 8. You can choose to set this printer as the default printer by checking the Set as the default printer box. Click Next to continue. 9.
-
Page 64: Chapter 6: Using The N5200
Chapter 6: Using the N5200 Overview Once the N5200 is setup and operating, users on the network may manage all varieties of digital music, photos, or files by simply using their web browsers. To manage your personal files or access public files on the N5200, just enter its IP address into your browser (default IP address is http://192.168.1.100), and you will be taken to the N5200 Login page. -
Page 65: Mapping A Client Pc To The N5200
7. To upload a file from your computer to the current folder, press the New file (upload) button. When the screen appears, press Browse and locate the file to upload. Press OK and the file is uploaded to the current folder. 8. -
Page 66: File Backup
Add Nsync Task Item Description Task Name The name of your Nsync task. Manufacturer Select whether the target is a Thecus Product (e.g. N5200) or FTP server. Target Server IP The IP address of your target server. Address Source Folder The share folder you want to backup. -
Page 67: Setting Up An Nsync Target On An Nsync Device
TCP/1194 on your firewall in both directions. Thecus Backup Utility The Thecus Backup Utility is on your Installation CD. When you click on the CD, the Backup Utility will be installed under Program Groups > Thecus > Thecus Backup Utility. If it is not installed, you can copy the file (Thecus Backup Utility.exe) to a convenient location on your hard disk and double click to... - Page 68 If you can not find Thecus Backup Utility on your CD, please download it NOTE from the Thecus website (http://www.thecus.com). When you execute this utility for the first time, it will ask you whether to create a DB file. Click Yes.
-
Page 69: Windows Xp Data Backup
Windows XP Data Backup If you use Windows XP Professional, you can also use the Windows Backup Utility (Ntbackup.exe) to backup your files. If you use Windows XP Home Edition, follow these steps to install the utility: 1. Insert the Windows XP CD into a drive and double-click the CD icon in My Computer. -
Page 70: Chapter 7: Tips And Tricks
Chapter 7: Tips and Tricks USB and eSATA Storage Expansion The N5200 supports external USB hard disks through its three USB ports. Once a USB hard disk has successfully mounted, the entire volume will be copied automatically to the default USB HDD folder. The N5200 supports up to 6 USB external storage devices. -
Page 71: Remote Administration
This is especially useful if you are traveling and suddenly need a file from your N5200. Setting up remote administration is a three-part process, and will require the following equipment: Thecus N5200 NAS device • Cable/DSL Router with Dynamic DNS support •... -
Page 72: Firewall Software Configuration
Replacing Damaged Hard Drives If you are using RAID 1, RAID 5, RAID 6, or RAID 10, you can easily replace a damaged hard drive in the Thecus N5200 while keeping your data secure with the system’s automatic data recovery. -
Page 73: Chapter 8: Troubleshooting
IP address by either looking directly onto the N5200’s LCD panel, or by using the setup wizard to retrieve the IP of your N5200. 1. Start the Setup Wizard, and it will automatically detect all Thecus IP storage products on your network. -
Page 74: Restoring Factory Defaults
Restoring Factory Defaults From the System menu, choose the Factory Default item and the Reset to Factory Default screen appears. Press Apply to reset the N5200 to factory default settings. Resetting to factory defaults will not erase the data stored in the hard WARNING disks, but WILL revert all the settings to the factor y default values. -
Page 75: Appendix A: Product Specifications
Appendix A: Product Specifications Hardware Specifications Product Model N5200B N5200BR Core Processors / Memory Processor Intel® 600MHz Celeron® M Memory 512MB DDR Network Interfaces Gigabit RJ-45 connector Gigabit RJ-45 connector Gigabit RJ-45 connector 4 Port Gigabit switch Storage HDD Bays 5 x 3.5”... - Page 76 Share folder level permission File level permission Public folder Quota Management Share folder quota control Backup Thecus Backup Utility (Windows XP/2000 and MAC OS X) Thecus Nsync System Management Web GUI Multilingual support (English, French, German, Italian, Traditional Chinese, Simplified Chinese,...
-
Page 77: Appendix B: Customer Support
Chapter 8: Troubleshooting, located in this manual. You can also try to ensure that you are using the latest firmware version for your N5200. Thecus is committed to providing free firmware upgrades to our customers. Our newest firmware is available on our Download Center: http://www.thecus.com/download.php... -
Page 78: Appendix C: Raid Basics
RAID Levels The Thecus N5200 supports standard RAID levels 0, 1, 5, 6, 10, and JBOD. You choose a RAID level when you create a system volume. The factors for selecting a RAID level are: •... -
Page 79: Raid 1
RAID 1 RAID 1 mirrors all data from one hard disk drive to a second one hard disk drive, thus providing complete data redundancy. However, the cost of data storage capacity is doubled. This is excellent for complete data security. RAID 5 RAID 5 offers data security and it is best suited for networks that perform many small I/O transactions at the same time, as well as applications that require data... -
Page 80: Disk Usage
Disk Usage When all 5 disks are of the same size, and used in RAID, N5200 disk usage percentage is listed below: RAID Level Percentage Used RAID 0 100% RAID 1 RAID 5 RAID 6 RAID 10 JBOD 100% RAID 10 allows only 4 disks and one as spare disk. NOTE... -
Page 81: Appendix D: Active Directory Basics
Appendix D: Active Directory Basics Overview With Windows 2000, Microsoft introduced Active Directory (ADS), which is a large database/information store. Prior to Active Directory the Windows OS could not store additional information in its domain database. Active Directory also solved the problem of locating resources;... -
Page 82: Appendix E: Ups Compatibility List
Appendix E: UPS Compatibility List Brand Series Model Notes Ablerex MS-RT ActivePower 1400VA MiniGuard UPS 700 M2501 cable Back-UPS Pro Matrix-UPS Smart-UPS Back-UPS 940-0095A/C cables, 940-0020B/C cables, 940-0023A cable Back-UPS Office 940-0119A cable Masterswitch Not a UPS - 940- 0020 cable Back-UPS RS 500 custom non- USB cable Regulator Pro serial... - Page 83 Brand Series Model Notes PowerRite MAX Fiskars PowerServer 10, 30 All models with alarm interface MP110/210 Gamatronic MS-T µPS3/1 Gemini UPS625/UPS1000 R3000 XR R5500 XR INELT Monolith 1000LT Infosec iPEL 350, 500, 750, 1000 Ippon (various) UPStation GXT2 contact-closure Liebert cable Masterguard (various)
- Page 84 Brand Series Model Notes Powercom TrustTrust 425/625 BNT-1000AP Advice Partner/King Pr750 BNT-2000AP PowerGuard PG-600 PowerKinetics 9001 PowerTech Comp1000 DTR cable power Power Walker Line-Interactive VI1000 3110, 3115, 5119, 5125, 5119 RM, PW5115 Powerware PW5125PW9120, PW9125, 9120, 9150, 9305 PM525A/-625A/-800A/-1000A/- Powerwell 1250A RPF525/625/800/1000 Repotec...
-
Page 85: Appendix F: Licensing Information
Source Code Availability Thecus Technology Corp. has exposed the full source code of the GPL licensed software. For more information on how you can obtain our source code, please visit our web site, http://www.thecus.com. -
Page 86: Cgic License Terms
CGIC License Terms Basic License CGIC, copyright 1996, 1997, 1998, 1999, 2000, 2001, 2002, 2003, 2004 by Thomas Boutell and Boutell.Com, Inc. Permission is granted to use CGIC in any application, commercial or noncommercial, at no cost. HOWEVER, this copyright paragraph must appear on a "credits"... - Page 87 Also, for each author's protection and ours, we want to make certain that everyone understands that there is no warranty for this free software. If the software is modified by someone else and passed on, we want its recipients to know that what they have is not the original, so that any problems introduced by others will not reflect on the original authors' reputations.
- Page 88 c) If the modified program normally reads commands interactively when run, you must cause it, when started running for such interactive use in the most ordinary way, to print or display an announcement including an appropriate copyright notice and a notice that there is no warranty (or else, saying that you provide a warranty) and that users may redistribute the program under these conditions, and telling the user how to view a copy of this License.
- Page 89 operating system on which the executable runs, unless that component itself accompanies the executable. If distribution of executable or object code is made by offering access to copy from a designated place, then offering equivalent access to copy the source code from the same place counts as distribution of the source code, even though third parties are not compelled to copy the source along with the object code.
- Page 90 This section is intended to make thoroughly clear what is believed to be a consequence of the rest of this License. 8. If the distribution and/or use of the Program is restricted in certain countries either by patents or by copyrighted interfaces, the original copyright holder who places the Program under this License may add an explicit geographical distribution limitation excluding those countries, so that distribution is permitted only in or among countries not thus excluded.
Need help?
Do you have a question about the N5200B, N5200BR and is the answer not in the manual?
Questions and answers