
Related Manuals for Phoenix Contact UM EN PROFICLOUD


Summary of Contents for Phoenix Contact UM EN PROFICLOUD
- Page 1 Startup and operation of hard- ware and software components of the PROFICLOUD User manual...
- Page 2 User manual Startup and operation of hardware and software components of the PROFICLOUD 2016-05-24 Designation: UM EN PROFICLOUD Revision: Order No.: — This user manual is valid for: Designation Revision Order No. AXC CLOUD-PRO 2402985 CLOUD COUPLER-PRO 2402990 PHOENIX CONTACT...
- Page 3 How to contact us Internet Up-to-date information on Phoenix Contact products and our Terms and Conditions can be found on the Internet at: phoenixcontact.com Make sure you always use the latest documentation.
- Page 4 The receipt of technical documentation (in particular user documentation) does not constitute any further duty on the part of Phoenix Contact to furnish information on modifications to products and/or technical documentation. You are responsible to verify the suitability and intended use of the products in your specific application, in particular with regard to observing the applicable standards and regulations.
-
Page 5: Table Of Contents
Assigning the PROFINET device name ..........44 PROFICLOUD coupler CLOUD COUPLER-PRO ..........45 4.2.1 Safety notes for mounting ..............45 4.2.2 Mounting ....................46 PROFICLOUD web interface ....................49 License model ..................... 49 Establishing a connection with the PROFICLOUD web interface ......50 106496_en_02 PHOENIX CONTACT... - Page 6 Documentation ..................85 PROFICLOUD services ......................87 CLOUD SERVICE/WEATHER ................87 CLOUD SERVICE/CALC..................94 Error causes and remedies.......................97 AXC CLOUD-PRO....................97 CLOUD COUPLER-PRO..................98 Appendix for document lists......................99 List of figures ....................... 99 List of tables ...................... 101 Index........................103 PHOENIX CONTACT 106496_en_02...
-
Page 7: General Information
(WBM) of the PROFICLOUD coupler: • Open the WBM of the PROFICLOUD coupler (see Section 3.2.6). • Click on the “Licenses” link on the bottom-left of the WBM. • Download the text file located here containing the licensing information. 106496_en_02 PHOENIX CONTACT... -
Page 8: Requesting Source Code
The source code of these software components can be requested from After Sales Service at Phoenix Contact in the form of a CD or DVD-ROM for a processing fee of 50 euros within three years of delivery of the PROFICLOUD coupler. -
Page 9: System Description
AXC CLOUD-PRO the PROFICLOUD. The PROFICLOUD devices must each be registered in the PROFICLOUD with a UUID (Uni- versally Unique Identifier) and must be assigned to a PROFICLOUD coupler. The PROFINET network then commences communication via the PROFICLOUD. 106496_en_02 PHOENIX CONTACT... -
Page 10: Proficloud System Overview
Emul. field device: Locally emulated PROFINET device Cloud field device: Distributed PROFICLOUD device (e.g., AXC CLOUD-PRO) Virtual cloud field device: Virtual PROFICLOUD device (e.g., CLOUD SERVICE/CALC) Hybrid cloud field device: Combination of virtual and distributed PROFICLOUD de- vice PHOENIX CONTACT 106496_en_02... -
Page 11: Proficloud With Proficloud Devices Distributed Worldwide
9 10 11 12 13 14 15 16 FAIL FAIL SD-CARD SD-CARD PROG PROG CLOUD CLOUD DREG DREG Distributed Distributed PROFINET station PROFINET station Figure 2-2 PROFICLOUD with PROFICLOUD devices distributed worldwide Please note: The PROFICLOUD system is not designed for real-time communication. 106496_en_02 PHOENIX CONTACT... - Page 12 PROFICLOUD PHOENIX CONTACT 106496_en_02...
-
Page 13: Device Descriptions
NOTE: Electrostatic discharge! The device contains components that can be damaged or destroyed by electrostatic dis- charge. When handling the device, observe the necessary safety precautions against electrostatic discharge (ESD) according to EN 61340-5-1 and IEC 61340-5-1. 106496_en_02 PHOENIX CONTACT... -
Page 14: Connection And Operating Elements
Plug for connecting the supply voltage SD card holder The SD card is not supplied as standard. Please refer to the ordering data in Section “Accessories” on page 84. Mode selector switch 10. Diagnostics and status indicators PHOENIX CONTACT 106496_en_02... -
Page 15: Diagnostics And Status Indicators
Connection to the PROFICLOUD was established, but the flashing green nection to the PROFICLOUD device is not connected with a PROFICLOUD (0.5 Hz) PROFICLOUD coupler in the PROFICLOUD. flashing (4 The PROFICLOUD device is in DREG mode (see Section 3.1.5). 106496_en_02 PHOENIX CONTACT... - Page 16 Boot phase of the PROFICLOUD device, from sending the (troubleshooting) BootP request to assigning the IP address settings, if the MAC flashing (2 address of the PROFICLOUD device has been entered in the PC Worx software. Otherwise stops flashing after three failed BootP requests. PHOENIX CONTACT 106496_en_02...
- Page 17 I/O warning at an Axioline F device yel- Error/warning low/red red on I/O error at an Axioline F device PWR: supply voltage (communications power U 24 V communications power supply not present or too low. green Logic 24 V communications power supply present. 106496_en_02 PHOENIX CONTACT...
-
Page 18: Mode Selector Switch
PRO or if the application program has been stopped by PC Worx. Please note: Each time the operating mode is changed, the AXC CLOUD-PRO is restarted and the AXC CLOUD-PRO attempts to establish a connection to the PROFICLOUD. PHOENIX CONTACT 106496_en_02... - Page 19 Hold down the mode selector switch (for approx. four seconds) in DREG position until the CLOUD LED begins to flash. The AXC CLOUD-PRO is restarted. After restarting, the device is deregistered from the PROFICLOUD and can be registered in another account. 106496A001 Figure 3-3 Mode selector switch 106496_en_02 PHOENIX CONTACT...
-
Page 20: Reset Button (Concealed)
In the default settings, the AXC CLOUD-PRO contains an application program for the au- tomatic startup of the Axioline F local bus. When the AXC CLOUD-PRO is completely re- set, the application program is deleted. Automatic startup of the Axioline F local bus is then no longer possible. PHOENIX CONTACT 106496_en_02... -
Page 21: Supply Plug
AXC CLOUD-PRO through the Axioline F station (local bus). A bus base module is supplied with the AXC CLOUD-PRO. 8482A010 Figure 3-6 Structure of the AXC CLOUD-PRO bus base module Bus base module Connection of the local bus to the AXC CLOUD-PRO (socket) Connection to the following bus base module (socket) 106496_en_02 PHOENIX CONTACT... -
Page 22: Automatic Startup Of The Axioline F Local Bus
For some diagnostic codes, an additional diagnostic code is generated in order to specify the error encountered in more detail. The diagnostic codes are issued in the input bytes 0 ... 1, and the additional diagnostic codes in the input bytes 2 ... 3 (see Table 3-4). PHOENIX CONTACT 106496_en_02... -
Page 23: Input And Output Bytes Used For The Axioline F Modules Of The Example
The local bus is not in the expected state. C800 000X Representation of the states of the local bus: Bit 0 – READY, bit 1 – ACTIVE, bit 3 – RUN Timeout error during internal processing C990 xxxx Number of the currently processed case instruction 106496_en_02 PHOENIX CONTACT... - Page 24 Meanings of the diagnostic codes and additional diagnostic codes Diagnostic code Additional diag- Meaning nostic code Local bus error (XX is a placeholder for the slot number) CFXX xxxx Axioline F diagnostic register (see user manual “Axioline F, diagnostic register, and error messages”) PHOENIX CONTACT 106496_en_02...
-
Page 25: Proficloud Coupler Cloud Coupler-Pro
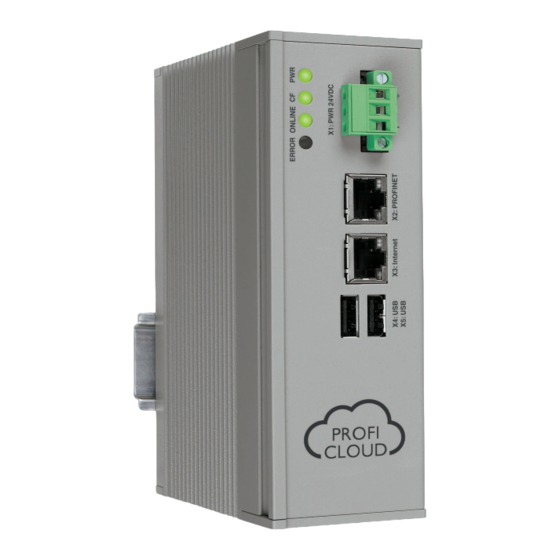
Connection elements of the PROFICLOUD coupler The PROFICLOUD coupler consists of the following components: LEDs Ethernet interface X2 for connection to the PROFINET network Ethernet interface X3 for connection to the Internet and the PROFICLOUD USB interfaces Power connector 106496_en_02 PHOENIX CONTACT... -
Page 26: Diagnostics And Status Indicators
ONLINE green The PROFICLOUD coupler is switched off the PROFICLOUD service is not being executed. CompactFlash® card inactive green flashing CompactFlash® card active Supply voltage is not present or is too low. green Supply voltage is present. PHOENIX CONTACT 106496_en_02... -
Page 27: Power Connector
Device descriptions 3.2.5 Power connector 106496A005 Figure 3-8 Power connector terminal points Table 3-8 Power connector terminal points Terminal point Assignment 24 V DC (19.2 V DC ... 28.8 V DC) 0 V DC Functional earth ground 106496_en_02 PHOENIX CONTACT... -
Page 28: Web-Based Management (Wbm)
This user name cannot be modified. No additional users can be created. • Click the “Log-in” button to log into the WBM. Forgotten your password? If you have already changed the password (see Section 3.2.6.3) and have forgotten it, please contact the Phoenix Contact service hotline. PHOENIX CONTACT 106496_en_02... - Page 29 PROFICLOUD coupler Network settings of the PROFICLOUD coupler “General” section UUID UUID of the PROFICLOUD coupler which the WBM you are currently logged into relates to Status Registration status of the PROFICLOUD coupler in the PROFICLOUD 106496_en_02 PHOENIX CONTACT...
- Page 30 The password should be at least 6 characters long. • Enter the desired password again in the “Confirm pass- word” input field. • Click the “Change password” button to complete the pass- word change • click the “Cancel” button to cancel the password change. PHOENIX CONTACT 106496_en_02...
-
Page 31: Log Messages Of The Proficloud Coupler
PROFICLOUD coupler. The “Overview/Coupler Status Details” page is opened (see Figure 3-11). • Click the “Download Complete Log” button to save all log messages of the PROFICLOUD coupler as a log file. 106496_en_02 PHOENIX CONTACT... - Page 32 PROFICLOUD Figure 3-11 Log messages of the PROFICLOUD coupler PHOENIX CONTACT 106496_en_02...
-
Page 33: Log Messages Of The Linux Operating System
The “Overview/Log Viewer” page is opened (see Figure 3-12). • Click the “Download Complete Log” button to save all log messages of the Linux operating system as a log file. Figure 3-12 Log messages of the Linux operating system 106496_en_02 PHOENIX CONTACT... - Page 34 Shows the MAC address and IP address of Ethernet interface X3 (Ethernet interface for connection to the Internet and the PROFICLOUD; see item 3 in Figure 3-7). Configure Configure network settings • Click this button to configure the network settings (see Sec- tion “Configuring network settings”). PHOENIX CONTACT 106496_en_02...
-
Page 35: Wbm - The "Overview/Network Configuration" Page
The network settings are configured in WBM from the “Overview/Network Configuration” tings page. Figure 3-13 WBM – the “Overview/Network Configuration” page PROFINET adapter Settings for Ethernet interface X2 (see item 2 in Figure 3-7) (eth0) MAC address of Ethernet interface X2 106496_en_02 PHOENIX CONTACT... - Page 36 IP, Proxy Port, Internet”: Proxy Login, Proxy • In the input fields, enter all the information necessary for Password using the proxy server. Save Configuration Save your settings • Click this button to save the network settings. PHOENIX CONTACT 106496_en_02...
-
Page 37: Renewing Tls Certificates
TLS certificates are not valid indefinitely and must be renewed before expiry: – The TLS certificate of the PROFICLOUD is automatically renewed by Phoenix Contact. – The TLS certificate of the PROFICLOUD coupler is renewed by a firmware update of the device. - Page 38 PROFICLOUD PHOENIX CONTACT 106496_en_02...
-
Page 39: Mounting And Power Supply Of The Hardware
DIN rail in a control cabinet, the device’s degree of protection is not ensured. In such cases, this can lead to device failure. • Mount the device as described in Section 4.1.2 in order to ensure the device’s degree of protection. 106496_en_02 PHOENIX CONTACT... -
Page 40: Mounting
• Make sure that the device connector for the bus base connection is situated above the corresponding socket on the bus base module. Figure 4-2 Snapping the AXC CLOUD-PRO into place PHOENIX CONTACT 106496_en_02... -
Page 41: Connecting Ethernet
Use the ferrules in accordance with the specifications in the UM EN AXL F SYS INST user manual. • Make sure the ferrules are properly crimped. • Insert the cable in the terminal point. It is clamped automatically. Figure 4-4 Connecting a solid cable 106496_en_02 PHOENIX CONTACT... - Page 42 Bladed screwdriver, blade width of 2.5 mm (e.g., SZS 0.4x2.5, Order No. 1205037) Figure 4-5 Connecting a stranded cable Connecting the supply • Place the plug vertically into its position and press firmly. plug • Make sure that the locking latch snaps in. Figure 4-6 Connecting the supply plug PHOENIX CONTACT 106496_en_02...
-
Page 43: Sizing Of The Power Supply
[ ] V [ ] A 1.1 x I 2.4 x I 1.5 x I 6219B070 6219B071 Figure 4-7 Overload range with fall-back characteristic Figure 4-8 Overload range without fall-back charac- curve teristic curve 106496_en_02 PHOENIX CONTACT... -
Page 44: Connecting The Power Supply
The AXC CLOUD-PRO is now fully initialized. If the LEDs do not light up or do not start flashing, there is a serious error in the AXC CLOUD-PRO. In this case, please contact Phoenix Contact. 4.1.5 Assigning the PROFINET device name The PROFINET device name is the unique identification for the device in the PROFINET network. -
Page 45: Proficloud Coupler Cloud Coupler-Pro
Connect the terminal point of the power connector with the functional earth ground. Please note: The USB ports are designed for connecting a USB stick in order to perform firmware up- dates. The USB ports are not designed for connecting other I/O devices. 106496_en_02 PHOENIX CONTACT... -
Page 46: Mounting
Rotate the CLOUD COUPLER-PRO downwards against the lower edge of the DIN rail. Push on the device until it snaps into place. • Secure the device on the DIN rail with suitable end brackets. Figure 4-9 Snapping the CLOUD COUPLER-PRO into place PHOENIX CONTACT 106496_en_02... -
Page 47: Connecting The Profinet Network
Connect the local PROFINET network with an Ethernet cable to the “PROFINET” RJ45 network socket. 106496A002 Figure 4-10 Connecting the PROFINET network Connecting the Internet • Connect the Internet with an Ethernet cable to the “Internet” RJ45 socket. 106496A003 Figure 4-11 Connecting the Internet 106496_en_02 PHOENIX CONTACT... -
Page 48: Figure 4-12: Connecting The Power Connector Cables
Inserting the power con- • Insert the power connector into its position on the CLOUD COUPLER-PRO. nector • Secure the power connector in place on the CLOUD COUPLER-PRO housing with the designated connector screws. Figure 4-13 Inserting the power connector PHOENIX CONTACT 106496_en_02... -
Page 49: Proficloud Web Interface
The license includes a balance of 720 units. This equates to 30 days of usage time. In order to use a PROFICLOUD device over a longer period, you will need a license for an account (see above). 106496_en_02 PHOENIX CONTACT... -
Page 50: Establishing A Connection With The Proficloud Web Interface
Only registered users may access the PROFICLOUD. To register as a user, proceed as fol- lows: • Click the “Register now!” link on the homepage. The “User Registration” page is opened. Figure 5-1 The “User Registration” page PHOENIX CONTACT 106496_en_02... - Page 51 Use a combination of upper-case letters, lower-case letters, and digits for the pass- word. The password should be at least 8 characters long. Confirm your password Repeat password • Enter the desired password again in the “Password” input field. 106496_en_02 PHOENIX CONTACT...
- Page 52 Register Register • Click this button to complete the registration. Once you have completed registration, you can then log into the PROFICLOUD (see Section 5.4). Cancel Cancel • Click this button to cancel registration. PHOENIX CONTACT 106496_en_02...
-
Page 53: Signing In
When signing in for the first time after registration, the “Over- view” page opens for the “Default Account”. Forgotten your password? If you have forgotten your password, proceed as follows: • Click the “Forgot your password?” link on the homepage. 106496_en_02 PHOENIX CONTACT... -
Page 54: Figure 5-3 "Password Reset" Page
Enter the desired password again in the “Confirm password” input field. • Click the “Change Password” button to complete the password change. Once you have finished changing the password, you can log into the PROFICLOUD with your user name and new password. PHOENIX CONTACT 106496_en_02... -
Page 55: Account Menu
Connection status of already registered devices Indicates the number of registered PROFICLOUD devices or couplers which are online. PROFICLOUD couplers to which no PROFICLOUD device is assigned will go offline. PROFICLOUD devices which are not assigned to any PROFICLOUD couplers are offline. 106496_en_02 PHOENIX CONTACT... -
Page 56: Figure 5-5 "Add Coupler Or Device" Window
Click the “Register” button to register the device in the PROFICLOUD • click the “Cancel” button to cancel registration. The new registered device (in the example: the PROFICLOUD device “Device1”) is now dis- played in the “Overview” page. PHOENIX CONTACT 106496_en_02... -
Page 57: Figure 5-6 "Overview" Page With Registered Proficloud Coupler And Device
PROFICLOUD coupler. You can register any number of PROFICLOUD couplers and assign a maximum of 15 PROFICLOUD devices to each PROFICLOUD coupler. The devices are assigned on the “Overview” page via the PROFICLOUD coupler: • Click the desired PROFICLOUD coupler from the “Overview” page. 106496_en_02 PHOENIX CONTACT... -
Page 58: Figure 5-7 "Overview/Connections" Page
The assigned PROFICLOUD device is now displayed in the “Overview/Connections” page below the PROFICLOUD coupler. Figure 5-8 “Overview/Connections” page of the “Koppler” [coupler] PROFICLOUD coupler with the assigned PROFICLOUD device “Device1” PHOENIX CONTACT 106496_en_02... -
Page 59: Figure 5-9: "Exchange Device" Window
The UUID is either indicated on the license card or printed directly on the hardware. • Click the “Exchange” button to exchange the old PROFICLOUD device for the new de- vice • click the “Cancel” button to cancel the exchange. 106496_en_02 PHOENIX CONTACT... -
Page 60: Figure 5-10: "Edit Device" Window (Here: Of The Proficloud Coupler Named "Koppler" [Coupler])
PROFICLOUD, you must register the device again in the PROFICLOUD (see Section “Registering a device”). To delete a device, proceed as follows: • In the “Overview” page, click the PROFICLOUD device or PROFICLOUD coupler you want to delete PHOENIX CONTACT 106496_en_02... -
Page 61: Figure 5-11 "Remove Device From Current Account" Window
If you delete a PROFICLOUD coupler to which PROFICLOUD devices are still assigned, you must assign the PROFICLOUD devices to another PROFICLOUD coupler or cou- plers after the deletion process in order to continue using the PROFICLOUD devices. 106496_en_02 PHOENIX CONTACT... -
Page 62: Managing Your Balance - The "Balance" Page
Connected Remote Indicates the number of PROFICLOUD devices currently con- Devices nected. Billing Amount Per Indicates the number of units that are deducted from your bal- Hour ance per hour. PHOENIX CONTACT 106496_en_02... - Page 63 Top up balance • Enter the ID of the runtime license in the input field. • Click the “Redeem” button. Your balance is topped up. All information relating to the bal- ance is updated in the “Balance” page. 106496_en_02 PHOENIX CONTACT...
-
Page 64: Managing Users - The "Users" Page
Section 5.3). After registering, the user can log into the PROFICLOUD (see Section 5.4). After logging in, the “Over- view” page (see Section 5.5.1) of the account to which he/she was invited is displayed to the user. PHOENIX CONTACT 106496_en_02... -
Page 65: Notifications - The "Notifications" Page
You will then be notified by email if the event occurs. Notification List Overview of events warranting notification by email You can remove an event by clicking the corresponding button. You will then no longer be notified of the event by email. 106496_en_02 PHOENIX CONTACT... -
Page 66: Possible Events And Required Additional Information
PROFICLOUD device has established an Internet connec- tion to the PROFICLOUD. Device went offline UUID of the relevant You receive an email notifying you that the relevant PROFICLOUD device PROFICLOUD device has lost the Internet connection to the PROFICLOUD. PHOENIX CONTACT 106496_en_02... -
Page 67: Renaming The Account - The "Rename" Page
If necessary, enter a description (0 ... 255 characters) of the account in the input field. Save Save changes • Click this button to save the new name of the account. Cancel Cancel • Click this button to cancel renaming the account. 106496_en_02 PHOENIX CONTACT... -
Page 68: Deleting An Account - The "Delete" Page
However, you can use the remaining balance for an- other account. To do this, you will automatically re- ceive an email after the deletion process containing a new UUID you can use to transfer the remaining bal- ance to another account (see Section 5.5.2). PHOENIX CONTACT 106496_en_02... - Page 69 If there are multiple account users, you must remove them from the account (see Section 5.5.3) before you can delete it. Cancel Cancel • Click this button to cancel the deletion of the account. 106496_en_02 PHOENIX CONTACT...
-
Page 70: User Menu
The “Create Account” page Account Name Name of the account • Enter the desired name (1 ... 30 characters) in the input field. Permissible characters: – a ... z – A ... Z – 0 ... 9 – Special characters PHOENIX CONTACT 106496_en_02... - Page 71 Create an account and switch to the newly created account • Click this button to create a new account and switch direct- ly to this newly created account. Cancel Cancel • Click this button to cancel the creation of the account. 106496_en_02 PHOENIX CONTACT...
-
Page 72: Switching Account - The "Switch Account" Page
In the “Switch Account” page, you can switch between the accounts to which you are as- signed as a user. Figure 5-18 The “Switch Account” page • Click the account you would like to switch to. • Click the “Switch To” button to switch to the account. PHOENIX CONTACT 106496_en_02... -
Page 73: Changing User Preferences - The "Preferences" Page
User name The user name cannot be modified. Email Change the email address • If necessary, enter a new email address in the input field. When entering a new email address, the previous email ad- dress is overwritten. 106496_en_02 PHOENIX CONTACT... - Page 74 Select your time zone from the drop-down list. Save Save changes to user preferences • Click this button to save the changes made to the user pref- erences. Cancel Cancel • Click this button to cancel changes to the user preferences. PHOENIX CONTACT 106496_en_02...
-
Page 75: Figure 5-20 "Preferences/Journal" Page
In the “Login Management” section you can display a history of all actions of all users and events in your accounts. You can also delete your user from here. Displaying the history • In the “Login Management” section, click the “Open Journal” link. The history (“Preferences/Journal” page) is opened. Figure 5-20 “Preferences/Journal” page 106496_en_02 PHOENIX CONTACT... -
Page 76: Possible Action/Event Filters For The History
A user has been removed from the PROFICLOUD. User preferences changed User preferences have been changed. Email address verification email sent An email has been sent containing information about the verification of the email address entered during the registra- tion process. PHOENIX CONTACT 106496_en_02... - Page 77 A PROFICLOUD coupler has been disconnected from a PROFICLOUD device. Device added to account A PROFICLOUD device has been added to an account. Device removed from account A PROFICLOUD device has been removed from an ac- count. 106496_en_02 PHOENIX CONTACT...
-
Page 78: Figure 5-21: "Preferences/Delete User Login" Page
“Preferences/Delete User Login” page Account Name Shows the names of the accounts in which you are the sole user. Account Balance Shows the current balances of the runtime licenses of the ac- counts in which you are the sole user. PHOENIX CONTACT 106496_en_02... -
Page 79: Logging Out
PROFICLOUD. Cancel Cancel • Click this button to cancel the deletion of your user. Logging out • Click the “Logout” button (at the top right-hand corner of each page) to log out from the PROFICLOUD. 106496_en_02 PHOENIX CONTACT... - Page 80 PROFICLOUD PHOENIX CONTACT 106496_en_02...
-
Page 81: Technical Data And Ordering Data
Conductor cross section [AWG] 24 ... 16 PROFINET Number of slots Device ID 0133 PROFICLOUD Device ID 0126 Process data width 256 bytes Encryption TLS 1.0 Axioline F local bus interface Connection method Bus base module Transmission speed 100 Mbps 106496_en_02 PHOENIX CONTACT... - Page 82 Conducted disturbance variables EN 61000-4-6/IEC 61000-4-6 EN 61000-4-3 (radiated noise immunity) Criterion A, 10 V/m Electromagnetic fields EN 61000-4-3/IEC 61000-4-3 Noise emission test according to EN 61000-6-4 EN 55011 (noise emission) Class A Approvals For the latest approvals, please visit phoenixcontact.net/products. PHOENIX CONTACT 106496_en_02...
-
Page 83: Cloud Coupler-Pro Technical Data
2 x Ethernet (RJ45); transmission speed: 10/100/1000 Mbps Device supply Supply voltage 24 V DC Supply voltage range 24 V DC ±20% (19.2 V DC ... 28.8 V DC) Power consumption 12.48 W at 24 V DC, typically 106496_en_02 PHOENIX CONTACT... -
Page 84: Ordering Data
AXL F DI8/1 DO8/1 1H 2701916 24 V DC, 500 mA, 1-conductor connection technology (including bus base module and connectors) 6.3.3 Software Description Type Order No. Pcs./Pkt. PC Worx automation software See current catalog from Phoenix Contact phoenixcontact.net/products PHOENIX CONTACT 106496_en_02... -
Page 85: Documentation
UM QS EN PC Worx – “Installing and operating the AXC 1050 and AXC 1050 XC controllers” user UM EN AXC 1050 (XC) – manual “Valueline configurable box PC” data sheet DB EN VL BPC 100... – 106496_en_02 PHOENIX CONTACT... - Page 86 PROFICLOUD PHOENIX CONTACT 106496_en_02...
-
Page 87: Aproficloud Services
With the PROFICLOUD service CLOUD SERVICE/WEATHER you can access weather in- formation from the Internet via a weather service. The weather data serve as forecast values only. Phoenix Contact does not guarantee the correctness or completeness of the data. The PROFICLOUD service is treated as a virtual PROFICLOUD device in the PROFICLOUD system. - Page 88 Longitude and latitude changed too often You can change the geographical data a maximum of 400 times a week. Weather service temporarily unavailable Invalid longitude/latitude combination Chosen data selector is invalid (see Table A-1) No location found for the longitude/latitude combination PHOENIX CONTACT 106496_en_02...
- Page 89 For example, the weather symbol ID 1999999 indicates sun as per Table A-4: No clouds No rain No snow No hail or sleet No meteorological phenomena No warnings The associated weather symbol is Table A-5 lists all possible weather symbol IDs and their associated weather symbols. 106496_en_02 PHOENIX CONTACT...
-
Page 90: Weather Symbol Ids
1199949 1199959 1199969 1199971 1199979 1199982 1199989 1199991 1199992 1199999 1211999 1219991 1219999 1222919 1222999 1229919 1229999 1233999 1239991 1239999 1244919 1244999 1249919 1249999 1259999 1291999 1292999 1293992 1293999 1294999 1295991 1295992 1295999 1299199 1299299 1299499 1299919 PHOENIX CONTACT 106496_en_02... - Page 91 1999971 1999979 1999982 1999989 1999991 1999992 1999999 2111999 2119991 2119999 2122919 2122999 2129919 2129999 2133999 2139999 2144919 2144999 2149919 2149999 2159999 2191999 2192999 2193999 2194999 2195991 2195992 2195999 2199199 2199299 2199499 2199919 2199929 2199939 2199942 2199949 2199959 106496_en_02 PHOENIX CONTACT...
- Page 92 2299499 2299919 2299929 2299939 2299942 2299949 2299959 2299969 2299971 2299979 2299982 2299989 2299991 2299992 2299999 2322919 2329919 2329999 2333999 2344919 2349919 2349999 2359999 2394999 2395999 2399919 2399929 2399939 2399942 2399949 2399959 2991999 2993992 2995992 2999969 2999971 2999979 PHOENIX CONTACT 106496_en_02...
- Page 93 Before the service can be used in the PROFINET network or via the PROFICLOUD, you must assign a PROFINET device name to the service. • Assign a unique and meaningful PROFINET device name for the service. 106496_en_02 PHOENIX CONTACT...
-
Page 94: Cloud Service/Calc
The result of a cal- culation is returned in the form of output process data. Phoenix Contact does not guarantee the correctness or completeness of the computa- tional result. The PROFICLOUD service is treated as a virtual PROFICLOUD device in the PROFICLOUD system. -
Page 95: Error Codes Of The Result
Before the service can be used in the PROFINET network or via the PROFICLOUD, you must assign a PROFINET device name to the service. • Assign a unique and meaningful PROFINET device name for the service. 106496_en_02 PHOENIX CONTACT... - Page 96 PROFICLOUD PHOENIX CONTACT 106496_en_02...
-
Page 97: B Error Causes And Remedies
Internet connection as described No data transmitted. in Section 4.1.2. Incorrect device IP configuration • Assign an IP address to the device dynamically via DHCP. Communication with PROFICLOUD Connection interrupted • Carry out PROFINET diagnostics. devices terminated 106496_en_02 PHOENIX CONTACT... -
Page 98: Cloud Coupler-Pro
• Assign an IP address to the device dynamically via DHCP (see Section 3.2.6). Communication with PROFICLOUD Connection interrupted • Carry out PROFINET diagnostics. devices terminated No PROFINET communication Incorrect PROFINET configuration • Carry out PROFINET diagnostics. PHOENIX CONTACT 106496_en_02... -
Page 99: C Appendix For Document Lists
Overload range with fall-back characteristic curve ......43 Figure 4-8: Overload range without fall-back characteristic curve ....... 43 Figure 4-9: Snapping the CLOUD COUPLER-PRO into place ......46 Figure 4-10: Connecting the PROFINET network ........... 47 Figure 4-11: Connecting the Internet ............... 47 106496_en_02 PHOENIX CONTACT... - Page 100 Figure 5-17: The “Create Account” page ..............70 Figure 5-18: The “Switch Account” page ..............72 Figure 5-19: The “Preferences” page ..............73 Figure 5-20: “Preferences/Journal” page ..............75 Figure 5-21: “Preferences/Delete User Login” page ..........78 PHOENIX CONTACT 106496_en_02...
-
Page 101: C 2 List Of Tables
Table A-8: Status codes of result ................94 Table A-9: Error codes of the result............... 95 Appendix B Table B-1: AXC CLOUD-PRO: Error causes and remedies ........97 Table B-2: CLOUD COUPLER-PRO: error causes and remedies......98 106496_en_02 PHOENIX CONTACT... - Page 102 PROFICLOUD PHOENIX CONTACT 106496_en_02...
-
Page 103: C 3 Index
AXC CLOUD-PRO ..........20 Mounting ............... 46 CLOUD COUPLER-PRO ........33 Power connector ..........27, 48 Password .............. 53 PROFICLOUD deregistration ........ 30 TLS certificate ............37 Web-based management (WBM)......28 Connecting to the PROFICLOUD........ 50 System description ............9 106496_en_02 PHOENIX CONTACT... - Page 104 PROFICLOUD TLS certificates ............37 User Changing settings..........73 Delete..............78 Management ............64 Registration ............50 Virtual device Process data ............87 Web-based management (WBM) ....... 28 PHOENIX CONTACT 106496_en_02...
Need help?
Do you have a question about the UM EN PROFICLOUD and is the answer not in the manual?
Questions and answers