Table of Contents
Advertisement
Quick Links
Advertisement
Table of Contents

Related Manuals for Sunny Health & Fitness SF-A022005


Summary of Contents for Sunny Health & Fitness SF-A022005
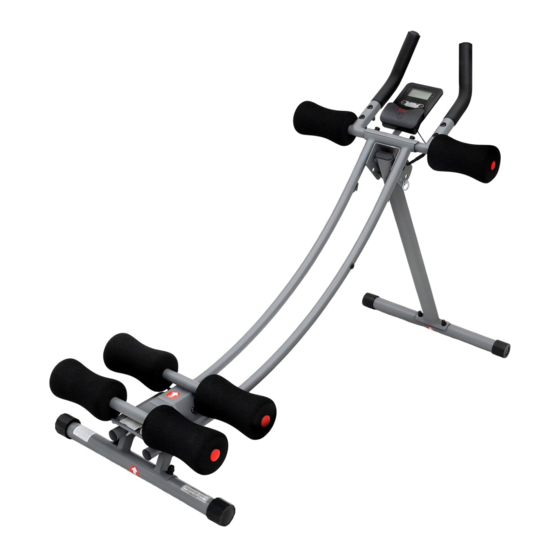
- Page 1 CORE GLIDER AB TRAINER MACHINE SF-A022005 USER MANUAL IMPORTANT! Please retain owner’s manual for maintenance and adjustment instructions. Your satisfaction is very important to us, PLEASE DO NOT RETURN UNTIL YOU HAVE CONTACTED US: support@sunnyhealthfitness.com or 1- 877 - 90SUNNY (877-907-8669).
-
Page 2: Important Safety Information
IMPORTANT SAFETY INFORMATION We thank you for choosing our product. To ensure your safety and health, please use this equipment correctly. It is important to read this entire manual before assembling and using the equipment. Safe and effective use can only be achieved if the equipment is assembled, maintained, and used properly. -
Page 3: Exploded Diagram
EXPLODED DIAGRAM 38-1 23 23 HARDWARE PACKAGE #11 φ 8*180 1PC #21 φ16*φ 8.5*1.5 10PCS #22 φ8*φ 13*2.0 6PCS #14 M8 2PCS #16 M8 8PCS #23 φ16*φ 8.5*1.5 2PCS #17 M8*50 4PCS #36 φ 9* φ 12*150 1PC #18 M8*40 4PCS #41 S6 1PC #19 M8*45 2PCS #42 S13 , S15 2PCS... -
Page 4: Parts List
PARTS LIST Description Spec. Qty. Description Spec. Qty. Slide Tube Flat Washer φ16*φ8.5*1.5 Front Support Tube φ20*φ10.5*2.0 Flat Washer Slide Seat Support Wheel φ53.5*φ19.4*30 Hand Support Tube Arc Foam φ90*φ23*160 Front Stabilizer 25*50*1.5 Oval End cap Small Buffer Rear Stabilizer φ10*11 Column Left Handlebar... - Page 5 ASSEMBLY INSTRUCTIONS We value your experience using Sunny Health and Fitness products. For assistance with parts or troubleshooting, please contact us at support@sunnyhealthfitness.com or 1-877-90SUNNY (877-907-8669). STEP 1: Pull out the Pin (No. 12) form Slide Tube (No. 1), open the Slide Tube (No.
- Page 6 We value your experience using Sunny Health and Fitness products. For assistance with parts or troubleshooting, please contact us at support@sunnyhealthfitness.com or 1-877-90SUNNY (877-907-8669). STEP 3: #19 M8*45 2PCS #21 φ16*φ 8.5*1.5 2PCS Attach Hand Support Tube (No. 4) #22 φ8*φ 13*2.0 2PCS to Slide Tube (No.
- Page 7 We value your experience using Sunny Health and Fitness products. For assistance with parts or troubleshooting, please contact us at support@sunnyhealthfitness.com or 1-877-90SUNNY (877-907-8669). STEP 5: Insert the Slide Seat Support (No. 3) into the Slide Tube (No. 1), the 4 Wheels (No. 25) are over the Left Slide Tube (No.
- Page 8 We value your experience using Sunny Health and Fitness products. For assistance with parts or troubleshooting, please contact us at support@sunnyhealthfitness.com or 1-877-90SUNNY (877-907-8669). STEP 7: Attach 6 Arc Foams (No. 26) to Hand Support Tube (No. 4) and Slide Seat Support (No. 3) by hand.
-
Page 9: Battery Installation And Replacement
BATTERY INSTALLATION & REPLACEMENT Battery Battery Cover BATTERY INSTALLATION: 1. Take out 2 AAA battery from meter box. 2. Press the buckle of battery cover on the Meter (No. 38), then remove battery cover. 3. Install 2 AAA battery into the battery case on the back of the Meter (No. 38). Pay attention to the battery + and –... -
Page 10: Slope Adjustment
SLOPE ADJUSTMENT This machine has 2 stages of slope adjustment. Open the Slide Tube (No. 1) and Front Support Tube (No. 2), Insert Pin (No. 12) to the hole A or hole B accordingly and then can adjust slope of Slide Tube (No. 1) and Ground (H). When the Pin (No. -
Page 11: Folding Instructions
FOLDING INSTRUCTIONS Pull out the Pin (No. 12) from Slide Tube (No. 1), fold the Front Support Tube (No. 2) into Slide Tube (No. 1) in the direction indicated by the arrow above, then insert the Pin (No. 12) into Slide Tube (No. 1). -
Page 12: Functional Buttons
EXERCISE METER FUNCTIONAL BUTTONS: MODE: Push down for selecting functions. If the long time holds down MODE button down for resetting time count and calories. SET: To set the values of TIME, COUNT and CAL when not in scan mode. RESET: Push down for resetting TIME, COUNT and CAL. -
Page 13: Specifications
NOTE: 1. If the display is faint or shows no figures, please replace the batteries. 2. The meter will automatically shut off if there is no signal received after 2 minutes. 3. When there is signal input, the meter automatically turns on. 4.
Need help?
Do you have a question about the SF-A022005 and is the answer not in the manual?
Questions and answers