
Related Manuals for WLINK WL-R100 Series


Summary of Contents for WLINK WL-R100 Series
- Page 1 WL-Rxx Series Router User Manual User Manual ---Apply to WL-R100/R200/R210/R520 Series 4G/3G Router V1.0 http://www.wlink-tech.com March, 2018 V3.3 http://www.wlink-tech.com Jan, 2022...
- Page 2 WL-Rxx Series Router User Manual Copyright © Shenzhen WLINK Technology Company Limited 2012 ~ 2022 Without our written approval, anyone can’t extract, copy whole or part of content of this file and can’t spread out in any format. Caution Due to product updates or functional upgrading, we may renew the content of this file, and this file only for reference.
-
Page 3: Table Of Contents
WL-Rxx Series Router User Manual Contents 1 Hardware Installation..............................5 1.1 WL-Rxx Family List............................. 5 1.2 LED Indicator..............................5 1.3 Serial Port Connection..........................6 1.4 Power Supply............................... 7 1.5 Review................................7 2 Router Configuration.............................. 8 2.1 Local Configure............................8 2.2 Status................................9 2.3 Overview............................... 9 2.4 Traffic Stats..............................10 2.5 Device List.............................. - Page 4 WL-Rxx Series Router User Manual 3.3 Port Forwarding............................62 3.4 IP Passthrough............................63 3.5 Captive Portal.............................65 3.6 GPS Settings..............................68 3.7 Firewall................................ 71 3.8 VPN Tunnel..............................72...
-
Page 5: Hardware Installation
WL-Rxx Series Router User Manual Hardware Introduction This chapter is mainly for hardware introduction, there would be some difference between the scheme and real object. But the difference won’t have any influence to products performance. WL-Rxx Family List Serial Model Appearance Wi-Fi Dimension(mm) -
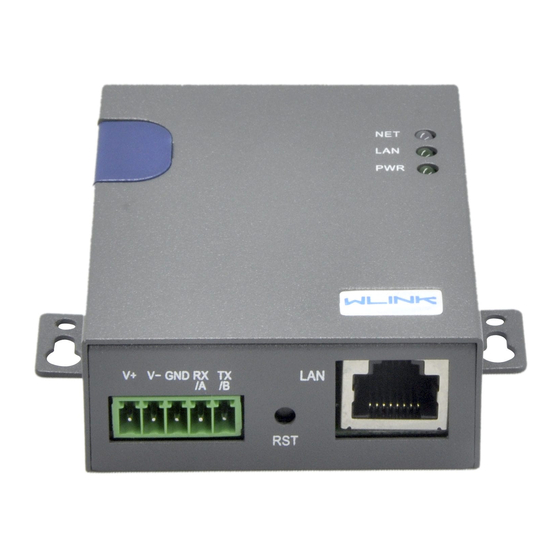
Page 6: Serial Port Connection
WL-Rxx Series Router User Manual Green Blinking Data Sending Green Dark Unplugged Green Solid light Router OS is running. 2) WL-R210 LED Status silk-screen status Indication LED1 indicates signal is Pool (CSQ0~10) Signal Solid Light LED2 indicates signal is good (CSQ11~19) LED3 indicates signal is strong (CSQ20~31) Signal Quick Blink... -
Page 7: Power Supply
Power Supply Voltage input range: +7.5~32VDC. (Extended models: 7.5~ 48VDC) Review After insert the SIM/UIM card and connect Ethernet cable and antenna, connect power supply adaptor or power cable. Please connect the antenna before power on, otherwise the signal maybe poor because of impedance mismatching. -
Page 8: Router Configuration
WL-Rxx Series routers support GUI and CLI configuration. This chapter introduce GUI configuration via Ethernet port, if need CLI configuration guide, please contact our technical support department by email: support@wlink-tech.com. Local Configure The router supports to be configured by local Ethernet port, you could specify a static IP or set as DHCP. -
Page 9: Status
WL-Rxx Series Router User Manual User should use the default user name and password when log in for the first time Figure 2-2 User Identify Interface ----END Status Check routers information such as status, traffic Stats and device list after login router. Especially, suggest change the password according to the prompts because of security requirement. -
Page 10: Traffic Stats
WL-Rxx Series Router User Manual Figure 2-3 Router Status GUI Traffic Stats. Click Status->Traffic Stats. to enter the traffic stats.GUI.to check Cellular/WAN traffic in real-time. Figure 2-4 Traffic Stats. GUI Device List Click Status->Device List to enter the device list GUI.to check the connected devices information in the list. -
Page 11: Tool Column
WL-Rxx Series Router User Manual Figure 2-5 Device List GUI Tool Column Figure 2-6 Tool Column GUI 2.6.1 Tools 2.6.1.1 Ping Click Tools->Ping to enter ping test GUI. Used to test the reachability of a host on an Internet IP network and to measure the round-trip time for messages sent from the originating host to a destination server. - Page 12 WL-Rxx Series Router User Manual 2.6.1.3 WOL Click Tools-> WOL to enter WOL(Wake On Lan) GUI. Used to wake up those connected devices via WOL protocol. Clock left mouse button to wake up the device. 2.6.1.4 Log Click Tools-> Log to enter Log GUI. Use to check logs in GUI, download GUI and send logs to server.
-
Page 13: Basic Network
WL-Rxx Series Router User Manual 2.6.2 Bandwidth Click Bandwidth to enter bandwidth graphic GUI. Used to check cellular/LAN/Wi-Fi real-time bandwidth. 2.6.3 System Click system to choose software reboot, hardware reboot and logout GUI. Basic Network 2.7.1 WAN Setting Step 1 Basic Network>WAN to enter below interface. - Page 14 WL-Rxx Series Router User Manual Table 2-1 WAN Setting Instruction Parameter Instruction Type Support DHCP, PPPoE, Static IP address Step 2 After setting, please click “save” to finish, the device will reboot. ----End 2.7.2 Cellular Setting Step 1 Basic Network-> Cellular, you can modify relevant parameter according to the application.
- Page 15 WL-Rxx Series Router User Manual WL-R100/R200 supports single SIM. WL-R520 supports dual-SIM as optional. WL-R210 supports dual-SIM as default. Table 2-2 Cellular Setting Instruction Parameter Instruction Enable Modem Enable/Disable 4G mode. Use PPP ECM dialup as default. PPP optional. ICMP check If enable ICMP check and setup a reachable IP address as destination IP, the router will reconnect/reboot once ICMP check failed.
- Page 16 WL-Rxx Series Router User Manual Parameter Instruction 【SIM1 Only】Only SIM1 works. 【SIM2 Only】Only SIM2 works. 【Backup】SIM1 is the primary SIM. Once SIM1 failed, it’ll switch to SIM2 and work on SIM2 for a specified period of time, then it switches back to SIM1. Connect Mode 【Auto】The router will automatically connect to 3G/4G networks and give priority to 4G.
- Page 17 WL-Rxx Series Router User Manual 【Cellular Traffic Check】 【Check Mode】there are Rx(Receive), Tx(Transmission) and Rx/Tx check modes. 【Rx】 Router will check the 3G/LTE cellular receiver traffic. If no receiver traffic within the defined check interval, the router will implement the specified action reconnect or reboot.
- Page 18 WL-Rxx Series Router User Manual Table 2-3 LAN Setting Instruction Parameter Instruction Bridge Supports 4 LAN IP address for br0 to br3 interface. If need to support VLAN, please go to VLAN GUI. Router IP Address Router IP address, default IP is 192.168.1.1 Subnet Mask Router subnet mask, default mask is 255.255.255.0 DHCP...
- Page 19 WL-Rxx Series Router User Manual Table 2-4 LAN Setting Instruction Parameter Instruction VLAN ID number. The VID range is from 1 to 15. LAN1~LAN4, Tagged Enable to make router can encapsulate and de-encapsulate the VLAN tag. Bridge Routers interface br0, br1, br2, br3 and WAN Step 2 Please Click “Save“...
- Page 20 WL-Rxx Series Router User Manual Step 2 Please Click “Save“ to finish. ----End 2.7.6 Dynamic DNS Setting Step 1 Basic Network->DDNS to enter the DDNS setting page.
- Page 21 Table 2-5 DDNS Setting Instruction parameter Instruction Default is standard DDNS protocol, for customized protocol, please IP address contact Wlink engineer. Usually, use default IP 0.0.0.0 Auto refresh Set the interval of the DDNS client obtains new IP, suggest 240s or time above Service Select the DDNS service provider that listed.
-
Page 22: Wlan Setting
WL-Rxx Series Router User Manual Table 2-6 Routing Setting Instruction Parameter Instruction Destination Router can reach the destination IP address. Gateway Next hop IP address which the router will reach Subnet Mask Subnet mask for destination IP address Metrics are used to determine whether one particular route should Metric be chosen over another. - Page 23 WL-Rxx Series Router User Manual 2.8.1 Basic Setting Step 1 WLAN->Basic Setting to configure relative parameter Table 2-7 Basic of WLAN Setting Instruction Parameter Instruction Radio Mode 2.4G model, Wi-Fi bandwidth for 1300Mbps Enable wireless Enable or Disable the Wireless Wireless mode Support AP mode.
-
Page 24: Advanced Network Setting
WL-Rxx Series Router User Manual Step 2 Please Click “Save“ to finish. Support 4 SSIDs as Max ----End 2.8.3 Wireless Survey Step 1 WLAN> Wireless Survey to check survey. The Router will automatically scan neighbour SSIDs. Step 2 Please Click “Stop” to change refresh by manual. ----End Advanced Network Setting 2.9.1... - Page 25 WL-Rxx Series Router User Manual Table 2-8 Port Forwarding Instruction Parameter Instruction Protocol Support UDP, TCP, both UDP and TCP Src. Address Source IP address. Forward only if from this address. Ext. Ports External ports. The ports to be forwarded, as seen from the WAN.
- Page 26 WL-Rxx Series Router User Manual Table 2-9 Port Redirecting Instruction Parameter Instruction Protocol Support UDP, TCP, both UDP and TCP Int Port Internal port. Dst. Address The redirecting IP address. Ext. Ports External port for redirection. Description Remark the rule Step 2 Please click ”save”...
- Page 27 WL-Rxx Series Router User Manual Table 2-10 DMZ Instruction parameter Instruction Destination The destination address inside the LAN. Address Source If no IP address inside, it will allow all IP address to access. Address If define IP address, it will just allow the defined IP address Restriction to access.
- Page 28 WL-Rxx Series Router User Manual 2.9.5 Triggered Setting Step 1 Advanced Network> Triggered to check or modify the relevant parameter. Table 2-12 Triggered Instruction parameter Instruction Protocol Support UDP, TCP, both UDP and TCP Triggered Ports Trigger Ports are the initial LAN to WAN "trigger". Transferred Forwarded Ports are the WAN to LAN ports that are Ports...
- Page 29 Ex-storage: Captive portal file is in extended storage such as SD card. Web Host Configure domain name for the captive portal access. For example, Configure as wlink.tech.com, we might directly access to captive portal page in the website as wlink.tech.com Portal Host Reserved.
- Page 30 WL-Rxx Series Router User Manual WL-R100 doesn’t support Captive Portal feature. ----End 2.9.7 Serial App. Setting Step 1 Advanced Network> Serial App to check or modify the relevant parameter.
- Page 31 WL-Rxx Series Router User Manual Table 2-14 Serial App Instruction Parameter Instruction Serial to TC/IP Support Disable, Server and Client mode. Such as Client. mode Server IP/Port IP address and domain name are acceptable for Server IP Socket Type Support TCP/UDP protocol Socket Timeout Router will wait the setting time to transmit data to serial port.
- Page 32 WL-Rxx Series Router User Manual Step 2 Please click ”save” to finish. ----End 2.9.9 Bandwidth Control Setting Step 1 Advanced Network> Bandwidth Control to check or modify the relevant parameter. Table 2-15 Bandwidth Control Instruction Max Available Download Speed limit for router. Max Available Upload Speed limit for router.
- Page 33 WL-Rxx Series Router User Manual Default Class If no specified IP/MAC, the download and upload limit for total speed for all of device. Step 2 Please click ”save” to finish. ----End 2.9.10 VRRP Setting Step 1 Advanced Network> VRRP to check or modify the relevant parameter. Step 2 Please click ”save”...
-
Page 34: Firewall
WL-Rxx Series Router User Manual ----End 2.10 Firewall 2.10.1 IP/URL Filtering Step 1 Firewall> IP/URL Filtering to check or modify the relevant parameter. - Page 35 WL-Rxx Series Router User Manual Table 2-16 IP/URL Filtering Instruction Parameter Instruction IP/MAC/Port Support IP address, MAC address and port filter. Filtering Accept/Drop options for filter policy. Key Word Support key word filter. Filtering URL Filtering Support URL filter. Access Filtering Support Access Filter.
-
Page 36: Vpn Tunnel
WL-Rxx Series Router User Manual 2.11 VPN Tunnel 2.11.1 GRE Setting Step 1 VPN Tunnel> GRE to check or modify the relevant parameter. Table 2-18 GRE Instruction Parameter Instruction GRE tunnel number Tunnel Address GRE Tunnel local IP address which is a virtual IP address. - Page 37 WL-Rxx Series Router User Manual...
- Page 38 WL-Rxx Series Router User Manual Table 2-19 Basic of OpenVPN Instruction Parameter Instruction Start with WAN Enable the Openvpn feature for 4G/3G/WAN port. Interface Type Tap and Tun type are optional. Tap is for bridge mode and Tunnel is for routing mode. Protocol UDP and TCP optional.
- Page 39 WL-Rxx Series Router User Manual Parameter Instruction Encryption As the configuration requested. Compression As the configuration requested. TLS Renegotiation TLS negotiation time. -1 as default for 60s. Time Connection Retry Openvpn retry to connection interval. Time Verify server As the configuration requested. certificate Custom As the configuration requested.
- Page 40 WL-Rxx Series Router User Manual Table 2-22 Status of OpenVPN Instruction Parameter Instruction Status Check Openvpn status and data statistics. Step 2 Please click ”save” to finish. ----End 2.11.3 PPTP/L2TP Client Setting Step 1 VPN Tunnel> VPN Client to check or modify the relevant parameter. Table 2-23 PPTP/L2TP Basic Instruction parameter Instruction...
- Page 41 WL-Rxx Series Router User Manual Table 2-24 L2TP Advanced Instruction L2TP Advanced enable Name L2TP Tunnel name Accept DNS As the configuration requested. MTU is 1450bytes as default MRU is 1450bytes as default Tunnel Auth. L2TP authentication Optional as the configuration requested.
- Page 42 WL-Rxx Series Router User Manual 2.11.4 IPSec Setting 2.11.4.1 IPSec Group Setup Step 1 IPSec> Group Setup to check or modify the relevant parameter. Table 2-27 IPSec Group Setup Instruction parameter Instruction IPSec Support Standard IPSec, GRE over IPSec, L2TP over Extensions IPSec Local Security...
- Page 43 WL-Rxx Series Router User Manual parameter Instruction Remote IPsec peer IP address/domain name. IP/Domain Remote IPSec remote subnet and mask. Subnet/Mask Remote Forwarding-firewalling for Remote subnet Firewall Step 2 Please click ”save” to finish. ---End 2.11.4.2 IPSec Basic Setup Step 1 IPSec >Basic Setup to check or modify the relevant parameter. Table 2-28 IPSec Basic Setup Instruction parameter Instruction...
- Page 44 WL-Rxx Series Router User Manual parameter Instruction Phase 1 Support HASH MD5 and SHA Authentication Phase 1 SA IPSec Phase 1 SA lifetime Life Time Phase 2 DH Select Group1, Group2, Group5 from list. It must be Group matched to remote IPSec setting. Phase 2 Support 3DES, AES-128, AES-192, AES-256 Encryption...
-
Page 45: Administration
WL-Rxx Series Router User Manual Table 2-29 IPSec Advanced Setup Instruction parameter Instruction Aggressive Default for main mode Mode ID Payload Enable ID Payload compress Compress To enable DPD service ICMP ICMP Check for IPSec tunnel IPSec Custom IPSec advanced setting such as left/right ID. Options Step 2 Please click ”save”... - Page 46 WL-Rxx Series Router User Manual Parameter Instruction Domain name Default is empty, support maximum up to 32 character, it is the domain of WAN, no need to configure for most application. Step 2 Please click ”save” to finish ----End...
- Page 47 WL-Rxx Series Router User Manual 2.12.2 Time Setting Step 1 Please click “Administrator> time” to check or modify the relevant parameter. If the device is online but time update is fail, please try other NTP Time Server. Step 2 Please click “save to finish. ----End...
- Page 48 WL-Rxx Series Router User Manual 2.12.3 Admin Access Setting Step 1 Please click “Administrator>Admin” to check and modify relevant parameter. In this page, you can configure the basic web parameter, make it more convenient for usage. Please note the “password” is the router system account password. Step 2 Please click save iron to finish the setting ----End 2.12.4...
- Page 49 WL-Rxx Series Router User Manual Step 2 Please click save iron to finish the setting ----End 2.12.6 Storage Setting Step 1 Please click “Administrator>Storage Setting” to check and modify relevant parameter. Step 2 Please click save iron to finish the setting WL-R100/R200 series router doesn’t support extra storage.
- Page 50 WL-Rxx Series Router User Manual Step 2 Please click save iron to finish the setting ----End 2.12.8 DI/DO Setting(Apply to WL-R210 only) Step 1 Please click “Administrator>DI/DO Setting” to check and modify relevant parameter. 2.12.8.1 DI Configure...
- Page 51 WL-Rxx Series Router User Manual Table 2-31 DI Instruction Parameter Instruction Enable Enable DI. Port1 is for I/O1 and Port2 is I/O2. Both I/O1 and I/O2 are DI ports Mode Selected from OFF, ON and EVENT_COUNTER modes. OFF Mode: DI from high level(3.3v~5V) to low level(0V), it will trigger alarm.
- Page 52 WL-Rxx Series Router User Manual Parameter Instruction Under EVENT_COUNTER mode, if first pulse shape and last pulse shape are not the same level, WL-G510 will trigger alarm according to Counter Action setting. Counter Trigger Available when DI under Event Counter mode Input from 0 to 100.
- Page 53 WL-Rxx Series Router User Manual EVENT_COUNTER Model The counted number of pulses will be triggered. 2.12.8.2 DO Configure Table 2-32 DO Instruction Parameter Instruction Enable 1 DO as selected Alarm Source Digital output initiates according to different alarm source. Select from DI Alarm, SMS Control and M2M Control. Selections can be one or more.
- Page 54 WL-Rxx Series Router User Manual Parameter Instruction SMS Control: Digital Output triggers the related action when receiving SMS from the number in phone book. M2M Control: it’s not ready. Alarm Action Digital Output initiates when there is an alarm. Selected from “OFF”, “ON”, “Pulse”. OFF: Open from GND when triggered.
- Page 55 WL-Rxx Series Router User Manual DO might be customized pulse width ratio: T1, T2 duration and n value. ---End 2.12.9 Configuration Setting Step 4 Please click “ Administrator> Configuration ” to do the backup setting Figure 3-1 Backup and Restore Configuration GUI Restore Default would lose all configuration information, please be careful.
- Page 56 WL-Rxx Series Router User Manual 2.12.10 System Log Setting Step 6 Please click “Administrator> Logging” to start the configuration, you can set the file path to save the log (Local or remote sever). Figure 3-2 System log Setting GUI Step 7 After configure, please click “Save” to finish. ----End...
- Page 57 WL-Rxx Series Router User Manual 2.12.11 Firmware upgrade Step 8 Please click “Administrator>firmware upgrade” to open upgrade firmware tab. Figure 3-3 Firmware Upgrade GUI Please don’t cut off the power during upgrading. The upgrade period is about 4mins. 2.12.12 “Reset” Button for Restore Factory Setting If you couldn’t enter web interface for other reasons, you can also use this way.
-
Page 58: Configuration Instance
WL-Rxx Series Router User Manual Configuration Instance This chapter is mainly for configured test case, there would be some difference between the scheme and real object. But the difference doesn’t have any influence to products performance. 3.1 VLAN WL-R200/R210/R520 supports VLAN partition based on Ethernet port (LAN1~LAN5) 1) Configure LAN with Basic Network. - Page 59 WL-Rxx Series Router User Manual 2) If untag for br1 ad br2, it won’t be accessed between SW1 and SW2. 3) If tag for br1 and br2, it will be accessed between sw1 and sw2. ---End...
-
Page 60: Wan Backup (Wan As Main, Cellular Backup)
WL-Rxx Series Router User Manual 3.2 WAN Backup (WAN as Main, Cellular Backup) The WAN and Cellular backup feature can quickly switch traffic to Cellular (link2) when WAN (link1) fails, and WL-Rxx brings you a stable network experience. 1) Navigate to Basic Network > WAN, you may configure the WAN parameters with your situation 2) Navigate to Basic Network >... - Page 61 WL-Rxx Series Router User Manual 4) Navigate to Basic Network > Schedule, configure WAN (Link1) preferred, Cellular backup (Link2) Add ICMP Check to WAN Set the working mode (Schedule) Parameters Instruction modem The router dial-up to network via modem The router dial-up to network via WAN (DHCP, PPPOE, Static IP) Ethernet ICMP Check When the ICMP Check fails, the switching action between Link1 and Link2 will be triggered...
-
Page 62: Port Forwarding
WL-Rxx Series Router User Manual 6) The system quickly switches traffic to Cellular when the WAN fails ---End 3.3 Port Forwarding 1) The router online and got a public IP address 14.31.134.94 Note: It’s based on SIM card carrier 2) The PC is connected to router and got IP address 192.168.1.24 3) Configuration... -
Page 63: Ip Passthrough
WL-Rxx Series Router User Manual 4) The PC can be accessed via 14.31.134.94:443 over Internet ---End 3.4 IP Passthrough 1) The router online 2) Configure IP passthrough destination MAC address (PC Ethernet MAC) - Page 64 WL-Rxx Series Router User Manual 3) Set the PC to DHCP 4) Check the Ethernet status and ping test...
-
Page 65: Captive Portal
WL-Rxx Series Router User Manual 5) Set the PC Ethernet as DHCP to release the IP and access to router GUI again ---End 3.5 Captive Portal Please click “Advanced Network> Captive Portal” to check or modify the relevant parameter. - Page 66 WL-Rxx Series Router User Manual Upload Portal file and Splash.html by local Upload portal images and splash.html in router for the Slider (0001_portal.png, 0002_portal.png, and 0003_portal.png) to the Router under the “ Administration / Storage Settings” menu. Furthermore, also might upload splash with images together. Each Ad file just supports 3 Ad portal images.
- Page 67 WL-Rxx Series Router User Manual Finally, we can see the results by connect to router WIFI...
-
Page 68: Gps Settings
WL-Rxx Series Router User Manual Modify portal file storage path Modify portal file storage for In-storage as below. ---End 3.6 GPS Settings Please click “Advanced Network> GPS” to view or modify the relevant parameter. - Page 69 WL-Rxx Series Router User Manual Table 4-6 “GPS” Instruction parameter Instruction GPS Mode Enable/Disable GPS Format NMEA and M2M_FMT(WLINK) Server IP/Port GPS server IP and port Heart-Beat If choose M2M_FMT format, heart-beat ID will be packed into GPS data. Interval GPS data transmit as the interval time.
- Page 70 WL-Rxx Series Router User Manual M2M_FMT Format as below. 1. GPS data structure. Router ID, gps_date, gps_time, gps_use, gps_latitude, gps_NS, gps_longitude, gps_EW, gps_speed, gps_degrees, gps_FS, gps_HDOP, gps_MSL 2. Example 0001_R081850ac,150904,043215.0,06,2234.248130,N,11356.626179,E,0.0,91.5,1,1.2,9 3. GPS data description Field Name Format Example Description Router ID String 0001_R081850 0001...
-
Page 71: Firewall
WL-Rxx Series Router User Manual 3.7 Firewall 1) IP/MAC/Port Filtering This part used to intercept packages from router’s WAN/Celluar interface to Internet. Test case: 1.1 Only allow three devices (MAC/LAN/WLAN) can access to Internet via WAN: 110.110.10.10 1.2 Only allow three devices (MAC/LAN/WLAN) can access to the router page (192.168.1.1) 2) Key Word Filtering This part used to filter key word packages from router’s WAN/Cellular interface to Internet. -
Page 72: Vpn Tunnel
WL-Rxx Series Router User Manual 4) Access Filtering This part used to filter packages from Internet to router’s WAN/Celluar interface. Test case: 4.1) Intercept all TCP packets accessing the router's WAN/Celluar(110.110.10.10). 4.2) Only two devices (MAC/LAN/WLAN) are allowed to be accessed from Internet packets. - Page 73 WL-Rxx Series Router User Manual 1) WL-R200(A) Config Navigate to Basic Network > LAN Navigate to VPN Tunnel > GRE 2) WL-R200(B) Config Navigate to Basic Network > LAN...
- Page 74 WL-Rxx Series Router User Manual Navigate to VPN Tunnel > GRE 3.8.2 OpenVPN...
- Page 75 WL-Rxx Series Router User Manual OpenVPN between WL-Rxx client and Server Please click “VPN Tunnel> OpenVPN Client” to check or modify the relevant parameter. Parameter Instruction Start with WAN Enable the Openvpn feature for 4G/3G/WAN port. Tap and Tun type are optional. Tap is for bridge mode Interface Type and Tunnel is for routing mode.
- Page 76 WL-Rxx Series Router User Manual HMAC authorization As the configuration requested. Create NAT on tunnel Configure NAT in Openvpn tunnel. Parameter Instruction Poll Interval Openvpn client check router’s status as interval time. Redirect Internet Traffic Configure Openvpn as default routing. Access DNS As the configuration requested.
- Page 77 WL-Rxx Series Router User Manual Parameter Instruction Certificate Authority Keep certificate same as the server Client Certificate Keep client certificate same as the server Client Key Keep client key same as the server Parameter Instruction Status Check OpenVPN status and data statistics. Click “save”...
- Page 78 WL-Rxx Series Router User Manual The fllowing steps are for server running on Windows 7/8/10 Access to (http://openvpn.net/release/) and download the file “openvpn-2.3.0-install.exe” (or higher) After installing OpenVPN, please find the OpenVPN folder to generate the certificate of server and client. (Access to http://openvpn.net for more information)
- Page 79 WL-Rxx Series Router User Manual Configure “vas.bat.sample” to complete the initialization step and keys Configure the client keys to WLINK OpenVPN client GUI when you create the server and client certificate in the path OpenVPN/easy-rsa/keys Client certificate (Generated on the server)
- Page 80 WL-Rxx Series Router User Manual OpenVPN>easy-rsa>keys Ping test to your server when the tunnel is established ---End 3.8.3 L2TP/PPTP Please click “VPN Tunnel>PPTP/L2TP Client” to view or modify the relevant parameter.
- Page 81 WL-Rxx Series Router User Manual Configured as PPTP Note: The Custom Options are based on your server ---End 3.8.4 IPSec IPSec between WL-R200 and Cisco Router 1) Cisco Config (main mode) crypto isakmp policy 10...
- Page 82 0.0.0.0 0.0.0.0 crypto ipsec transform-set Tran-set esp-3des esp-sha-hmac crypto ipsec nat-transparency spi-matching 2) WLINK Config Navigate to VPN Tunnel > IPSec > Group Setup Navigate to VPN Tunnel > IPSec > Basic Setup Navigate to VPN Tunnel > IPSec > Advanced Setup...
- Page 83 WL-Rxx Series Router User Manual ---End...
Need help?
Do you have a question about the WL-R100 Series and is the answer not in the manual?
Questions and answers