Table of Contents
Advertisement
Quick Links
Advertisement
Table of Contents

Subscribe to Our Youtube Channel
Related Manuals for Lockly DEADBOLT SECURE PLUS


Summary of Contents for Lockly DEADBOLT SECURE PLUS
- Page 1 DEADBOLT EDITION SECURE PLUS with Fingerprint and RFID Card USER MANUAL...
-
Page 2: Table Of Contents
Section 4 - Locking and Unlocking Section 9 - Safety Precautions 4.1 Unlocking using Access Codes 9.1 Safety Precautions 4.2 Unlocking using Fingerprints 4.3 Locking / Unlocking using App For additional support, visit http://Lockly.com/help or email help@Lockly.com TABLE OF CONTENTS... -
Page 3: Product Features
Through your smartphone, monitor door access from anywhere in the world and securely control who comes and goes. You can also control your Lockly smart lock using your voice with Amazon Alexa or Google Assistant-enabled devices.(requires Secure Link Wi-Fi Hub, Included on Secure... -
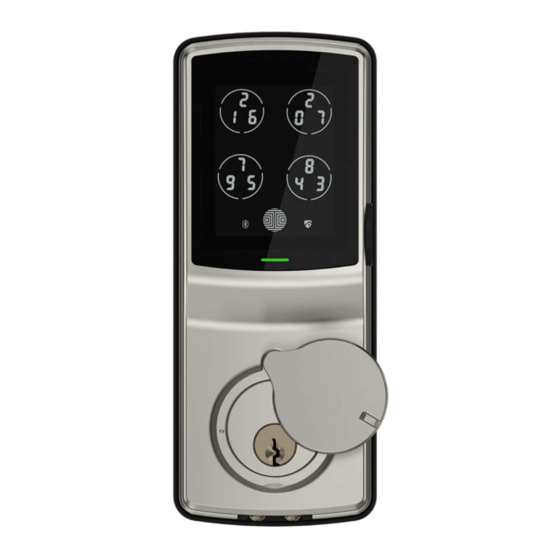
Page 4: Product Overview - Exterior
2.1 Product Overview - Exterior RFID Card Reader OK Button Welcome /Safe Mode Fingerprint Sensor Battery Indicator Bluetooth Indicator Key Hole Cover Key Hole Reboot 9V Battery Socket SECTION 2.1... -
Page 5: Product Overview - Interior
2.2 Product Overview - Interior Battery Cover Battery Compartment ( Operated by 4 x AA Batteries) Reset Button Program Button Beep Alert Display Keypad Switch Thumbturn SECTION 2.2... -
Page 6: Understanding Your New Lock
Access Codes, adding/deleting fingerprints, adding/deleting RFID cards, configuring your Offline Access Code™ (OAC) and other features of your lock. To access these features, you will need the Lockly app and a registered account. You may visit the link below to download the app if you haven't done so. -
Page 7: Reset Button
The Activation Code can be found on the Activation Code Card that came with your smart lock. After you have the Activation Code ready, push the reset button on the back panel of the Lockly Secure to perform your reset. See below to see which Reset Process applies for you. Once the smart lock has been reset, all the data previously stored will be deleted. -
Page 8: Rebooting Your Lock
Access Codes will still be stored within Lockly. Press and release the reboot button when you want to reboot the lock. Your Lockly will beep once after reboot. Only reboot when necessary. To reboot, find the reboot button located on the bottom of the exterior side of Lockly lock. The reboot button is located in the middle of the two 9V battery backup sockets. -
Page 9: Low Battery
2.7 Low Battery When the battery is in seriously low condition, Lockly will make continuous beeping sounds in addition to the flashing low battery icon on the touch screen. You should replace batteries immediately to avoid your smart lock from shutting down. -
Page 10: Changing The Battery
2.8 Changing The Battery Under normal use, the Lockly battery will last up to a year. Please check battery levels regularly and change your batteries when the low battery notification is issued. For best practice, always use new batteries by a major brand. -
Page 11: Configuring Access
The Default Access Code is Your new Lockly Access Code can be any combination of 6 to 8 digits. Once a new Access Code is entered, the Default Access Code of 123456 would be deleted. A maximum of 16 sets of Access Codes can be stored for use at any given time. -
Page 12: Adding A Fingerprint
Lockly Secure Plus & Secure Pro models . We are using an advanced biometric sensor, providing the most secure fingerprint authentication. For security reasons, Lockly will only accept fingerprint patterns that consist of cross intersection points. Patterns with no cross intersection points will not be acceptable. - Page 13 6 - then 5, 4, 3, 2, 1, until the fingerprint is successfully registered. Note: Please keep a record of your fingerprint registration number or customize a profile registration name on the Lockly app to distinguish whom it was registered to. SECTION 3.2...
- Page 14 3.2 Adding a Fingerprint (Continued) Please make sure your fingers are clean from dirt and oils before scanning NOTICE your fingerprint. Make sure the sensor is also clean by taking a soft cloth and wiping the surface. Scan your finger by lightly placing your designated finger on the sensor until you hear a beep. Lift your finger and repeat the process slowly until the digit “6”...
-
Page 15: Fingerprint Scanning Directions
3.3 Fingerprint Scanning Directions The fingerprint sensor equipped in your smart lock is loaded with powerful fingerprint algorithms to extract quality features from fingers, even in poor conditions. Placing your finger on the sensor correctly helps consistency in fingerprint recognition. The following directions and tips will guide you on how to scan an optimal fingerprint image. -
Page 16: Fingerprint Scanning Tips & Troubleshooting
• If wet - wipe excess moisture from finger before scanning • If dirty - wipe stains and dirt off from finger before scanning • Make sure the sensor is clean from dirt or smudges - wipe sensor with soft cloth regularly For more troubleshooting help, visit http://Lockly.com/help SECTION 3.4... -
Page 17: Adding An Rfid Card
3.5 Adding an RFID Card Once you’re in RFID Registration Mode, the screen will display the RFID card serial number when adding. Place the RFID card to the screen where the PASS will show on the keypad once RFID card sensor is embedded. card is registered successfully. -
Page 18: Adding Secure Link
Lock. If you purchased a Secure Pro model, the Secure Link is included in your package. For all other Lockly products, the Secure Link can be purchased and added anytime. To set up the Lockly Secure smart lock with Secure Link Wi-Fi Hub and Door Sensors, launch the Lockly App on your iOS or Android device. -
Page 19: Unlocking Using Access Codes
Three consecutive wrong attempts will put Lockly in “Safe Mode”. (See Section 4.7) Lock your Lockly by pressing the OK Button or by brushing your hand across the screen anytime when the door is closed. The smart lock will also auto-lock after unlocking based on your set auto-lock settings. -
Page 20: Unlocking Using Fingerprints
4.2 Unlocking using Fingerprints Unlocking Place a registered finger to the fingerprint scanner located on the exterior side of the lock to the right. To register a fingerprint, please see Section 3.2. If your fingerprint is registered and acknowledged, you will hear a “beep”... -
Page 21: Locking/Unlocking Using App
™ and connect with your Amazon Alexa or Google Assistant-enabled devices. Please download the app by visiting the link below or search “Lockly” from the correct app store. Scan or visit Lockly.com/app... -
Page 22: Unlocking Using Rfid
4.4 Unlocking using RFID Place your RFID card Light up the screen by touching the keypad. closer to the panel. After the deadbolt unlocks, push door to open. If you installed an accent door handle, use handle as per manufacturer's instructions. SECTION 4.4... -
Page 23: Locking / Unlocking Using Physical Key
4.5 Locking/Unlocking with Physical Key Exterior View To unlock your lock using the physical key (included), open the key cover by sliding the cover on either left or right direction to reveal the keyhole. Insert key and turn clockwise (right swing door) or counterclockwise (left swing door) to unlock the door. -
Page 24: Locking/Unlocking With Voice Assistants
Once your Lockly Smart Lock and Secure Link¹ Wi-Fi Hub has been installed and configured correctly, make sure you enable the Lockly Action on Google or the Amazon Alexa Skill before you can configure your voice to perform voice commands. -
Page 25: Safe Mode
After 10 minutes, you may attempt to enter the correct Access Code to unlock the door. After the second incorrect attempt to unlock the lock with the wrong Access Code, Lockly will disable the keypad for 20 minutes, displaying a “20” on the screen. After the third wrong attempt to unlock the door with the correct Access Code, the screen will be disabled for 30 minutes. - Page 26 Option 2 - Lockly Bluetooth App Use the app that is synced to your Lockly to disable Safe Mode by unlocking the door. If you have not downloaded the app to use with your smart lock, you won’t be able to use this option to disable Safe Mode.
-
Page 27: Rain Mode
Lockly entered rain mode and it will be recorded in your access history. If you have not yet connected your device to Lockly App, follow below steps to activate the rain mode feature: RAIN MODE ON RAIN MODE OFF 1. -
Page 28: Shine Mode
4.9 Shine Mode Lockly touchscreen keypad brightness was designed for optimum battery life. However, some users may need to adjust the brightness to their convenience to enter access codes. Swipe your fingers across the keypad to light up to its normal brightness. -
Page 29: Offline Access Code
(OAC) is a unique feature of our smart lock. It allows you to grant access ™ to guests remotely without guests needing to download the app. To use the OAC feature, make sure you download the Lockly app for iOS or Androi first, and sync ™... -
Page 30: Sub-Admin Access
Sub-Admin Access can be created to grant access for others to be able to control your lock and grant access to others via Bluetooth when within range of your Lockly smart lock. The sub-admin permission can be setup through the Lockly App then Add A New User. -
Page 31: Important Notes
Your lock can be programmed to auto-lock between 5-300 seconds after the door opening. You can select the timing through the Lockly App. If auto-lock is not activated and door is still open, the touchscreen will remain lighted, simply press the on the keypad to lock. -
Page 32: Cleaning
8.1 Cleaning Making sure your Lockly is clean is best practice to ensure optimal product use. Follow the DOs and DON’Ts below. DON’T • Don’t use abrasives, high alkaline • Rinse the touchscreen with warm cleaners, or gasoline to clean your water prior to cleaning. -
Page 33: Safety Precautions
9.1 Safety Precautions Please read all instructions carefully. Remind all Lockly users of the safety precautions. Read the following instructions for your own safety Do not attempt to disassemble the smart lock by yourself. It can cause product damage, void warranty, and cause injuries. - Page 34 FCC Warning: This device complies with Part 15 of the FCC Rules. Operation is subject to the following two conditions: (1) This device may not cause harmful interference, and (2) this device must accept any interference received, including interference that may cause undesired operation. NOTE 1: This equipment has been tested and found to comply with the limits for a Class B digital device, pursuant to part 15 of the FCC Rules.
- Page 35 L’émetteur/récepteur exempt de licence contenu dans le présent appareil est conforme aux CNR d’Innovation, Sciences et Développement économique Canada applicables aux appareils radio exempts de licence. L’exploitation est autorisée aux deux conditions suivantes: 1. L’appareil ne doit pas produire de brouillage; 2.
- Page 36 Bluetooth ® SIG, Inc. , and any use of such marks by Lockly is under license. Other trademarks and trade names are those of their respective owners. Google, Android, Google Play and Google Home are trademarks of Google LLC.
Need help?
Do you have a question about the DEADBOLT SECURE PLUS and is the answer not in the manual?
Questions and answers