Table of Contents
Advertisement
Quick Links
COMPONENTS LIST
A
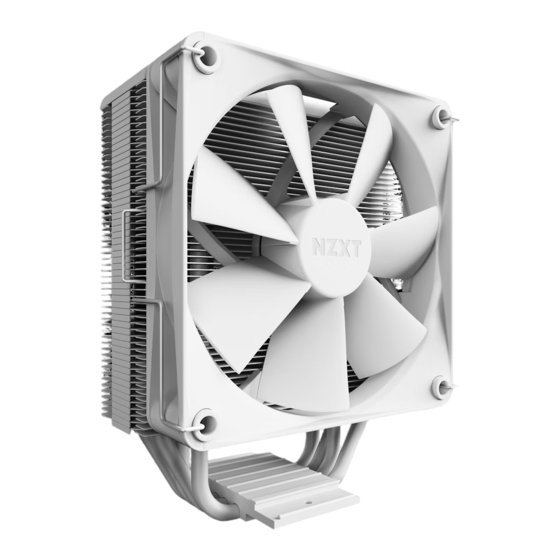
Heatsink and Fan
Dissipateur et ventilateur
Kühlkörper und Lüfter
Dissipador e ventoinha
Disipador y ventilador
散热器和风扇
x1
ヒートシンクとファン
E
AMD Clips
Attaches AMD
AMD-Clips
Clips AMD
Broches de AMD
AMD 脚架
x2
AMD用クリップ
G
Pillars
Colonnes
Stangen
Pilares
Columnas
支柱
x4
支柱
I
Crossbar Screws
Vis barre transversale
Querstrebenschrauben
Parafusos da barra transversal
Tornillos para la barra transversal
横杆螺丝
x2
クロスバー用ネジ
K
Thermal Grease
Graisse thermique
Wärmeleitpaste
Massa térmica
Compuesto térmico
散热膏
x1
熱伝導グリス
INTEL
INSTALLATION OF MOUNTING KIT
LGA 1366
Aligning
NOTE: Towards the head
LGA 1156/1155
of the screw, one side is
at, align appropriately
LGA 775
with the backplate.
B
H
H
H
1
Insert the backplate screws through the appropriate CPU socket
holes on the backplate.
Insérez les vis de la plaque arrière au travers des trous de prise
appropriés du processeur sur la plaque arrière.
Führen Sie die Rückplattenschrauben durch die passenden
CPU-Sockelaussparungen in der Rückplatte.
Insira os parafusos da placa posterior através dos orifícios para o
socket da CPU na placa posterior.
.
Inserte los tornillos para la placa posterior a través de los ori cios del
zócalo de la CPU apropiados que se encuentran en dicha placa.
将背板螺丝通过相应的 CPU 安装孔位插入到背板上。
バックプレート用ネジを、使用されるCPU に適したCPUソケッ
トに穴に挿入してください。
4
Positionnez le dissipateur sur le processeur.
Setzen Sie den Kühlkörper auf die CPU.
Coloque o dissipador na CPU.
.
Coloque el disipador en la CPU.
将散热器装到 CPU 上。
ヒートシンクをCPU に固定してください。
RESPIRE T20 Manual
B
Backplate
Plaque dorsale
Rückplatte
Placa posterior
Placa posterior
背板
x1
バックプレート
F
Nuts
Ecrous
Muttern
Porcas
AMD
Tuercas
螺母
x4
ナット
H
Backplate Screws
Vis Plaque dorsale
Rückplattenschrauben
Parafusos da placa posterior
Tornillos para la placa posterior
背板螺丝
x4
バックプレート用ネジ
J
LGA2011 Screws
Vis LGA2011
LGA2011-Schrauben
Parafusos LGA2011
LGA2011
Tornillos para LGA2011
LGA2011 螺丝
x4
LGA2011 用ネジ
L
Speed Adapter
Adaptateur vitesse
Drehzahladapter
Adaptador de velocidade
Adaptador de velocidad
速度适配器
x1
スピード調整アダプタ
INTEL SOCKET LGA 1366/1156/1155/775
G
G
G
H
2
Install the backplate and secure with pillars.
Installez la plaque arrière et xez-la avec les colonnes.
Setzen Sie die Rückplatte auf, xieren Sie diesen mit den Stangen.
Instale a placa posterior e xe com os pilares.
Instale la placa posterior y fíjela con las columnas.
安装背板并用支柱固定。
バックプレートを挿入し、支柱で固定してください。
C
5
Put the crossbar through the heatsink and lay on the Intel clips. Secure
the cross bar with the crossbar screws.
Mettez la barre transversale au travers du dissipateur et posez-la sur les clips
Intel. Fixez la barre transversale avec les vis de barre transversale.
Führen Sie die Querstrebe so durch den Kühlkörper, dass diese auf den
Intel-Clips au iegt. Fixieren Sie die Querstrebe mit den Querstrebenschrauben.
Coloque a barra transversal no dissipador e coloque os clips Intel. Aperte a
barra transversal com os respectivos parafusos.
Intel.
.
Coloque la barra transversal a través del disipador y aplique los broches de
Intel. Fije la barra transversal con los tornillos para dicha barra.
使横杆穿过散热器,压在 Intel 脚架上。 用横杆螺丝将横杆拧紧。
クロスバーをヒートシンクを通してインテルクリップ上に置き、クロスバ
ー用ネジで固定してください。
C
x1
PREPARATION OF INSTALLATION
A
Remove the fan
Retirez le ventilateur
Lüfter ausbauen
Remova a ventoinha
.
Quitar el ventilador.
拆下风扇。
ファンを取り外す。
F
G
F
D
3
Install Intel clips with the arrows facing towards the CPU,
then secure the nuts tightly by hand.
Installez les attaches Intel avec les èches tournées vers le
processeur, puis xez les écrous fermement avec la main.
Bringen Sie die Intel-Clips so an, dass die Pfeile zur CPU
zeigen, ziehen Sie die Schrauben dann mit der Hand fest an.
Instale os clips Intel com as setas viradas para a CPU e depois
aperte as porcas rmemente com a mão.
.
,
Instale los broches de Intel con las echas orientadas hacia la
CPU y, a continuación, je las tuercas rmemente con la mano.
安装 Intel 脚架,使箭头面向 CPU,然后用手拧紧螺母。
インテルクリップを、図のようにCPUに挿入し、ナットを手
でしっかり締め付けてください。
I
6
Attach
the fan to the heatsink.
Attachez le ventilateur au dissipateur.
Bringen Sie den Lüfter am Kühlkörper an.
Encaixe a ventoinha no dissipador.
Acople el ventilador al disipador
将风扇安装到散热器。
ファンをヒートシンクに取り付けて下さい。
D
Crossbar
Barre transversale
Querstrebe
Barra transversal
Barra transversal
横杆
クロスバー
NOTE: Completely clean
any existing thermal
grease off the CPU.
注:CPU上の既存の熱
伝導グリスをきれいに
ふき取ってください。
Remove the protective lm on the bottom of the heatsink, then apply a thin layer of
thermal grease.
Retirez le lm de protection sur le bas du radiateur, puis appliquez une ne couche
de graisse thermique.
Entfernen Sie die Schutzfolie am Boden des Kühlkörpers, tragen Sie dann eine
dünne Schicht Wärmeleitpaste auf.
Remova a película de protecção da parte inferior do dissipador e depois aplique
uma camada na de massa térmica.
.
Quite la película protectora de la parte inferior del disipador y, a continuación,
aplique una capa na de compuesto térmico.
揭下散热器底部上的保护膜,然后涂上一层簿簿的散热膏。
ヒートシンク底部の保護フィルムを取り外し、熱伝導グリスを薄く均一に塗る。
INTEL SOCKET LGA 2011
J
F
D
F
F
Install LGA 2011 screws on to the integrated backplate on the
motherboard, then place the Intel clips on the LGA 2011 screws,
using the outer-most hole. Secure the nuts tightly by hand.
Installez les vis LGA 2011 sur la plaque arrière intégrée de la carte
mère, puis placez les attaches Intel sur les vis LGA 2011, en utilisant le
trou le plus à l'extérieur. Fixez les écrous fermement avec la main.
Installieren Sie die LGA 2011-Schrauben an der integrierten
Rückplatte des Motherboards, setzen Sie dann die Intel-Clips auf
die LGA 2011-Schrauben auf, nutzen Sie dazu die Bohrung ganz
außen. Ziehen Sie die Muttern mit der Hand an.
Instale os parafusos LGA 2011 na placa posterior integrada na
placa principal e depois coloque os clips Intel nos parafusos LGA
2011, utilizando o orifício exterior mais distante. Aperte as porcas
rmemente com a mão.
LGA 2011
,
LGA 2011,
Instale los tornillos para LGA 2011 de la placa posterior integrada en
Intel
la placa base y, a continuación, coloque los broches de Intel en los
tornillos para LGA 2011 utilizando el ori cio más externo. Apriete las
.
tuercas rmemente a mano.
将 LGA 2011 螺丝安装到主板的后板上,然后通过最外侧的孔给
Intel 脚架套上 LGA 2011 螺丝。 用手拧紧螺母。
LGA 2011用ネジをマザーボードに付けてあるバックプレートに
挿入し、インテルクリップのもっとも外側の穴を通してLGA
2011用ネジの上に置き、手でナットを固定してください。
Fan
7
Connect the fan cable onto the motherboard or connect the
speed adapter to lower the fan speed.
Branchez le câble du ventilateur sur la carte mère ou branchez
l'adaptateur de vitesse en vue de réduire la vitesse du ventilateur.
Verbinden Sie das Lüfterkabel mit dem Anschluss am Motherboard;
alternativ schließen Sie den Drehzahladapter an, wenn Sie eine
geringere Lüfterdrehzahl wünschen.
Ligue o cabo da ventoinha à placa principal ou ligue o adaptador
.
de velocidade para diminuir a velocidade da ventoinha.
.
Conecte el cable del ventilador a la placa base o al adaptador
de velocidad para reducir la velocidad de dicho ventilador.
将风扇线缆连接到主板,或连接速度适配器以降低风扇速度。
遅くするためのスピードアダプタに接続し、スピードアダプタのコ
ネクタをマザーボード上のファンコネクタに接続してください。
Intel Clips
Attaches Intel
Intel-Clips
Clips Intel
Intel
Broches de Intel
Intel 脚架
x2
インテル用クリップ
K
,
F
D
F
J
D
F
J
J
J
Intel
.
.
F
an
OR
L
,
Advertisement
Table of Contents

Related Manuals for NZXT RESPIRE T20


Summary of Contents for NZXT RESPIRE T20
- Page 1 RESPIRE T20 Manual COMPONENTS LIST Heatsink and Fan Backplate Crossbar Intel Clips Dissipateur et ventilateur Plaque dorsale Barre transversale Attaches Intel Kühlkörper und Lüfter Rückplatte Querstrebe Intel-Clips Dissipador e ventoinha Placa posterior Barra transversal Clips Intel Intel Disipador y ventilador...
- Page 2 Support et service Kundendienst und Service Si vous avez des questions ou des problèmes avec le produit NZXT que vous Falls Fragen oder Probleme bezüglich Ihres NZXT-Produktes auftreten, wenden If you have any questions or problems with the NZXT product you purchased, avez acheté, n’hésitez pas à...
Need help?
Do you have a question about the RESPIRE T20 and is the answer not in the manual?
Questions and answers