Advertisement
Quick Links
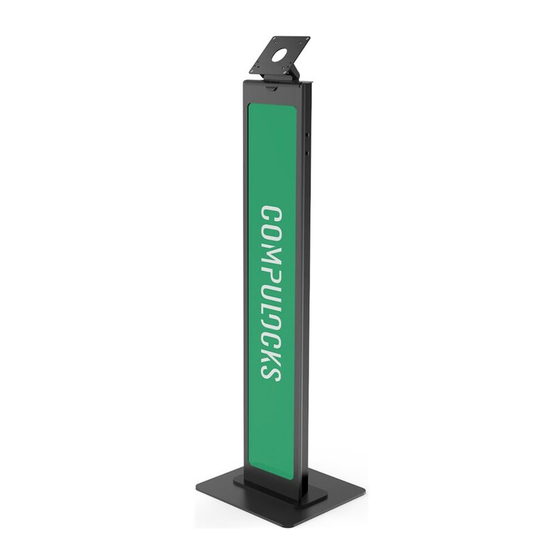
BrandMe Security Floor Stand
User Manual
A
x1
B
C
x2
x1
D
E
x1
x1
©Compulocks Brands Inc. All Rights Reserved.
F
G
H
x2
x4
x8
J
x1
K
x1
www.compulocks.com | online@maclocks.com | +1 800-948-0344
A
Top End Assembly
B
Upright Extrusion
C
Graphic Panel
D
Base Cover
E
Base
I
F
M5 x 40mm Round Spacer
G
M5 x 20mm Button Head Screw
x4
H
M5 x 20mm Flat Head Screw
I
M4 x 8mm Button Head Phillips Screw
J
T-25 Torx L-Wrench
K
M5 Hex Wrench
NOTE! Before getting started
If you plan on a constant power connection to
your Tablet, you will need to obtain a longer USB
cable, allowing you to route the cable through
the Upright Extrusion (B).
You will also need a AC Power Cord to connect
to a Power Cube. These Cables are not supplied
with the Stand.
To attach Enclosure to the Top End Assembly you
will need Phillips Head Screwdriver.
Page 1 of 10
Advertisement

Related Manuals for compulocks BrandMe


Summary of Contents for compulocks BrandMe
- Page 1 Power Cube. These Cables are not supplied with the Stand. To attach Enclosure to the Top End Assembly you will need Phillips Head Screwdriver. ©Compulocks Brands Inc. All Rights Reserved. www.compulocks.com | online@maclocks.com | +1 800-948-0344 Page 1 of 10...
- Page 2 M5 x 20mm Flat Head Screws (H), tighten using T-25 Torx L-Wrench (J). Back Note! Make sure screws in Upright Extrusion are tight. Back Front Front ©Compulocks Brands Inc. All Rights Reserved. www.compulocks.com | online@maclocks.com | +1 800-948-0344 Page 2 of 10...
- Page 3 L-Wrench (J). the cable at the top of the Upright Extrusion (B). Note! Make sure screws in Upright Extrusion are tight. 9-10” of cable ©Compulocks Brands Inc. All Rights Reserved. www.compulocks.com | online@maclocks.com | +1 800-948-0344 Page 3 of 10...
- Page 4 Base (E) for floor mounting (screws for floor mounting not included). Tip! To prevent A/C cord from disconnecting, tie a knot in the cord. ©Compulocks Brands Inc. All Rights Reserved. www.compulocks.com | online@maclocks.com | +1 800-948-0344 Page 4 of 10...
- Page 5 Step 8 Secure Base Cover (D) with M5 x 20mm Flat Head Screws Install Graphic Panel (C) as shown. (H) using T-25 Torx L-Wrench (J). ©Compulocks Brands Inc. All Rights Reserved. www.compulocks.com | online@maclocks.com | +1 800-948-0344 Page 5 of 10...
- Page 6 Cut the Graphic Panel (C) to the desired size and install Install Printer Tray (L) above the Graphic Panel (C) using as shown in step 8. supplied screws (M) and tighten. ©Compulocks Brands Inc. All Rights Reserved. www.compulocks.com | online@maclocks.com | +1 800-948-0344 Page 6 of 10...
- Page 7 End Assembly (A) using M5 x 20mm Button Head Screws Head Phillips Screws (I). (G), tighten using T-25 Torx L-Wrench (J). Tip! You can also install the Enclosure in portrait mode (vertically). ©Compulocks Brands Inc. All Rights Reserved. www.compulocks.com | online@maclocks.com | +1 800-948-0344 Page 7 of 10...
- Page 8 Enclosure (N) is open. Repeat with the second Lock. Remove the Key (O) from the Lock (P) and open the Front Panel (Q). ©Compulocks Brands Inc. All Rights Reserved. www.compulocks.com | online@maclocks.com | +1 800-948-0344 Page 8 of 10...
- Page 9 Enclosure (N) and close it. Locks (P) with the holes for them and press the button on the Locks (P). The Enclosure is closed. ©Compulocks Brands Inc. All Rights Reserved. www.compulocks.com | online@maclocks.com | +1 800-948-0344 Page 9 of 10...
- Page 10 .375” or 9.53mm will be covered by the Extrusions both sides Graphic Panel. Note! The Graphic slides into the grooves of the Extrusions of the Stand. 6.0” 15.24cm ©Compulocks Brands Inc. All Rights Reserved. www.compulocks.com | online@maclocks.com | +1 800-948-0344 Page 10 of 10...
Need help?
Do you have a question about the BrandMe and is the answer not in the manual?
Questions and answers