Advertisement
Quick Links
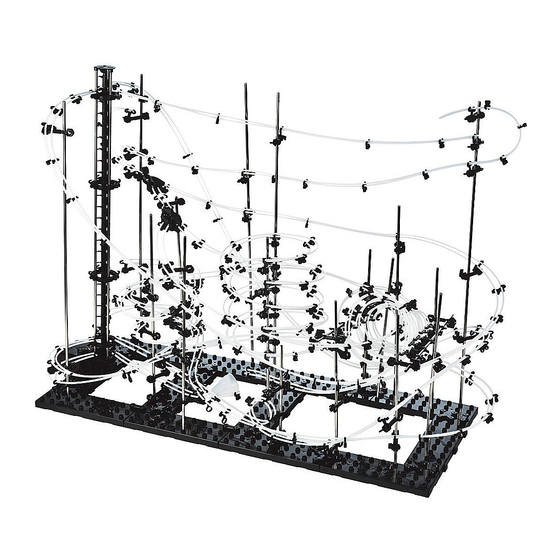
LEVEL 8
PRODUCT AND CONSUMER WARNING
CHOKING HAZARD: This product contains small parts and is not intended for children under 3.
• This product is intended for users 8 years of age and older.
• To avoid choking, keep small parts away from children.
• Use caution—this product contains parts with sharp edges.
• To avoid potential damage to the product, only insert the included marbles into the elevator.
Advertisement

Related Manuals for Spacerails Level 8


Summary of Contents for Spacerails Level 8
- Page 1 LEVEL 8 PRODUCT AND CONSUMER WARNING CHOKING HAZARD: This product contains small parts and is not intended for children under 3. • This product is intended for users 8 years of age and older. • To avoid choking, keep small parts away from children.
- Page 2 Wire Cutters or Utility Scissors Pen or Marker 3 AA Batteries (newer models) or 1 C Battery Rail Clip Rail Coupling Marble Rail x150 40,000 mm Ruler (in centimeters) Seaich Corporation, LLC. All rights reserved. www.seaich.com | Spacerails, LLC. www.spacerails.com Page 2...
- Page 3 Rail Clip in place. (These will be assembled during the RAIL SPLITTERS shaft assembly step.) Step 1: Attach one Rail Clip on each of the Rail Splitter posts. Seaich Corporation, LLC. All rights reserved. www.seaich.com | Spacerails, LLC. www.spacerails.com Page 3...
-
Page 4: Base Assembly
Arm Lock. Refer to the next page for orientation and referenced on the shaft drawings. location of each arm. Arm A Arm B Arm C Seaich Corporation, LLC. All rights reserved. www.seaich.com | Spacerails, LLC. www.spacerails.com Page 4... - Page 5 Illustration is approximately 37% of actual size. All shaft measurements are in Millimeters. FRONT BACK OF BASE OF BASE BASE SHAFT TO BASE ORIENTATION Shaft A Shaft B Shaft C Shaft D Shaft E Seaich Corporation, LLC. All rights reserved. www.seaich.com | Spacerails, LLC. www.spacerails.com Page 5...
- Page 6 SHAFT ASSEMBLY CONTINUED Shaft F Shaft G Shaft H Shaft I Shaft J Seaich Corporation, LLC. All rights reserved. www.seaich.com | Spacerails, LLC. www.spacerails.com Page 6...
- Page 7 SHAFT ASSEMBLY CONTINUED FRONT BACK OF BASE OF BASE BASE SHAFT TO BASE ORIENTATION Shaft K Shaft L Shaft M Shaft N Shaft O Seaich Corporation, LLC. All rights reserved. www.seaich.com | Spacerails, LLC. www.spacerails.com Page 7...
- Page 8 Shaft S and shaft T are suspended above the base using Arm B connections From shafts L, M, O, and P. Shaft P Shaft Q Shaft R Seaich Corporation, LLC. All rights reserved. www.seaich.com | Spacerails, LLC. www.spacerails.com Page 8...
-
Page 9: Elevator Assembly
Power Box. pieces together with the male part built, attach three support shafts facing up to fill the shaft. to the Power Box. Seaich Corporation, LLC. All rights reserved. www.seaich.com | Spacerails, LLC. www.spacerails.com Page 9... - Page 10 Step 6: Insert three Elevator Guards each in Step 7: Attach Rail Clips to each into position on the support the bottom two Elevator Rings. Elevator Ring as shown. shafts right-side up. Seaich Corporation, LLC. All rights reserved. www.seaich.com | Spacerails, LLC. www.spacerails.com Page 10...
- Page 11 Please see the included full size drawings. This will simplify the positioning of base, arms, shafts, and the rail cut lengths. 78 cm 90 cm 150 cm 310 cm 360 cm 365 cm 435 cm Seaich Corporation, LLC. All rights reserved. www.seaich.com | Spacerails, LLC. www.spacerails.com Page 11...
- Page 12 Shaft S and shaft T are suspended above the base using Arm B connections from shafts L, M, O, and P. FRONT BACK OF BASE OF BASE Seaich Corporation, LLC. All rights reserved. www.seaich.com | Spacerails, LLC. www.spacerails.com Page 12...
-
Page 13: Installing Rails
Rails should extend into the elevator enough to catch the Marble. Keep incline as smooth as possible to avoid losing speed or contact with rails. Seaich Corporation, LLC. All rights reserved. www.seaich.com | Spacerails, LLC. www.spacerails.com Page 13... - Page 14 F-4 and Finish rail at arm A-3. Repeat step for second rail. Attach rail Clips every 8-10 cm along rail to maintain stability and keep rails parallel. Seaich Corporation, LLC. All rights reserved. www.seaich.com | Spacerails, LLC. www.spacerails.com Page 14...
- Page 15 NOTE: If length of rail is longer or shorter than expected try adjusting the size of the nested loops to better utilize the rails. Seaich Corporation, LLC. All rights reserved. www.seaich.com | Spacerails, LLC. www.spacerails.com Page 15...
- Page 16 For the single loop on the front try starting with a 10 cm loop. These numbers are intended to be a guide only. Test your loops with the Marble. Adjust until you get good consistent speed throughout this section. Seaich Corporation, LLC. All rights reserved. www.seaich.com | Spacerails, LLC. www.spacerails.com Page 16...
- Page 17 9 cm on the back loop. These numbers are intended to be a guide only. Test your loops with the Marble. Adjust until you get good consistent speed throughout this section. Seaich Corporation, LLC. All rights reserved. www.seaich.com | Spacerails, LLC. www.spacerails.com Page 17...
- Page 18 Adjust the speed and angle of the ramp for the jump and catch to be successful. Arm E-1 Arm E-1 Rail Clip Seaich Corporation, LLC. All rights reserved. www.seaich.com | Spacerails, LLC. www.spacerails.com Page 18...
- Page 19 Create a dip or find other ways going at the same time. If the marbles are coming into to slow marbles to just the right speed at entrance. Seaich Corporation, LLC. All rights reserved. www.seaich.com | Spacerails, LLC. www.spacerails.com Page 19...
- Page 20 Seaich Corporation 1910 West 1040 South Salt Lake City, UT 84104 (833) 732-4242 orders@seaich.com Spacerails LLC Spacerail © 2021 www.spacerails.com...
Need help?
Do you have a question about the Level 8 and is the answer not in the manual?
Questions and answers