
Related Manuals for Fisher & Paykel CGI905DNGTB


Summary of Contents for Fisher & Paykel CGI905DNGTB
- Page 1 COMBI: GAS + INDUCTION COOKTOP MINIMAL CGI905DNGTB, CGI905DLPTB4, CGI603DNGTB4, CGI603DLPTB4 USER GUIDE NZ AU...
-
Page 3: Table Of Contents
CONTENTS Safety and warnings First use Safety features Cookware Using your burner Using your induction zones SmartZones PowerBoost GentleHeat Auto RapidHeat Using the timer Cooking guide Care and cleaning Troubleshooting Energy guidelines Warranty and service Registration To register your product visit our website: fisherpaykel.com/register... -
Page 4: Safety And Warnings
SAFETY AND WARNINGS WARNING! Electrical Shock Hazard Failure to follow this advice may result in electrical shock or death. • Switch the power to the cooktop off at the wall before cleaning or maintenance. • Do not cook on a broken or cracked cooktop. If the glass should break or crack, turn off the gas supply and switch the appliance off immediately at the mains power supply (wall switch) and... - Page 5 SAFETY AND WARNINGS WARNING! Explosion Hazard Failure to follow this advice may result in death or serious injury. • Do not use or store flammable materials such as gasoline near this appliance. • Do not spray aerosols in the vicinity of this appliance while it is in operation.
- Page 6 SAFETY AND WARNINGS READ AND SAVE THIS GUIDE WARNING! To reduce the risk of fire, injury to persons or damage when using the appliance, follow the important safety instructions listed below. Read all the guidance before using the appliance. General Use Never use your appliance as a work or storage surface.
- Page 7 SAFETY AND WARNINGS Ensure the electrical connection is accessible after installation Child Safety Do not allow children to play with the appliance or sit, stand, or climb on it. Do not store items of interest to children in cabinets above the appliance. Children climbing on the cooktop could be seriously injured.
-
Page 8: First Use
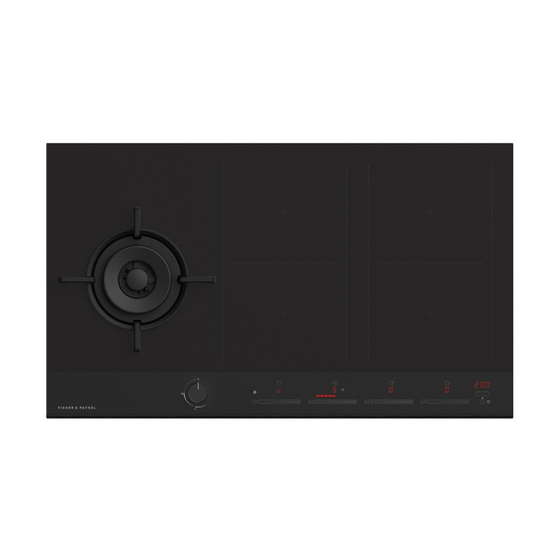
FIRST USE Cooktop features 1 Dual wok burner 2 Pan support 3 Induction zones 4 Control panel 5 Burner dial 6 Zone indicator 7 Zone display 8 Zone heat selector 9 GentleHeat control !0 GentleHeat indicators !1 Cooktop ON/OFF !2 Timer control !3 Timer display !4 Keylock !1 !4... -
Page 9: Safety Features
SAFETY FEATURES The cooktop control dials can be locked for cleaning and to prevent unintended use. When the cooktop is locked the controls and cooktop display will remain unresponsive. LOCKING THE COOKTOP UNLOCKING THE COOKTOP Ensure all cooking zones have been turned To unlock the cooktop, touch and hold . -
Page 10: Cookware
COOKWARE Cookware size For optimal performance, ensure the size of the cookware is suitable for the zone in use. CGI603DTB CGI905DTB Cooking zone Min. pan size* max. pan size* without small pan support 200mm 340mm 1 Dual wok burner with wok stand no minimum 400mm unbridged... - Page 11 COOKWARE Induction cookware The quality of your cookware can affect cooking performance. Only use induction-compatible cookware that has been specifically designed for induction cooking. Look for the induction symbol on the packaging or the bottom of the pan. Suitable cookware material: Unsuitable cookware material: stainless steel –...
-
Page 12: Using Your Burner
USING YOUR BURNER When using your burner, you can choose to use the inner burner only or both the inner and outer burners as desired. Inner and outer burners Inner burner only HIGH Push the dial down and turn counterclockwise to the highest heat setting Once the burner is lit, hold the dial down for a further 3 seconds. - Page 13 USING YOUR BURNER Manual lighting If the burner will not light after several attempts, it can be manually lit. If you have attempted to light the burner with the ignition, allow 1 minute for any accumulated gas to dissipate before manually lighting. Carefully hold a lit match near the burner.
-
Page 14: Using Your Induction Zones
USING YOUR INDUCTION ZONES To begin cooking Touch and hold the control for ON/OFF 2 seconds. The indicator light above the control will glow. will appear in the cooking zone display. Place a suitable pan on the cooking zone. Ensure the bottom of the pan and the surface of the cooking zone are clean and dry. - Page 15 USING YOUR INDUCTION ZONES Turn the cooking zone off: Touch or slide the setting selector until shows in the zone display. Turn the cooktop off: touch the control. ON/OFF flashes in the display: will flash in the cooking zone display of any zone that is too hot to touch.
-
Page 16: Smartzones
SMARTZONES The SmartZones can accommodate several small pots. These small pots will be detected as one large pot. The entire SmartZone is activated when a pot is detected. This means that other magnetic items (such as cutlery) sitting in the cooking zone will heat up. - Page 17 SMARTZONES If no pan is detected on one cooking zone: The left hand display will still show the selected temperature and the right hand display will still show If after 10 minutes no pan is detected: The bridging function will switch off. The cooking zone without a detectable pan will turn off.
-
Page 18: Powerboost
POWERBOOST Using PowerBoost This feature enables you to sear meat or bring liquid to boil very quickly. When a cooking zone is set to PowerBoost, it uses more than 100% of the power of that particular cooking zone, resulting in a boost of intense heat. PowerBoost heats food and liquids very quickly. Do not leave the cooktop unattended when using this feature. -
Page 19: Gentleheat
GENTLEHEAT Using GentleHeat There are two GentleHeat settings. The Low setting is ideal for the most delicate cooking tasks (such as melting chocolate), as the cooking zone will provide a very low continuous gentle heat. The Medium setting is ideal for keeping cooked food warm and the gentle warming of delicate foods. -
Page 20: Auto Rapidheat
AUTO RAPIDHEAT Using Auto RapidHeat APPROXIMATE TIME HEAT SETTING AT RAPID HEAT This feature enables the cooking zones to: 40 seconds heat up food or liquid quickly at the highest setting, and 1 minute reduce the temperature automatically 2 minutes to a pre-selected heat setting. - Page 21 AUTO RAPIDHEAT Then, when the period of highest setting is over, will stop flashing and the cooking zone will automatically reduce the heat to your pre-selected lower setting. If you would like a lower or higher heat setting than you originally selected, simply slide to the new setting and hold until the starts flashing.
-
Page 22: Using The Timer
USING THE TIMER You can set the timer for up to 1 hour and 59 minutes. The time will be displayed in hours and minutes when the timer is set for longer than 10 minutes. Using timer as minute minder The minute minder can be set when not using any cooking zones. - Page 23 USING THE TIMER To cancel a timer setting With the cooktop turned on, tap the – and + controls together until the indicator light in the desired cooking zone illuminates. Press and hold the control until the minute – display shows .
-
Page 24: Cooking Guide
COOKING GUIDE Take care when frying: oil and fat heat up very quickly, particularly if you’re using PowerBoost. At extremely high temperatures oil and fat will ignite spontaneously and this presents a serious fire risk. Cooking tips When food comes to the boil, reduce the temperature setting. Using a lid will reduce cooking times and save energy by retaining the heat. - Page 25 COOKING GUIDE Induction heat settings HEAT SETTING SUITABILITY melting chocolate, butter, and foods that burn quickly delicate warming for small amounts of food 1 - 2 gentle simmering slow warming 3 - 4 reheating rapid simmering cooking rice 5 - 6 pancakes 7 - 8 sautéing...
- Page 26 COOKING GUIDE Burner supports Small pan support The small pan support has been designed for supporting cookware with a base diameter smaller than 200mm. Using the small pan support Ensure cooktop is cool before slotting the small pan support onto the centre of the dual wok burner as shown. Ensure all notches rest securely on the burner pan supports before use.
-
Page 27: Care And Cleaning
CARE AND CLEANING Replacing burner parts Ensure that all burner parts are correctly fitted. An incorrectly assembled burner may produce dangerous flames. Flames should be blue with no yellow tipping, and burn without fluttering around the burner cap. Burner cap Burner ring Incorrect alignment Flame spreader... - Page 28 CARE AND CLEANING Burner The burner should be cleaned regularly. Food residue may obstruct the ignitor and the notches of the flame spreader, preventing the burner from functioning correctly. Refer to ‘Replacing burner parts’ for details on safely removing and refitting burner parts. Burner caps, rings, flame spreaders and accessories 1 Remove the parts that you wish to clean.
- Page 29 CARE AND CLEANING WHAT? HOW? IMPORTANT! Everyday soiling 1 Switch the power to the When the power to the on glass (fingerprints, cooktop off at the wall. cooktop is switched off, marks, stains left by there will be no ‘hot surface’ 2 Apply cooktop cleaner while food or non-sugary indication but the cooking...
-
Page 30: Troubleshooting
TROUBLESHOOTING General PROBLEM POSSIBLE CAUSES WHAT TO DO The cooktop cannot No power. Ensure the cooktop is connected be turned on. to the power supply, that it is switched on at the wall and there is no power outage. If the problem persists, call your Authorised Service Centre or Customer Care. - Page 31 TROUBLESHOOTING Induction zones PROBLEM POSSIBLE CAUSES WHAT TO DO The touch controls The controls are locked. Unlock the controls. Refer to are unresponsive. ‘Safety features’. The touch controls are There may be a slight film of water Ensure the touch control area is difficult to operate.
- Page 32 TROUBLESHOOTING PROBLEM POSSIBLE CAUSES WHAT TO DO Some pans make crackling or This may be caused by the This is normal for induction clicking noises. construction of your cookware cookware and does not indicate (layers of different metals a fault. vibrating differently).
- Page 33 TROUBLESHOOTING PROBLEM POSSIBLE CAUSES WHAT TO DO The flames are too large, The cooktop may have Contact Customer Care and do not use or too small. been connected to the your cooktop until it has been checked by a wrong gas type. qualified technician.
-
Page 34: Energy Guidelines
ENERGY GUIDELINES This cooktop has been designed and constructed in accordance with the following codes and specifications: In New Zealand and Australia: AS/NZS 60335-1:2011 General Requirements for Domestic electrical appliances AS/NZS 60335-2-6:2014 Particular Requirements for Domestic electrical cooking appliances AS/NZS CISPR 14.1.2013 Electromagnetic Compatibility Requirements. AS/NZS 5263.0:2017 General Requirements for Domestic gas appliances AS/NZS 5263.1.1:2016 Particular requirements for Domestic gas cooking appliances In Europe:... -
Page 35: Warranty And Service
WARRANTY AND SERVICE Before you call for service or assistance Check the things you can do yourself. Refer to the installation instructions and your user guide and check that: 1 Your product is correctly installed. 2 You are familiar with its normal operation. If after checking these points you still need assistance or parts, please refer to the Service &... - Page 36 FISHERPAYKEL.COM © Fisher & Paykel Appliances 2020. All rights reserved. The models shown in this guide may not be available in all markets and are subject to change at any time. The product specifications in this guide apply to the specific products and models described at the date of issue.
Need help?
Do you have a question about the CGI905DNGTB and is the answer not in the manual?
Questions and answers