Table of Contents
Advertisement
Quick Links
Advertisement
Table of Contents

Subscribe to Our Youtube Channel
Related Manuals for tayco Hanna Series


Summary of Contents for tayco Hanna Series
- Page 1 Hanna installation guide February 2020...
- Page 2 Installation Service toll free I 1.800.675.4092 Mon - Fri I 8:30 am – 5:00 pm EST www.tayco.com...
-
Page 3: Table Of Contents
Table of Contents General Instructions 1|02 Installation Checklist ........................ 1 Care and Maintenance ......................2 Application Guide ........................3 Hanna 04|18 Hanna Meeting Table with tubular “T” base ................4 Hanna Meeting Table with slim “T” base .................. 6 Hanna Square Table with tubular “X” base ................8 Hanna Square Table with slim “X”... -
Page 4: Installation Checklist
Installation Checklist Perform a site inspection prior to the installation date to check existing site conditions and identify constraints and limitations that could possibly cause delays or problems during the actual installation. SITE ACCESSIBILITY 1. Verify existing loading facilities and proximity of loading dock to staging area. 2. -
Page 5: Care And Maintenance
American Corporation. Painted Metals Tayco’s painted metal products are powder-paint-coated. To clean these products, use a damp cloth, using only a small amount of lukewarm water if necessary. Dry with a clean a dry cloth. To avoid scratching and damaging the painted surface, do not use hard bristled brushes or abrasive. -
Page 6: Application Guide
Application Guide Hanna Hanna Specifying Tops and Bases Tops and bases are sold separately Tubular X-Base Slim X-Base Tubular T-Base Slim T-Base X-Base Tops T-Base Round Square Squircle Spread (IN) Rectangular Super Spread (IN) (Diameter) (Depth) (Depth) (Depth) Ellipse (Depth) Specifying Finishes Available in any of our standard powder paint colours FEBRUARY 2020... -
Page 7: Hanna Meeting Table With Tubular "T" Base
Hanna meeting table with tubular “T” base Note: The procedure below is for Rectangular and Super Ellipse meeting tables. 1. Place the table top on a clean solid surface or floor with the underside facing up, (Figure 1). Figure 1 Tools &... - Page 8 Hanna meeting table with tubular “T” base 2. Position the tubular “T” base using the pre-drilled positioning holes and attach it to table top using #10 X 1” Oval Head Screws, (Figure 2). 3. Drive four more screws to table top using #10 X 1”...
-
Page 9: Hanna Meeting Table With Slim "T" Base
Hanna meeting table with slim “T” base Note: The procedure below is for Rectangular and Super Ellipse meeting tables. 1. Place the table top on a clean solid surface or floor with the underside facing up, (Figure 1). Figure 1 Tools &... - Page 10 Hanna meeting table with slim “T” base 2. Position the slim “T” base using the pre-drilled positioning holes and attach it to table top using #10 X 1” Oval Head Screws, (Figure 2). 3. Drive four more screws to rectangular table top using #10 X 1”...
-
Page 11: Hanna Square Table With Tubular "X" Base
Hanna square table with tubular “X” base 1. Place the square table top on a clean solid surface or floor with the underside facing up, (Figure 1). Continued on the next page >> Figure 1 Tools & Hardware Needed FEBRUARY 2020 hanna 8... - Page 12 Hanna square table with tubular “X” base 2. Position the tubular “X” base using the pre-drilled positioning holes and attach it to square table top using #10 X 1” Oval Head Screws, (Figure 2). 3. Drive four more screws to square table top using #10 X 1”...
-
Page 13: Hanna Square Table With Slim "X" Base
Hanna square table with slim “X” base 1. Place the square table top on a clean solid surface or floor with the underside facing up, (Figure 1). Continued on the next page >> Figure 1 Tools & Hardware Needed FEBRUARY 2020 hanna 10... - Page 14 Hanna square table with slim “X” base 2. Position the slim “X” base using the pre-drilled positioning holes and attach it to square table top using #10 X 1” Oval Head Screws, (Figure 2). 3. Drive four more screws to square table top using #10 X 1”...
-
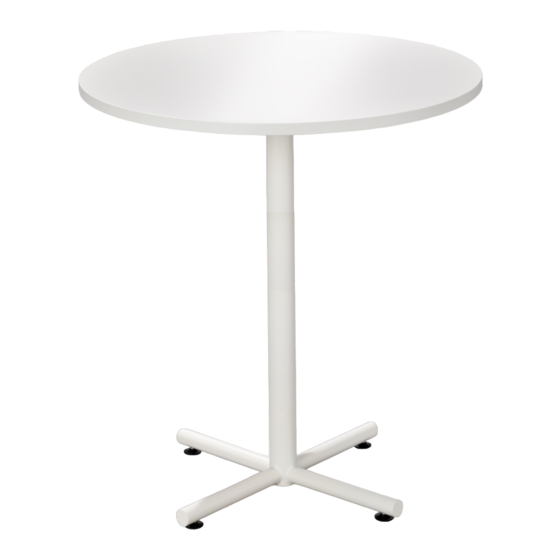
Page 15: Hanna Round Table With Tubular "X" Base
Hanna round table with tubular “X” base 1. Place the round table top on a clean solid surface or floor with the underside facing up, (Figure 1). Continued on the next page >> Figure 1 Tools & Hardware Needed FEBRUARY 2020 hanna 12... - Page 16 Hanna round table with tubular “X” base 2. Position the tubular “X” base using the pre-drilled positioning holes and attach it to round table top using #10 X 1” Oval Head Screws, (Figure 2). 3. Drive four more screws to round table top using #10 X 1”...
-
Page 17: Hanna Round Table With Slim "X" Base
Hanna round table with slim “X” base 1. Place the round table top on a clean solid surface or with the underside facing up, (Figure 1). Continued on the next page >> Figure 1 Tools & Hardware Needed FEBRUARY 2020 hanna 14... - Page 18 Hanna round table with slim “X” base 2. Position the slim “X” base using the pre-drilled positioning holes and attach it to round table top using #10 X 1” Oval Head Screws, (Figure 2). 3. Drive four more screws to round table top using #10 X 1”...
-
Page 19: Hanna Squircle Table With Tubular "X" Base
Hanna squircle table with tubular “X” base 1. Place the squircle table top on a clean solid surface or floor with the underside facing up, (Figure 1). Continued on the next page >> Figure 1 Tools & Hardware Needed FEBRUARY 2020 hanna 16... - Page 20 Hanna squircle table with tubular “X” base 2. Position the tubular “X” base using the pre-drilled positioning holes and attach it to squircle table top using #10 X 1” Oval Head Screws, (Figure 2). 3. Drive four more screws to squircle table top using #10 X 1”...
-
Page 21: Hanna Squircle Table With Slim "X" Base
Hanna squircle table with slim “X” base 1. Place the squircle table top on a clean solid surface or floor with the underside facing up, (Figure 1). Continued on the next page >> Figure 1 Tools & Hardware Needed FEBRUARY 2020 hanna 18... - Page 22 Hanna squircle table top with slim “X” base 2. Position the slim “X” base using the pre-drilled positioning holes and attach it to squircle table top using #10 X 1” Oval Head Screws, (Figure 2). 3. Drive four more screws to squircle table top using #10 X 1”...
- Page 24 0220...
Need help?
Do you have a question about the Hanna Series and is the answer not in the manual?
Questions and answers