Table of Contents
Advertisement
Quick Links
DCS5
DCS6
WARNING
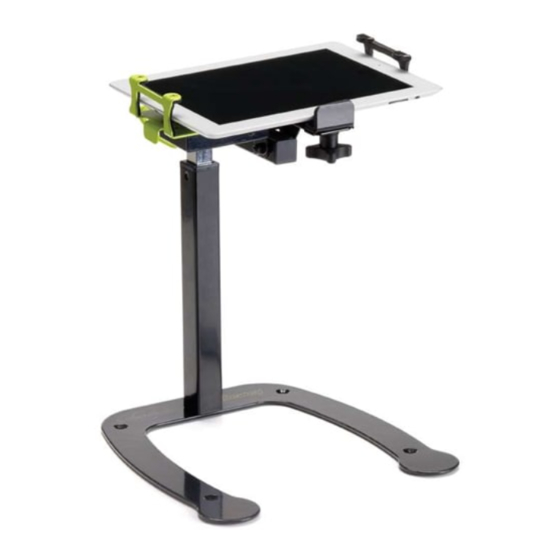
Smartphone
Paddle (1)
Headphone
Hanger (1)
Adjustable Tube
Assembly (1)
Base (1)
Please Recycle
DCS5_DCS6 - Version A - Released September 7th, 2016 - Copernicus Educational Products Inc.
the Document Camera Stand - Assembly Guide
Assembly Guide
DCS5_DCS6_2016_A
Check out our other products online at
www.copernicused.com
This product is meant to be assembled by an adult.
In its unassembled state, small parts present a hazard.
To be used under direct supervision of an adult.
For assistance, please contact us:
1-800-267-8494
Email info@copernicused.com
Have your packing slip ready for reference
iPad mini™
Paddle (1)
Top Arm
Pre-Assembly (1)
Adjustment Lip
& Knob (1)
Microscope Assembly
(Only included with DCS6)
Magnetic LED Light
(Only included with DCS5A&DCS6)
®
iPad not included.
Document Camera and Microscope
Function works with most Smartphones,
iPad mini™, iPad 2™ & Newer.
(1)
(1)
Advertisement
Table of Contents

Related Manuals for Copernicus Dewey DCS5


Summary of Contents for Copernicus Dewey DCS5
- Page 1 (Only included with DCS5A&DCS6) Assembly (1) Base (1) ® iPad not included. Document Camera and Microscope Function works with most Smartphones, iPad mini™, iPad 2™ & Newer. Please Recycle DCS5_DCS6 - Version A - Released September 7th, 2016 - Copernicus Educational Products Inc.
-
Page 2: North American
Validate Your Warranty Year To validate your warranty, submit the ON-LINE form at www.copernicused.com Enter a draw to win a Copernicus Product for your classroom at the same time! Frame Warranty DCS5_DCS6 - Version A - Released September 7th, 2016 - Copernicus Educational Products Inc. - Page 3 72 consecutive hours. Turn off power strip before unplugging. Specifications Read the electrical specifications of any electronic equipment you are using with your Copernicus products. Failure to read these specifications and follow their instructions could result in damage to your equipment or personal injury.
- Page 4 1-800-267-8494. Monday - Friday 8:30am - 4:30 pm EST. Email our Tech Support Service at info@copernicused.com Email our Tech Support Service Check out some of our other great products! www.copernicused.com DCS5_DCS6 - Version A - Released September 7th, 2016 - Copernicus Educational Products Inc.
-
Page 5: Additional Items Needed
4mm Drive Allen Key (Not to Scale) (43281) Additional Items Needed Not Included Apple TV® iPad mini™, iPad 2™ Smartphone or Newer Apple® VGA Cable Adapter DCS5_DCS6 - Version A - Released September 7th, 2016 - Copernicus Educational Products Inc. -
Page 6: You Will Need
To easily assemble the Top Arm, adjust the height of the Adjustable Tube Assembly to the lowest position then assemble the pieces together. The headphone holder holds up to two headphones. DCS5_DCS6 - Version A - Released September 7th, 2016 - Copernicus Educational Products Inc. - Page 7 FOR DCS6 ONLY Attach Microscope Assembly to Top Arm Pre-Assembly. Place threaded post of Adjustment Lip through slots in Top Arm Pre-Assembly and Microscope Arm, then tighten knob. DCS5_DCS6 - Version A - Released September 7th, 2016 - Copernicus Educational Products Inc.
-
Page 8: Landscape Position
To hold the VGA cable in place, use provided VGA strap. Tie the strap around the adapter cable and then loop over the edge of the Top Arm. DCS5_DCS6 - Version A - Released September 7th, 2016 - Copernicus Educational Products Inc. - Page 9 FOR DCS6 ONLY When using the Microscope Assembly (DCS6) here are suggested locations for the LED to be mounted. Tablet + Microscope Assembly Smartphone + Microscope Assembly DCS5_DCS6 - Version A - Released September 7th, 2016 - Copernicus Educational Products Inc.
- Page 10 The holes are made for 1/4” or M6 flat head bolts/screws. Holes are countersunk. The length and type of your hardware depends on your surface thickness. Mounting hardware not included. DCS5_DCS6 - Version A - Released September 7th, 2016 - Copernicus Educational Products Inc.
- Page 11 Adjustment Lip into the minimum position, then tighten Using Dewey with Smartphones Smartphones must be used with Dewey in the Landscape position. Camera on this side DCS5_DCS6 - Version A - Released September 7th, 2016 - Copernicus Educational Products Inc.
- Page 12 Arm, Lens and Stage can also swivel to and out to help position specimen under help position specimen in view of camera( ). camera( ). Tighten knob. DCS5_DCS6 - Version A - Released September 7th, 2016 - Copernicus Educational Products Inc.
-
Page 13: Supported Paper Size
NOTE: If the screen of your iPad turns off while in use, adjust sleep mode time by going to Setting>General>Auto-Lock. And when you are not using your device put it into sleep mode. DCS5_DCS6 - Version A - Released September 7th, 2016 - Copernicus Educational Products Inc. - Page 14 By rotating the top arm 90 degrees, change between landscape and By tilting down the top arm, switch between document camera and portrait projection. tablet stand position. DCS5_DCS6 - Version A - Released September 7th, 2016 - Copernicus Educational Products Inc.
Need help?
Do you have a question about the Dewey DCS5 and is the answer not in the manual?
Questions and answers