Advertisement
Quick Links
STEM100
STEM102
WARNING
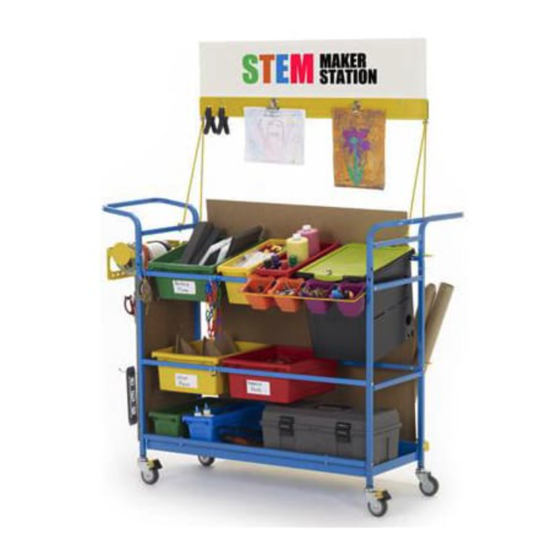
Premium STEM Maker Station
Please Recycle
1
STEM100_STEM102 - Version B - Released 01 December 2014 - Copernicus Educational Products Inc.
STEM Maker Station
Assembly Guide
STEM100_STEM102_2014_B
Check out our other products online at
www.copernicused.com
This product is meant to be assembled by an adult.
In its unassembled state, small parts present a hazard.
To be used under direct supervision of an adult.
(STEM100)
For assistance, please contact us:
1-800-267-8494
Email info@copernicused.com
Have your packing slip ready for reference
Base STEM Maker Station
(STEM102)
Advertisement

Related Manuals for Copernicus Premium STEM


Summary of Contents for Copernicus Premium STEM
- Page 1 In its unassembled state, small parts present a hazard. To be used under direct supervision of an adult. Premium STEM Maker Station (STEM100) Base STEM Maker Station (STEM102) Please Recycle STEM100_STEM102 - Version B - Released 01 December 2014 - Copernicus Educational Products Inc.
- Page 2 Unplug when not in use. Powerbar Specifications Read the electrical specifications of any electronic equipment you are using with your Copernicus products. Failure to read these specifications and follow their instructions could result in damage to your equipment or personal injury.
- Page 3 (CC4068-B) (CC4068-G) (CC4068-Y) (CC4068-R) 10 lbs Weight Limit STEMAC1 Powerbar Accessory Kit M6 Lock M6 Nut M6 30mm Power Bar Holder Cable Tie Power Bar Washer STEM100_STEM102 - Version B - Released 01 December 2014 - Copernicus Educational Products Inc.
- Page 4 Sign Rod - Left (CC4068-R) 10 lbs Weight Limit STEMAC1 Powerbar Accessory Kit M6 Lock M6 Nut Power Bar Holder Cable Tie Power Bar D M6 30mm Washer STEM100_STEM102 - Version B - Released 01 December 2014 - Copernicus Educational Products Inc.
- Page 5 “The beautiful thing about learning is that no one can take it away from you.” - B. B. King “The beautiful thing about learning is that no one can take it away from you.” - B. B. King STEM100_STEM102 - Version B - Released 01 December 2014 - Copernicus Educational Products Inc.
- Page 6 Please call Copernicus Customer Service, where we will be happy to help. 1-800-267-8494. Monday - Friday 8:30am - 4:30 pm EST. Email our Tech Support Service at vanessa@copernicused.com STEM100_STEM102 - Version B - Released 01 December 2014 - Copernicus Educational Products Inc.
- Page 7 Front Stretcher Premium Version: Attach Front Stretchers and Peg Board to Frame. Do not install hardware here. The hole on the Front Stretchers should be facing upwards. STEM100_STEM102 - Version B - Released 01 December 2014 - Copernicus Educational Products Inc.
- Page 8 Note the orientation of the holes on the stretcher. Check for the Red dot on the stretcher. This will denote the proper stretcher for this step. STEM100_STEM102 - Version B - Released 01 December 2014 - Copernicus Educational Products Inc.
- Page 9 Attach the Tape Roller to the side of the frame. Actual Size: You will need: (Not to Scale) Tape Spool Install Tape Spool into slot on Tape dispenser STEM100_STEM102 - Version B - Released 01 December 2014 - Copernicus Educational Products Inc.
- Page 10 Insert Casters into bottom of Frame Lock Caster before installing to make installation easier. Actual Size: You will need: (Not to Scale) Lower Shelf Install Lower Shelf onto bottom stretchers. STEM100_STEM102 - Version B - Released 01 December 2014 - Copernicus Educational Products Inc.
- Page 11 Attach Left and Right Sign Rods Top tabs should be facing inwards. DO NOT secure the long arms of the sign rods. To be done at a later step. STEM100_STEM102 - Version B - Released 01 December 2014 - Copernicus Educational Products Inc.
- Page 12 Attach the Top Metal Channel to the Sign Rods Metal Loops should be facing the back of the cart. Actual Size: You will need: (Not to Scale) Screwdriver Sign Coroplast Install Coroplast Sign STEM100_STEM102 - Version B - Released 01 December 2014 - Copernicus Educational Products Inc.
- Page 13 Stretchers Hook holder over frame. Side View Actual Size: You will need: (Not to Scale) Cardboard Holder Top Slide Cardboard Holder Top into bottom piece. STEM100_STEM102 - Version B - Released 01 December 2014 - Copernicus Educational Products Inc.
- Page 14 Actual Size: You will need: (Not to Scale) ‘S’ Hooks ‘S’ hooks can be placed on the stretchers to hold tools or other useful items STEM100_STEM102 - Version B - Released 01 December 2014 - Copernicus Educational Products Inc.
- Page 15 Cardboard Holder. Remove film before use. Hook Whiteboard onto top hooks for group learning and discussions Hook Whiteboard onto lower hooks for student led discussions and storage. STEM100_STEM102 - Version B - Released 01 December 2014 - Copernicus Educational Products Inc.
- Page 16 STEM100 Base Tub Pack 5 lbs Weight Limit 4x Small Tub 4x Tiny Tub 4x Open Tub 10 lbs Weight Limit 2.5 lbs Weight Limit STEM102 STEM100_STEM102 - Version B - Released 01 December 2014 - Copernicus Educational Products Inc.
-
Page 17: Cable Ties
Secure power bar with Cable Ties, being sure not to obstruct outlets Wrap the excess power bar cord around the hooks like shown below Cable Ties STEM100_STEM102 - Version B - Released 01 December 2014 - Copernicus Educational Products Inc. -
Page 18: Assembly Guide
SIR PHILLIP SIDNEY with another human VICKI CARUANA ROBERT MAYNARD HUTCHINS being. We should all be thankful for those people who rekindle the inner spirit. ALBERT SCHWEITZER STEM100_STEM102 - Version B - Released 01 December 2014 - Copernicus Educational Products Inc.
Need help?
Do you have a question about the Premium STEM and is the answer not in the manual?
Questions and answers