Table of Contents

Related Manuals for SPORTS AFIELD SA-HD5-BIO


Summary of Contents for SPORTS AFIELD SA-HD5-BIO
- Page 1 DROP ACTION BIOMETRIC SECURITY VAULT INSTRUCTION MANUAL FOR SA-HD5-BIO IMPORTANT: Please read this information and follow all safety rules carefully before operating your security vault. Failure to do so will void your warranty. 072921...
-
Page 2: Table Of Contents
TABLE OF CONTENTS IMPORTANT INFORMATION ....................2 1. REGISTRATION ........................ 3 2. UNDERSTANDING YOUR VAULT ..................4 3. INITIAL ENTRY ........................5 4. BATTERY INSTALLATION ....................6 5. PLACEMENT AND MOUNTING YOUR VAULT ..............6 6. PROGRAMMING YOUR FINGERPRINT ................9 7. -
Page 3: Important Information
DISCLAIMER - READ BEFORE VAULT SETUP PLEASE READ THIS INFORMATION CAREFULLY BEFORE OPERATING YOUR SPORTS AFIELD VAULT. DO NOT LOCK THIS MANUAL OR THE OVERRIDE ACCESS KEYS IN YOUR VAULT. Thank you for choosing a Sports Afield vault to protect your valuables. We are committed to securing, organizing and protecting your most important documents, valuables and keepsakes. -
Page 4: Registration
1. REGISTRATION Register your vault at www.saproducts.com By registering your Sports Afield vault we will be able to expedite and address any problems or challenges you may have which would otherwise require a notary letter and proof of payment. REGISTRATION INFORMATION The information you record onto this page will be required in the event you cannot access the contents of your Sports Afield vault. -
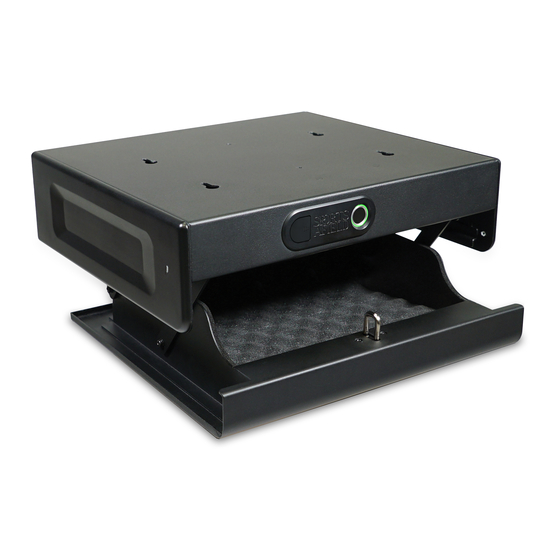
Page 5: Understanding Your Vault
2. UNDERSTANDING YOUR VAULT 14” 12” 3/4” Biometric Scanner Key Override Entry (Underneath Key Cover) ” Internal Light 18” Reset Button (Top Right Inside Vault) Locking Latch Battery Compartment (Top Inside Vault) -
Page 6: Initial Entry
3. INITIAL ENTRY 1. When unboxing, you will see the manual, mounting plate and key on top of the vault. Remove these items and set aside. Lay down a towel or protective barrier and place the vault on it’s side. Locate the key cover and remove it by pressing the three lines. -
Page 7: Battery Installation
4. BATTERY INSTALLATION While vault is still on it’s side, find the battery compartment located inside on the top of the vault. Press the tab to release the battery tray. RELEASE TAB Remove the empty battery tray from the compartment. Turn over the tray and insert the NOTCH SHOULD BE IN THE BACK. - Page 8 5. PLACEMENT AND MOUNTING YOUR VAULT (Continued) Planning Your Space This vault is intended to be mounted under a surface of your choice. Some possibilities include under your desk, under a bench, under a cabinet or any other location that is convenient for you.
- Page 9 5. PLACEMENT AND MOUNTING YOUR VAULT (Continued) STEP 5 MOUNTING STUDS KEYHOLE SLOTS Locate the (4) mounting studs and the (4) keyhole slots on top of unit. With the unit opened, align all 4 mounting plate studs with the key hole slots, push head of mounting studs through key hole slots and slide the unit forward to engage.
-
Page 10: Programming Your Fingerprint
6. PROGRAMMING YOUR FINGERPRINT 1. Behind the front panel, inside the right hand side of the vault, you will find a reset button. RESET BUTTON IS LOCATED BEHIND THE FRONT PANEL 2. Press the reset button to start the programming process. You will hear one beep and the indicator ring will illuminate on the front of BEEP... -
Page 11: Opening Vault With Programmed Fingerprint
7. OPENING VAULT WITH PROGRAMMED FINGERPRINT With keys in hand, close and lock the door. Place and hold the programmed finger on the scanner and indicator ring will illuminate green and the vault will unlock. You can now open your vault. If your print is not accepted: you will see 1 light flash with 1 sound. -
Page 12: Trouble Shooting
8. RECORDING ADDITIONAL FINGERPRINTS (Continued) HOLD FOR BEEP Press the reset button and follow Step 6 instructions again, for each fingerprint zone you would like to program. If you experience any problems LIFT FINGER reading your fingerprint, including inconsistent readings, note the area of your fingerprint that doesn’t work properly, and specifically re-program that area. -
Page 13: Lockout Mode/Tamper Protection
9. TROUBLE SHOOTING (Continued) PROBLEM SOLUTION Make sure to hold down your finger on the scanner instead of tapping, as the scanner needs time to YOUR FINGERPRINT complete the scanning process. IS NOT READING Fingerprints may lack definition due to excessive dryness. We recommend applying moisturizer or slide your finger print against your forehead before scanning process. -
Page 14: Clearing All Recorded Fingerprints
11. CLEARING ALL RECORDED FINGERPRINTS First, hold the reset button. The scanner will flash green light and make one sound. After holding for 5 seconds, the scanner will flash green and sound two times. HOLD DOWN THE RESET BUTTON GREEN LIGHT NOTE: If 100 max fingerprints have already been programmed... -
Page 15: Warranty
SA Consumer Products will repair or replace, at their sole discretion, any Sports Afield vault damaged by fire, forced entry, forced attack or natural flood for the lifetime of the original owner. SA Consumer Products will repair or replace, at their sole discretion, any Sports Afield vault with defective parts, paint or lock for three years of the original owner purchase date.
Need help?
Do you have a question about the SA-HD5-BIO and is the answer not in the manual?
Questions and answers