Table of Contents
Advertisement
Quick Links
Instruction Manual
User and maintenance manual for light towers
Gebruikers- en onderhoudshandboek voor verlichtingstorens
Manuel de l'utilisateur et de maintenance pour tours d'éclairage
Benutzer- und Wartungshandbuch für Beleuchtungstürme
Manual de uso y mantenimiento para torres de iluminación
Användar- och underhållshandbok för ljustorn
Bruger- og vedligeholdelsesvejledning til lystårne
Käyttö- ja huolto-ohjekirja valotornit
Apšvietimo bokštų naudojimo ir priežiūros instrukcija
English - Nederlands - Français - Deutsch - Español - Svenska - Dansk - Suomi
- Lietuvių k.
HiLight E2 & E3+ ESF
Advertisement
Table of Contents

Subscribe to Our Youtube Channel
Related Manuals for Atlas Copco HiLight E2+ESF


Summary of Contents for Atlas Copco HiLight E2+ESF
- Page 1 Instruction Manual User and maintenance manual for light towers Gebruikers- en onderhoudshandboek voor verlichtingstorens Manuel de l'utilisateur et de maintenance pour tours d’éclairage Benutzer- und Wartungshandbuch für Beleuchtungstürme Manual de uso y mantenimiento para torres de iluminación Användar- och underhållshandbok för ljustorn Bruger- og vedligeholdelsesvejledning til lystårne Käyttö- ja huolto-ohjekirja valotornit Apšvietimo bokštų...
-
Page 2: Table Of Contents
Please read the following instructions carefully before starting to use your machine. While every effort has been made to ensure that the information in this manual is correct, Atlas Copco does not assume responsibility for possible errors. Atlas Copco reserves the right to make changes without prior notice. - Page 3 Storage of the light tower ..33 Storage ..........33 Preparing for operation after storage ..........33 Disposal ...........34 General..........34 Disposal of materials .......34 Technical specifications .....35 10.1 Technical data of the HiLight E2 light tower........35 10.2 Technical data of the HiLight E3+ light tower.........37 10.3 Critical bolt connections ....39 10.4...
-
Page 4: Safety Precautions
The policy of Atlas Copco is to provide the users of their Atlas Copco equipment. It is the responsibility of unsafe operating conditions. Take necessary steps to equipment with safe, reliable and efficient products. -
Page 5: General Safety Precautions
The manufacturer does not accept any liability for any 7. Mind the markings and information labels on the General safety precautions damage arising from the use of non-original parts and for unit. 1. The owner is responsible for maintaining the unit modifications, additions or conversions made without 8. -
Page 6: Safety During Transport And Installation
If the floor is not level or can vary in fork lift holes, via the holes in the frame at the inclination, consult Atlas Copco. front and back or via the lifting beam. To prevent 10. The electrical connections shall correspond to damage, never put straps on the roof surface of the local codes. -
Page 7: Safety During Use And Operation
4. Never operate the unit in surroundings where 11. Never operate the light tower in excess of its limits Safety during use and there is a possibility of taking in flammable or as indicated in the technical specifications and operation toxic fumes. -
Page 8: Safety During Maintenance And Repair
1. Use only the correct tools for maintenance and disconnecting wires, switch off the load and the recommended or approved by Atlas Copco or the repair work, and only tools which are in good circuit breakers, stop the machine and make sure machine manufacturer. -
Page 9: Tool Applications Safety
14. When hot parts have to be handled, e.g. shrink fitting, special heat-resistant gloves shall be used and, if required, other body protection shall be applied. 15. Make sure that oil, solvents and other substances likely to pollute the environment are properly disposed of. -
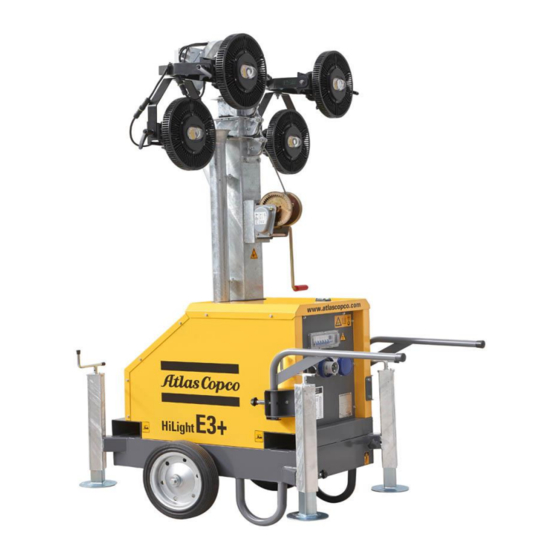
Page 10: Main Parts
Main parts General description The HiLight E2 and E3+ light towers provide 4 floodlights with different installed power depending on the configuration of the unit. They are built for running at sites where electricity is available from mains or generator. There are 14 HiLight E2 and E3+ models available (MOD 01–14), of which each offering a slightly different configuration. -
Page 11: Markings
Markings HiLight E3+ Markings provide instructions and information. They Indicates the different HiLight E2 also warn of hazards. For convenience and safety, Cubicle Light Tower service packs, liquids and Indicates the forklift slots. Description Order Nr Description Order Nr CIRCUIT BREAKER 2P 32A 1636007756 ADJUSTMENT PLATE 36X30 1636007883... -
Page 12: Mechanical Features
Mechanical features Electrical features Q1 ..General circuit breaker Interrupts the power supply when a short- The mechanical features described in this chapter are The electrical features described in this chapter are circuit occurs at the load side, or when the standard provided on this light tower. - Page 13 2.4.2 Control and indicator panel for S20 ..REMOTE/ON/OFF switch (optional) HiLight E2/E3+ MOD 03-04-05- The S20 switch only applies in models with 08-09-13-14 Timer and Photocell option installed. Following positions can be selected: Overview of the control panel MAN.: ON, for manual switch on To operate the light tower a control panel is installed.
-
Page 14: Available Models
Available models Timer and Model Name Floodlight Socket IN Socket OUT Power input Photocell CEE 32A, 2PH+PE, IP67 CEE 32A, 2PH+PE, IP67 230V MOD01 HiLight E2 4x Halide 400W CEE 32A, 2PH+PE, IP67 CEE 32A, 2PH+PE, IP67 230V MOD02 HiLight E2 TMR 4x Halide 400W Cable + SHUKO plug, 10A, 2PH+PE 230V... -
Page 15: Connection
To be able to lift the light tower by means of a forklift, Installation and Positioning and transport forklift slots (2) are provided in the frame. connection The operator is expected to apply all relevant safety precautions, Lifting including those mentioned on page 10 to page 14 of this booklet. - Page 16 4. Once the stabilizers (3) have been extended, 6. Rotate the floodlight support 90º (operation Check the levels (5) on top of the release the locking pin (1) to lock them in position) by loosening the 4 screws on top (6). light tower to ensure that the unit is position.
-
Page 17: Positioning For Transport
2. Use the handle at the top of each foot (2) to retract 4. Loosen the 4 screws of the floodlight support (6) 3.2.2 Positioning for transport the 4 feet (3). and rotate the support 90° (transport position). 1. Make sure the mast is lowered (1). Tighten the 4 screws again. -
Page 18: On-Site Transport
5. Once all the above actions have been completed, 3.2.3 On-site transport the light tower is ready for transport: The HiLight E2 and E3+ provide an undercarriage with wheels (1) and folding handles (2) to allow easy transport on site. The handles can be unfolded by loosening the locking pins (3). -
Page 19: Positioning Of The Light Tower Onto Vehicles
3.2.4 Transportation and positioning Installation of the light tower onto vehicles – Place the light tower on a horizontal, even and Due to its compact and optimized design, the solid floor. Check the levels on top of the light HiLight E2 and E3+ offer a great transport efficiency. tower to ensure its level position. - Page 20 Installation recommendations for HiLight E2: HiLight E2 Power (1x HiLight 1600 W Supply Cross section 6 mm³ Length (L1) 47.61 m Power (2x HiLight 3200 W HiLight E2 HiLight E2 Supply Cross section 6 mm³ Length (L2) 23.81 m Power (3x HiLight 4800 W Wiring section 6 mm³...
-
Page 21: Operating Instructions
Operating instructions Before starting Operating the light tower – Perform all daily checks and maintenance as 4.2.1 Positioning the floodlights In your own interest, always strictly specified in the “Maintenance schedule” on page 1. Check that the glass panes of the lights (1) are in observe relevant safety... -
Page 22: Extending/Lowering The Mast
3. To set the inclination angle of the floodlights, 2. Use the winch to manually raise/lower the mast to 4.2.2 Extending/lowering the mast loosen the adjustable hand lever (3). Put the the desired height. The mast can be extended up to 1. -
Page 23: Switching On/Off The Floodlights
4.2.3 Switching on/off the floodlights 1. To switch on the floodlights, switch ON the 4 circuit breakers (Q2-5) (1). 2. To switch off the floodlights, place the 4 automatic switches (Q2-5) (1) in their OFF position. - 28 -... -
Page 24: Periodic Maintenance
Yearly For the most important sub-assemblies, Atlas Copco has developed service kits that combine all wear parts. These service kits offer you the benefits of genuine parts, save on administration costs and are offered at reduced price, compared to the loose components. Refer to the parts list for more information on the contents of the service kits. -
Page 25: Precautions
2. Remove the lamp, first releasing the safety spring 5.1.1 Precautions 5.1.4 Replacing the lamps (2) placed around the lamp and then unscrewing – Do not carry out any change or modification to Do not touch the lamps when they the lamp from its seat (3). -
Page 26: Checks And Trouble Shooting
Checks and trouble Options available for Description of the electrical options shooting HiLight E2 and E3+ units Never perform a test run with 7.3.1 Photocell Overview of the mechanical connected power cables. Never options touch electrical connector without a voltage check. The following mechanical options are available: When a failure occurs, always –... - Page 27 The recommended value to set the regulator is at Setting the sensitivity regulator 50 Lux. The photocell sensitivity regulator is used for regulating the luminosity sensitivity level of the – < 50 Lux: the floodlights switch on. photocell. – > 50 Lux: the floodlights switch off. When the red LED (1) on the regulator is blinking, the The luminosity level can be adjusted to a desired regulator is reading the luminosity level measured by...
-
Page 28: Storage Of The Light Tower
Storage of the light tower Storage Preparing for operation after storage – Store the light tower horizontally in a dry, frost- free room which is well ventilated. Before operating the light tower again, remove the wrapping, VCI paper and silica gel bags and check the –... -
Page 29: Disposal
Before dismantling a machine at the end of its Your Atlas Copco light tower mainly consists of operating lifetime drain all fluids and dispose of metallic materials, that can be re-melted in steelworks according the applicable local disposal regulations. -
Page 30: Technical Specifications
Technical specifications 10.1 Technical data of the HiLight E2 light tower HiLight E2, HiLight E2, HiLight E2, HiLight E2, HiLight E2, 4x400W, 4x400W, 4x400W, 4x400W, 4x250W, IN/OUT sockets IN/OUT sockets, IN socket IN socket, IN socket, (MOD 01) Timer, (MOD 03) Timer, Timer, Photocell... - Page 31 Number of lights Lights Type of lights Metal Halide Metal Halide Metal Halide Metal Halide Metal Halide Light output 400 W 400 W 400 W 400 W 250 W Tower height 6975 mm 6975 mm 6975 mm 6975 mm 6975 mm Fully deployed (LxWxH) 2818 x 1597 x 2818 x 1597 x...
-
Page 32: 10.2 Technical Data Of The Hilight E3+ Light Tower
10.2 Technical data of the HiLight E3+ light tower HiLight HiLight HiLight HiLight HiLight HiLight HiLight HiLight HiLight E3+, E3+, E3+, E3+, E3+, E3+, E3+, E3+, E3+, 4x160W, 4x160W, 4x160W, 4x160W, 4x160W, 4x160W, 4x165W, 4x160W, 4x160W, IN/OUT IN/OUT IN socket IN/OUT IN/OUT IN/OUT... - Page 33 Magnetic release (lm) C curve C curve C curve C curve C curve C curve C curve C curve C curve Power input VAC 230 V 230 V 230 V 230 V 110 V 110 V 120 V 120 V 120 V Number of lights Lights...
-
Page 34: 10.3 Critical Bolt Connections
10.3 Critical bolt connections Allowed Applicable Torque Additional Parts to assembly Dimension Quality deviation standard (Nm) treatment (Nm) Mast - Base frame AC - STD 4369 K ± 18 Mast clamp - Structure AC - STD 4369 K ± 5 Mast break (stoppers) AC - STD 4369 ±... -
Page 35: Dimension Drawing (Based On Mod 4 Configuration)
10.4 Dimension drawing (based on MOD 4 configuration) LED VERSION DATA PLATE 1638 1220 - 40 -... - Page 36 METAL HALIDE VERSION LIFTING POINT 413.5 DATA PLATE 1225 - 41 -...
-
Page 37: Conversion List Of Si Units Into
10.5 Conversion list of SI units 10.6 Data plate Name of manufacturer into British units Machine type and model name Input voltage, input frequency, input current 1 bar 14.504 psi (Max.) 0.035 oz HILIGHT EXX Output voltage, output frequency, output current 1 kg 2.205 lbs (Max.) (only applicable for HiLight E2 and E3+... - Page 38 Circuit diagrams Elektrische schema’s Schémas de circuits Schaltpläne Esquema de conexiones Kopplingsscheman Kredsløbsdiagrammer Sähkökaaviot Jungimo diagramos - 319 -...
- Page 39 *Van toepassing op HiLight E3+ - IN/OUT- 1636 0101 29/01 aansluiting, 32A, 230V, Vermogen, Regelkring Applicable for HiLight E3+ - Socket IN/OUT, 32A, 230V, Power, Control circuit * Applicable à la tour HiLight E3+ - prise ENTRÉE/ SORTIE, 32A, 230V, puissance, circuit de commande *Gültig für HiLight E3+ –...
- Page 40 K100 Remote start relay Startrelais op Relais de démar- Fernstartrelais Relé de arranque Fjärrstartrelä (1) Fjernstartrelæ (1) Kaukokäynnis- Nuotolinio afstand (1) rage à distance remoto (1) tyksen rele (1) užvedimo relė Photocell (1) Fotocel (1) Cellule photo- Fotozelle (1) Célula fotoeléc- Fotocell (1) Fotocelle (1) Valokenno (1)
- Page 41 *Van toepassing op HiLight E2 - IN/OUT-aansluiting, 1636 0101 29/01 32A, 230V, Vermogen, Regelkring Applicable for HiLight E2 - Socket IN/OUT, 32A, 230V, Power, Control circuit * Applicable à la tour HiLight E2 - prise ENTRÉE/ SORTIE, 32A, 230V, puissance, circuit de commande *Gültig für HiLight E2 –...
- Page 42 C1-C4 Capacitor Condensator Condensateur Kondensator Capacitor Kondensator Kondensator Kondensaattori Kondensatorius E1-E4 Ignitor Ontsteking Igniteur Zündvorrichtung Encendedor Tändning Tænder Sytytin Degiklis K100 Remote start re- Startrelais op af- Relais de démar- Fernstartrelais Relé de arranque Fjärrstartrelä (1) Fjernstartrelæ (1) Kaukokäynnis- Nuotolinio užve- lay (1) stand (1) rage à...
- Page 43 Optional, Timer/ Optioneel, Ti- en option, minu- Timer und Foto- Opcional, tempo- Option, Tidrelä/ Valgfrit, timer/ Valinnainen, Papildomai pasi- Photocell mer/Fotocel teur/cellule pho- zelle als Sonder- rizador/célula fo- Fotocell fotocelle ajastin/valoken- renkamas lai- to-électrique ausstattung toeléctrica kmatis / fotoelementas - 324 -...
- Page 44 *Van toepassing op HiLight E3+ - IN-aansluiting, 1636 0101 30/01 16A, 230V, Vermogen, Regelkring Applicable for HiLight E3+ - Socket IN, 16A, 230V, Power, Control circuit * Applicable à la tour HiLight E3+ - prise ENTRÉE, 16A, 230V, puissance, circuit de commande *Gültig für HiLight E3+ –...
- Page 45 K100 Remote start re- Startrelais op af- Relais de démar- Fernstartrelais Relé de arranque Fjärrstartrelä (1) Fjernstartrelæ (1) Kaukokäynnis- Nuotolinio užve- lay (1) stand (1) rage à distance remoto (1) tyksen rele (1) dimo relė (1) Photocell (1) Fotocel (1) Cellule photo- Fotozelle (1) Célula fotoeléc-...
- Page 46 *Van toepassing op HiLight E2 - IN-aansluiting, 1636 0101 30/01 16A, 230V, Vermogen, Regelkring Applicable for HiLight E2 - Socket IN, 16A, 230V, Power, Control circuit * Applicable à la tour HiLight E2 - prise ENTRÉE, 16A, 230V, puissance, circuit de commande *Gültig für HiLight E2 –...
- Page 47 C1-C4 Capacitor Condensator Condensateur Kondensator Capacitor Kondensator Kondensator Kondensaattori Kondensatorius E1-E4 Ignitor Ontsteking Igniteur Zündvorrichtung Encendedor Tändning Tænder Sytytin Degiklis K100 Remote start re- Startrelais op af- Relais de démar- Fernstartrelais Relé de arranque Fjärrstartrelä (1) Fjernstartrelæ (1) Kaukokäynnis- Nuotolinio užve- lay (1) stand (1) rage à...
- Page 48 Optional, Timer/ Optioneel, Ti- en option, minu- Timer und Foto- Opcional, tempo- Option, Tidrelä/ Valgfrit, timer/ Valinnainen, Papildomai pasi- Photocell mer/Fotocel teur/cellule pho- zelle als Sonder- rizador/célula fo- Fotocell fotocelle ajastin/valoken- renkamas lai- to-électrique ausstattung toeléctrica kmatis / fotoelementas - 329 -...
- Page 49 *Van toepassing op HiLight E3+ - IN/OUT-aansluiting, 1636 0101 31/01 32A, 110V, Vermogen, Regelkring Applicable for HiLight E3+ - Socket IN/OUT, 32A, 110V, Power, Control circuit * Applicable à la tour HiLight E3+ - prise ENTRÉE/ SORTIE, 32A, 110V, puissance, circuit de commande *Gültig für HiLight E3+ –...
- Page 50 K100 Remote start re- Startrelais op af- Relais de démar- Fernstartrelais Relé de arranque Fjärrstartrelä (1) Fjernstartrelæ (1) Kaukokäynnis- Nuotolinio užve- lay (1) stand (1) rage à distance remoto (1) tyksen rele (1) dimo relė (1) Photocell (1) Fotocel (1) Cellule photo- Fotozelle (1) Célula fotoeléc-...
- Page 51 - 332 -...
- Page 52 Directives directives Name Signature Muel (Zaragoza), Spain Place , Date GRUPOS Electrógenos Europa, S.A. g i l , I I 50450 Muel ZARAGOZA Spain For info, please contact your local Atlas Copco representative www.atlas copco.com p.1(10) - 333 -...
- Page 53 www.atlascopco.com...
Need help?
Do you have a question about the HiLight E2+ESF and is the answer not in the manual?
Questions and answers