Advertisement
What's In The Box
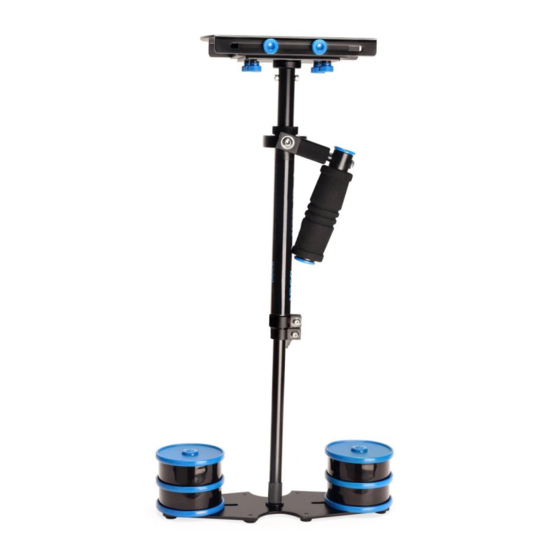
Please inspect the contents of your shipped package to ensure you have received everything that is listed
below.
DSLR Nano Blue Handheld Camera Stabilizer
(DSLR-NANO-QR-BL)
A s s e m b l y M a n u a l
Quick Release
Head, Mid & Bottom Plate
Central Post
Base Platform with 16
weight discs
Accessories
1
Advertisement
Table of Contents

Related Manuals for Flycam DSLR-NANO-QR-BL


Summary of Contents for Flycam DSLR-NANO-QR-BL
- Page 1 DSLR Nano Blue Handheld Camera Stabilizer (DSLR-NANO-QR-BL) A s s e m b l y M a n u a l What’s In The Box Please inspect the contents of your shipped package to ensure you have received everything that is listed below.
-
Page 2: Head Assembly
All rights reserved. No part of this document may be reproduced, stored in a retrieval system, or transmitted by any form or by any means, electronic, mechanical, photo-copying, recording, or otherwise, except as may be expressly permitted by the applicable copyright statutes or in writing by the Publisher. - Page 3 Then, retighten the bolt to se- cure the adapter to the plate. • Attach the head plate to the Flycam handheld stabilizer with appropriate fore & aft positioning and tighten the side knobs as shown. Further ‘fine tuning’ will probably be...
- Page 4 Then, return the lever to its original locked position. YOUR FLYCAM HANDHELD VIDEO STABILIZER FULLY ASSEMBLED If you do not wish to use the quick release plate, the camera can be directly attached to the Head Plate by using the following assembly sequence (without the quick release plate) •...
- Page 5 Adding Weights & Positioning for Proper Balance Continuing the assembly and balance requirements to make your FLYCAM DSLR Nano fully functional, you will note that the base platform has a provision to mount the balance weights in their cups via a slot found on both sides of the post.
-
Page 6: Balancing The Horizontal Axis
Testing for horizontal balance starts from a flat and level surface like a table, allowing the FLYCAM DSLR Nano to hang free as you hold it. If your FLYCAM DSLR Nano is correctly balanced on its horizontal axis, then it will be both level & upright, with the Central Post in a perfectly vertical position. -
Page 7: Balancing The Vertical Axis
Head Plate. If the FLYCAM DSLR Nano leans to the right, then loosen the screws on the bottom of the Bottom Plate and then gently slide the Mid Plate to the left. If it leans to the left from the operator’s point of view, then adjust the Mid Plate to the right. - Page 8 • Hold the handle normally and turn the FLYCAM DSLR Nano so that it is horizontal to the ground. Let go of the stalk while keeping a firm grip on the handle and count how long it takes to return to vertical again.
-
Page 9: Maintenance
Storage: Should you need to store your FLYCAM DSLR Nano for a long period of time then place the unit upright in a dry or low to normal humidity area whenever possible. If you are unable to find this kind of... - Page 10 Standing the unit upright is preferred as it alleviates stress on the system. NOTE: The FLYCAM DSLR Nano doesn’t work under water, nor is it waterproof. Avoid direct exposure to rain, water spray or any other harsh environment. Also the bearings are not sand/grit proof and need to be kept free of these contaminants.
Need help?
Do you have a question about the DSLR-NANO-QR-BL and is the answer not in the manual?
Questions and answers