Advertisement
Quick Links
I N S T R U C T I O N M A N U A L
Zest Stabilizer + Vista-II Arm & Vest
(VSTA-ZEST)
All rights reserved
No part of this document may be reproduced, stored in a retrieval system, or transmitted by any form or by any
means, electronic, mechanical, photocopying, recording, or otherwise, except as may be expressly permitted
by the applicable copyright statutes or in writing by the publisher.
Advertisement

Related Manuals for Flycam VSTA-ZEST


Summary of Contents for Flycam VSTA-ZEST
- Page 1 I N S T R U C T I O N M A N U A L Zest Stabilizer + Vista-II Arm & Vest (VSTA-ZEST) All rights reserved No part of this document may be reproduced, stored in a retrieval system, or transmitted by any form or by any means, electronic, mechanical, photocopying, recording, or otherwise, except as may be expressly permitted by the applicable copyright statutes or in writing by the publisher.
-
Page 2: Table Of Contents
At Flycam, our goal is to ensure 100% Customer Satisfaction in all that we do. We back our sales with a 1 year warranty from the date of purchase and work hard to resolve any problems in the unlikely event one should arise. -
Page 3: Foreword
On behalf of all the people that work so hard to provide you with the most up-to-date, flexible and cost-efficient production gear, we would like to welcome you into the Flycam family. By purchasing your Zest Power Stabilizer with Vista-II Arm & Vest, you have just joined a host of designers, engineers, machinists, assembly, customer service and office staff that take great pride in all that they do. -
Page 4: Introduction
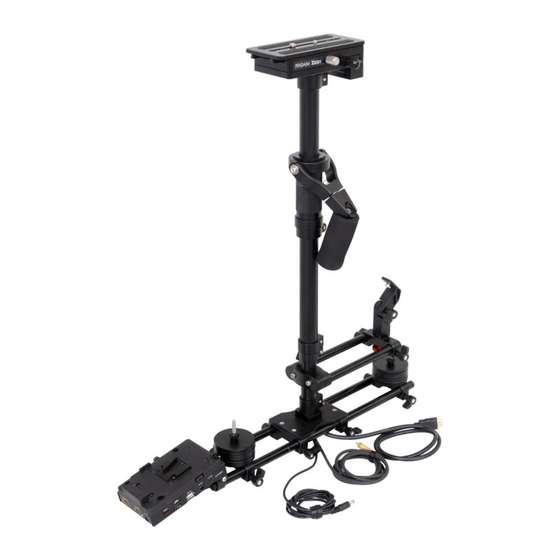
Introduction Flycam Zest, the first Electronic Power Video Stabilizer, is made to support today’s HD broadcast cameras with payload capacity of 5-15kg / 11-33lb. The highly adaptive and open architecture of Flycam Zest allows for extreme system configuration. You can lift the camera up with maximum extendibility of telescopic post or invert it to skim the floor, and then seamlessly return to normal Steadycam-mode. -
Page 5: Safety Hints
Note: If you have purchased (ST-VSTA-ZEST) kit, you will also receive the following: Vista-II Camera Stabilizer Arm Vista-II Camera Stabilizer Vest Safety Hints ATTENTION: PLEASE READ THIS BEFORE USING TO PREVENT SERIOUS DAMAGE TO THE GEAR! BE WATCHFUL OF THE HANDS Cautiously operate to avoid pinching your hand/fingers inside the arm. -
Page 6: Assembling
NEVER LEAVE THE FIXTURES LOOSE All the knobs/screws must be locked tightly to avoid unbalancing of the whole camera setup. BE HIGHLY VIGILANT WHILE ASSEMBLING Lack of attention while attaching Stabilizer, Arm & Vest together can cause substantial damage to equipment. NEVER LEAVE THE ARM UNATTANDED Don’t let an unloaded arm swing about as it may hit you or someone near you. - Page 7 Now attach Monitor Mount clamp onto Rods and tighten the knobs. Loosen bolts to adjust the height of Monitor Mount as per your requirement. NOTE: Loosen the knob and rotate Monitor Mount plate. The unique pivot mechanism of Monitor Clamp enables 360°...
- Page 8 Now mount your LCD (Not Included) Monitor Mount plate as shown in image. Now attach provided Weight Plates at both sides on Stabilizer Rods and tighten the knobs to secure them appropriately. Attach V-Mount Battery Plate onto Stabilizer Rods and tighten the provided knob to secure it properly.
- Page 9 Now slide Battery (Not Included) onto the Battery Plate. NOTE: The up and down (vertical) position of Telescopic Central Post is adjusted by loosening the knob on Central Post. Ascend or descend the stalk to achieve desired location and then re-tighten the knob.
- Page 10 (Not Included) on the Camera Plate of Stabilizer and tighten the screw to secure it accurately. Note: If you have purchased (ST-VSTA-ZEST) kit, please consider the following steps. Assembling of Arm & Vest Join both parts of Jacket by attaching the top buckles. Then wear the jacket/vest.
- Page 11 Now attach Hip Pad at both sides. NOTE: Length of chest plate can be adjusted according to the height of person by using the pin & knob, as shown in image. NOTE: You can also adjust the height of the Socket Block with the provided pin.
- Page 12 Loosen the knobs of Socket Block on Vest. Insert male part of Arm Socket Block into Socket Block of Vest and tighten back the knobs. NOTE: For attaching the Stabilizer to Arm & Vest, keep the handle of Stabilizer straight in accordance to the pin of Arm.
- Page 13 To Use As Single Arm Configuration Pull the pin from middle jointer and remove one section of the Arm. Pull a pin to remove male part of Socket Block from the end of section and attach it with upper single arm.
-
Page 14: Warranty
YOUR FLYCAM ZEST STABILIZER WITH VISTA-II ARM & VEST ALL DRESSED UP AND READY TO GO! (SHOWN WITH OPTIONAL ACCESSORIES) WARRANTY We offer a one year warranty for our products from the date of purchase. We will repair or replace your product, free of charge, in the event of a defect in materials or craftsmanship obtained during normal use or handling based on the user manual.
Need help?
Do you have a question about the VSTA-ZEST and is the answer not in the manual?
Questions and answers