
Related Manuals for EL-CELL ECC-Opto-10


Summary of Contents for EL-CELL ECC-Opto-10
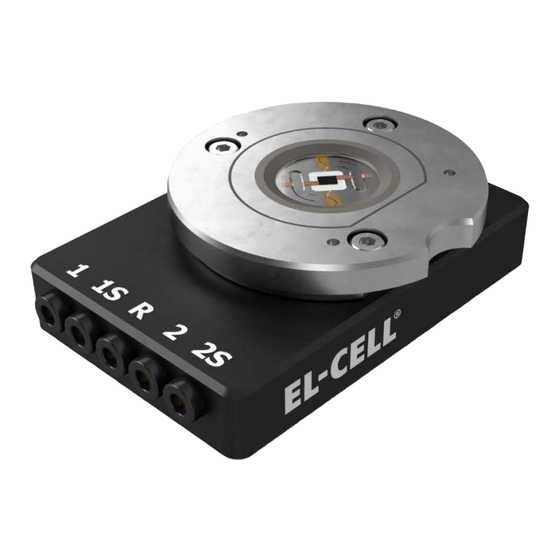
- Page 1 User Manual Release 1.21 ECC-Opto-10 Electrochemical test cell © 2022 EL-Cell GmbH...
- Page 2 The information in this manual has been carefully checked and believed to be accurate; however, no responsibility is assumed for inaccuracies. EL-Cell GmbH maintains the right to make changes without further notice to products described in this manual to improve reliability, function, or design. EL -Cell GmbH does not assume any liability arising from the use or application of this product.
-
Page 3: Table Of Contents
5 Assembly .......................... 7 6 Connecting the test cell ....................17 7 Disassembly and Cleaning ....................17 8 Unpacking........................18 9 Components ECC-Opto-10 ..................... 19 10 Technical Support ......................21 11 Warranty ........................21 Page 3 of 21 Release 1.21... -
Page 4: Product Description
Raman spectroscopy in reflection mode. The ECC-Opto-10 is connected to the battery tester via a 2 mm cell cable with banana plugs. It can be used with the PAT-Tester-x-8 as well as potentiostats and battery testers from third- party manufacturers. - Page 5 User Manual ECC-Opto-10 Working principle of the ECC-Opto-10 (side-by-side setup of electrodes): Inspection area (up to 18 mm) Sapphire glass window Electrode 2 Electrode 1 Lid sealing foil (PE) Sample holder Plunger/ Electrode R Glass fiber separator Inner sleeve II...
-
Page 6: Technical Data
Dead volume: 1.8 cm³ ▪ 3 Intended use The ECC-Opto-10 test cell is an electrochemical measuring instrument designed for use in a laboratory environment. It may only be used by trained personnel and only as described in this manual. 4 Safety Precautions Use proper safety precautions when using hazardous electrode materials and electrolytes. -
Page 7: Assembly
5.2. Instructions for assembling the cell for the side-by-side arrangement of electrodes. 5.3. Instructions for assembling the cell for the face-to-face arrangement of electrodes. These instructions can also be viewed as videos on our website el-cell.com. Page 7 of 21 Release 1.21... - Page 8 User Manual ECC-Opto-10 5.1 Lid assembly: 1. Turn the lid upside down. Insert the foil sealing into the lid. 2. Insert the window. 3. Insert the window thrust ring. 4. Attach the window flange and screw in the screws using the torque screwdriver 0.2 Nm.
- Page 9 User Manual ECC-Opto-10 5.2 Assembling the cell with a side-by-side sample holder: 1. Assemble the lid as described above. Then attach the electrode strips to the sample holder. 2. Use the loading tweezer to push the piston into the sleeve.
- Page 10 User Manual ECC-Opto-10 4. Put the separator on top and push it down using the loading tweezer. The separator must not be more than 10 mm in diameter. A smaller separator may be useful to prevent the sample holder from coming into contact with the electrolyte.
- Page 11 User Manual ECC-Opto-10 7. Make sure that the electrode strips are properly aligned before attaching the lid. 8. Drop the electrolyte onto the separator/electrodes. Use only the amount of electrolyte necessary to impregnate the porous material. Avoid excess electrolyte. Typically, around 30 μl of electrolyte is suitable.
- Page 12 Then press down the lid and tighten the three screws firmly with the 2.5 mm hexagon screwdriver. 12. The ECC-Opto-10 is now ready for testing. It can now be removed from the glove box. Page 12 of 21...
- Page 13 User Manual ECC-Opto-10 5.3 Assembling the cell with a face-to-face sample holder: 1. Follow the lid assembly steps. Then insert the lower piston into the inner sleeve. 2. Use the loading tweezer to push the piston into the sleeve. 3. Place the assembly into the cell base.
- Page 14 User Manual ECC-Opto-10 5. Put the separator on top. The separator must not be more than 10 mm in diameter. A smaller separator may be useful to prevent the sample holder from coming into contact with the electrolyte. 6. Use the loading tweezer again to push the cell stack further down.
- Page 15 User Manual ECC-Opto-10 9. Push down the electrode stack using the loading tweezer. 10. Insert the contact ring. 11. Put the holed current collector on top. Choose the hole size depending on the magnification used by the microscope. 12. Insert the second foil seal.
- Page 16 14. Finally, screw the cover on with the 2.5 mm hexagon screwdriver. 15. The ECC-Opto-10 is now ready for testing. Page 16 of 21 Release 1.21...
-
Page 17: Connecting The Test Cell
User Manual ECC-Opto-10 6 Connecting the test cell Connect your potentiostat to the 2 mm sockets of the cell. Note that sockets 1 and 1S are short-circuited inside the cell housing, as are sockets 2 and 2S. 7 Disassembly and Cleaning Right after use, disassemble the cell in the reverse order of assembly. -
Page 18: Unpacking
Contact the factory if anything is missing or damaged. NOTE: Damaged shipments must remain with the original packaging for freight company inspection. List of Components: ECC-Opto-10 test cell with flat socket, fully equipped for use in both 2-electrode and 3- electrode configuration Windows seal (10 pcs.) ECC1-05-0016-B/X Separator 10.0 mm x 0.26 mm, GF/A (10 pcs.) -
Page 19: Components Ecc-Opto-10
User Manual ECC-Opto-10 9 Components ECC-Opto-10 ECC-Opto-10 Page 19 of 21 Release 1.21... - Page 20 User Manual ECC-Opto-10 Lid (OPTO-10) 18 mm, assy Page 20 of 21 Release 1.21...
-
Page 21: Technical Support
11 Warranty For a period of one year from the date of shipment, EL-Cell GmbH (hereinafter Seller) warrants the goods to be free from defects in material and workmanship to the original purchaser. During the warranty period, Seller agrees to repair or replace defective and/or nonconforming goods or parts without charge for material or labor, or, at the Seller’s option, demand return...
Need help?
Do you have a question about the ECC-Opto-10 and is the answer not in the manual?
Questions and answers