
Related Manuals for Daniela DAN6IM


Summary of Contents for Daniela DAN6IM
- Page 1 DAN6IM 60CM INDUCTION COOKTOP A p p l i a n c e U s e r M a n u a l danielaappliances.com.au...
- Page 2 From an Italian heritage our brand Daniela was then established in 2005 from a father’s love to a daughter and naming it after Daniela, now the new proprietor. Daniela has worked closely with her father for many years learning from his decades of industry experience. Daniela with her extensive knowledge and understanding of appliances, now continues her father’s legacy with a modern flare.
- Page 3 DAN6IM 60CM INDUCTION COOKTOP PA G E 3 02 9604 1226 sales@danielaappliances.com.au danielaappliances.com.au...
-
Page 4: Installation
SAVE THIS INSTRUCTION IN A SAFE PLACE FOR FUTURE REFERENCE Thank you for choosing Daniela appliances! Please read all instructions before using this appliance. This book contains valuable information about operation, care and service. Keep it in a safe place for future reference. -
Page 5: Operation And Maintenance
• In order to avoid a hazard, this appliance must be installed according to these instructions for installation. • This appliance is to be properly installed and earthed only by a suitably qualified person. • This appliance should be connected to a circuit which incorporates an isolating switch providing full disconnection from the power supply. - Page 6 CUT HAZARD • The razor-sharp blade of a cooktop scraper is exposed when the safety cover is retracted. Use with extreme care and always store safely and out of reach of children. • Failure to use caution could result in injury or cuts. IMPORTANT SAFETY INSTRUCTIONS •...
- Page 7 • Do not use scourers or any other harsh abrasive cleaning agents to clean your cooktop, as these can scratch the induction glass. • If the supply cord is damaged, it must be replaced by the manufacturer, its service agent or similarly qualified persons in order to avoid a hazard.
-
Page 8: Product Overview
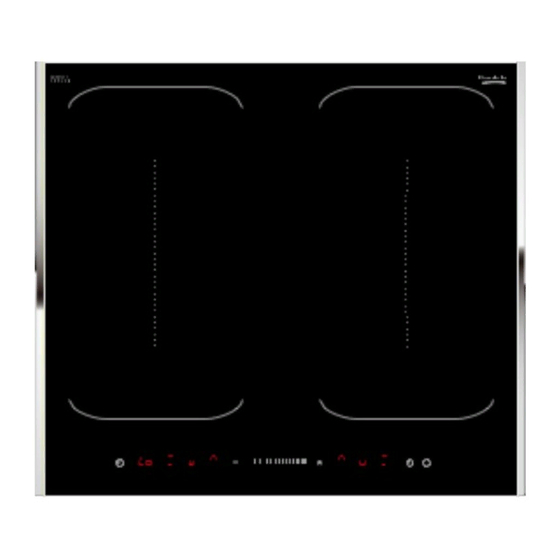
PRODUCT OVERVIEW CONTROL PANEL Power / Timer slider touch control Heating zone selection controls Pause control Keylock control TOP VIEW ON/OFF control Max. 1800/3000 W zone Keep warm control Max. 1800/3000 W zone Boost control Max. 1800/3000 W zone Max. 1800/3000 W zone Free induction zone. -
Page 9: Using The Touch Controls
USING THE TOUCH CONTROLS • The controls respond to touch, so you don’t need to apply any pressure. • Use the ball of your finger, not its tip. • You will hear a beep each time a touch is registered. •... -
Page 10: Pan Dimension
PAN DIMENSION The cooking zones are, up to a limit, The base diameter of automatically adapted to the diameter of induction cookware Cooking Zone the pan. However the bottom of this pan Minimum (mm) Maximum (mm) must have a minimum of diameter according to the corresponding cooking zone. -
Page 11: Finish Cooking
If the display flashes alternately with the heat setting This means that: • you have not placed a pan on the correct cooking zone or, • the pan you’re using is not suitable for induction cooking or, • the pan is too small or not properly centered on the cooking zone. No heating takes place unless there is a suitable pan on the cooking zone. -
Page 12: Using The Boost Function
USING THE BOOST FUNCTION ACTIVATE THE BOOST FUNCTION Touching the heating zone selection control. Touching the boost control “ ” , the zone indicator show “b” and the power reach Max. CANCEL THE BOOST FUNCTION Touching the heating zone selection control that you wish to cancel the boost function. -
Page 13: Flexible Area
KEEP WARM ACTIVATE THE BOOST FUNCTION Touching the heating zone selection control. Touching the keep warm control “ ” , the zone indicator will show “ ”. CANCEL THE KEEP WARM FUNCTION Touching the boost control “ ” , then the cooking zone will revert to its original setting. -
Page 14: Locking The Controls
FLEXIBLE AREA AS BIG ZONE To activate the flexible area as a single big zone, simply press the dedicated keys. • The power setting works as any other normal area. • If the pot is moved from the front to the rear part (or vice versa), the flexible area detects automatically the new position, keeping the same power. -
Page 15: Timer Control
TIMER CONTROL You can use the timer in two different ways: • You can use it as a minute minder. In this case, the timer will not turn any cooking zone off when the set time is up. • You can set it to turn one cooking zone off or more than one after the set time is up. •... - Page 16 Setting the timer to turn one or more cooking zones off Set one zone • Touching the heating zone selection control that you want to set the timer for. • Touch timer control, the “ 10 ” will show in the timer display and the “...
-
Page 17: Default Working Times
Set more zones The steps for setting more zones are similar to the steps of setting one zone. When you set the time for several cooking zones simultaneously, decimal dots of the relevant cooking zones are on. The minute display shows the min. timer. The dot of the corresponding zone flashes. -
Page 18: Cooking Guidelines
COOKING GUIDELINES COOKING TIPS • When food comes to the boil, reduce the temperature setting. • Using a lid will reduce cooking times and save energy by retaining the heat. • Minimise the amount of liquid or fat to reduce cooking times. •... -
Page 19: Detection Of Small Articles
• pancakes 7 - 8 • sauteeing • cooking pasta • stir-frying • searing • bringing soup to the boil • boiling water TECHNICAL SPECIFICATION COOKING HOB DAN6IM Cooking Zones 4 zones Supply Voltage 220-240V~ 50Hz or 60Hz Installed Electric Power 7200W Product Size L ×... -
Page 20: Care And Cleaning
CARE AND CLEANING WHAT? HOW? IMPORTANT! Everyday 1. Switch the power to the cooktop off. • When the power to the cooktop is soiling on glass switched off, there will be no ‘hot surface’ 2. Apply a cooktop cleaner while the glass is still (fingerprints, indication but the cooking zone may still warm (but not hot!) -
Page 21: Hints And Tips
HINTS AND TIPS PROBLEM POSSIBLE CAUSES WHAT TO DO The induction No power. Make sure the cooktop is connected to the hob cannot be power supply and that it is switched on. Check turned on. whether there is a power outage in your home or area. -
Page 22: Failure Display And Inspection
FAILURE DISPLAY AND INSPECTION The induction hob is equipped with a self diagnostic function. With this test the technician is able to check the function of several components without disassembling or dismounting the hob from the working surface. Troubleshooting PROBLEM POSSIBLE CAUSES WHAT TO DO F1-F6... - Page 23 FAILURE PROBLEM SOLUTION A SOLUTION B Some buttons The display board Replace the display board. can’t work, or the is damaged. LED display is not normal. The accessorial power Check the connection. board and the display board connected failure. The Cooking Mode High temperature Ambient temperature may Indicator comes on,...
- Page 24 INSTALLATION Selection of installation equipment Cut out the work surface according to the sizes shown in the drawing. For the purpose of installation and use, a minimum of 50mm space shall be preserved around the hole. Be sure the thickness of the work surface is at least 30mm. Please select heat-resistant and insulated work surface material (Wood and similar fibrous or hygroscopic material shall not be used as work surface material unless impregnated) to avoid the electrical shock and larger deformation caused by the heat radiation from the hotplate.
- Page 25 Under any circumstances, make sure the Induction cooker hob is well ventilated and the air inlet and outlet are not blocked. Ensure the induction cooker hob is in good work state. As shown below. Note: The safety distance between the hotplate and the cupboard above the hotplate should be at least 760mm.
-
Page 26: Before Locating The Fixing Brackets
BEFORE INSTALLING THE HOB Before installing the hob, make sure that:- • The work surface is square and level, and no structural members interfere with space requirements. • The work surface is made of a heat-resistant and insulated material. • If the hob is installed above an oven, the oven has a built-in cooling fan. -
Page 27: Adjusting The Bracket Position
ADJUSTING THE BRACKET POSITION Fix the hob on the work surface by screw 4 brackets on the bottom of hob (see picture) after installation. Adjust the bracket position to suit for different table top thickness. WARNING: Under any circumstances, the brackets cannot touch with the inner surfaces of the worktop after installation (see picture). - Page 28 CONNECTING THE HOB Connecting the hob to the mains power supply This hob must be connected to the mains power supply only by a suitably qualified person. Before connecting the hob to the mains power supply, check that: The domestic wiring system is suitable for the power drawn by the hob. The voltage corresponds to the value given in the rating plate The power supply cable sections can withstand the load specified on the rating plate.
- Page 29 This appliance is labeled in compliance with European directive 2002/96/EC for Waste Electrical and Electronic Equipment (WEEE). By ensuring that this appliance is disposed of correctly, you will help prevent any possible damage to the environment and to human health, which might otherwise be caused if it were disposed of in the wrong way.
- Page 30 INSTALLATION RECEIPT NUMBER: ........................If you require more information, service, warranty or spare parts enquiries please contact customer care. DANIELA APPLIANCES PTY LTD (02) 9604 1226 (9am – 5pm EST, Monday – Friday) PA G E 3 0 02 9604 1226 sales@danielaappliances.com.au...
-
Page 31: Terms And Conditions
If your goods remain boxed and in an unopened condition, they may be returned with in 30 days of the invoice date for a full refund. A collection fee of $50 will be charged should you require Daniela Appliances Pty Ltd to collect the stock. - Page 32 02 9604 1226 sales@danielaappliances.com.au A 6/9 Hume Road, Smithfield NSW 2164 danielaappliances.com.au...
Need help?
Do you have a question about the DAN6IM and is the answer not in the manual?
Questions and answers