Advertisement
Table of Contents
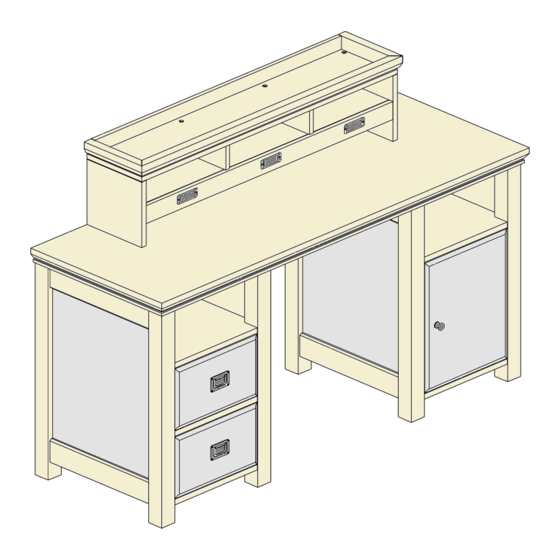
Oxford Hutch
Assembly Instruction
Pre-Assembly:
Please read all instructions before beginning assembly.
•
For your safety and convenience, assembly by two adult is recommended.
•
Carefully set out and identify all part hardware prior to assembly.
•
Save all packing materials until assembly is complete to avoid
•
accidentally discarding small part or hardware.
The Oxford Hutch is designed for use with the Oxford Desk.
•
Parts Enclosed:
(1) Top Panel(A)
•
(2) Side Panels (B)
•
(1) Fixed Shelf (C)
•
(2) Partition Panels (D)
•
(1) Back Panel (E)
•
To Assemble:
1. Carefully lay the side panel (B) on a flat scratch-free or carpeted surface. Insert the
wooden dowels (G) into the holes on the side panel (B), as shown in figure 1.
Fig.1
2. Attach the fixed shelf (C) to the side panel (B) by inserting the wooden dowels (G) into the
holes on the fixed shelf (C). Insert the Allen Bolts (F) through the holes on the cleat of
the fixed shelf (C) to the side panel (B). Tighten with the Allen Key (H) (Do not over
tighten), as shown in figure 2, illustration 1.
3. Insert the wooden dowels (G) into the holes on the other cleat of the fixed shelf (C). Attach
the other side panel by inserting the wooden dowels (G) on the fixed shelf (C) into the holes
on the side panel (B), and inserts the Allen bolts (F). Tighten with the Allen key (H), as
shown in figure 3, illustration 2.
Fig.2
C
B
4. Grip the cabinet firmly and turn upright. Insert the wooden dowels (G) into the holes on the
fixed shelf (C). Attach the partition panels (D) to the fixed shelf (C) by inserting the
wooden dowels (G) into the holes on the partition panels (D). Insert the Allen Bolts (F)
through the holes on the bottom of the fixed shelf (C) to the partition panels (D) and
tighten with the Allen Key (H) (Do not over tighten), as shown in figure 4, illustration 3.
Fig.4
D
C
B
Hardware Enclosed:
(16)Allen Bolts – M6 x 30mm (F)
•
(16)Wooden Dowels – M8 x 25mm (G)
•
(1) Allen Key M4 (H)
•
(2) Mending Plates (I)
•
(6) Bolt M4 x 5/8" (J)
•
(5) Screw 6 x 3/4" (K)
•
(F)
(G)
Fig.3
Illustration.1
D
B
(H)
(I)
B
Illustration.2
C
Illustration.3
(J)
(K)
Advertisement
Table of Contents

Related Manuals for PB TEEN Oxford Hutch


Summary of Contents for PB TEEN Oxford Hutch
- Page 1 • Save all packing materials until assembly is complete to avoid • accidentally discarding small part or hardware. The Oxford Hutch is designed for use with the Oxford Desk. • Hardware Enclosed: Parts Enclosed: (16)Allen Bolts – M6 x 30mm (F) •...
- Page 2 5. Attach the back panel (E) by sliding the back panel (E) to the cutout of the side panels (B). 6. Insert the wooden dowels (G) into the holes on the cleat of the side panels (B) and partition panels (D), as shown in figure 5, illustration 4. Fig.5 Illustration.4 7.
Need help?
Do you have a question about the Oxford Hutch and is the answer not in the manual?
Questions and answers