Table of Contents
Advertisement
Quick Links
Advertisement
Table of Contents

Subscribe to Our Youtube Channel
Related Manuals for LIBERTY AV SOLUTIONS DL-SCU33-SW


Summary of Contents for LIBERTY AV SOLUTIONS DL-SCU33-SW
- Page 1 USER MANUAL Web-Conferencing Room Switcher DL-SCU33-SW www.libav.com 800.530.8998...
-
Page 2: Product Overview
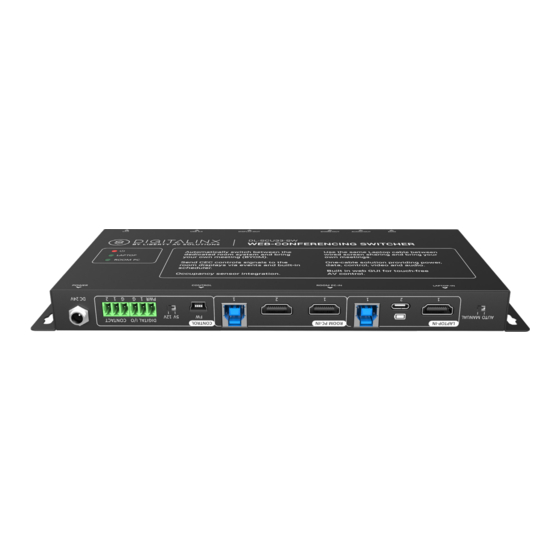
Thanks for choosing Liberty AV’s DL-SCU33-SW Web-Conferencing Room Switcher! The switcher/ hub (DL-SCU33-SW) is a multi-format switcher that provides AV switching and USB routing for BYOM (bring your own meeting) devices to connect to dedicated cloud-based room systems. Users will be able to easily bring-their-own-meeting (i.e. - Page 3 Dip switch: Select between 5 or 12 volts for the occupancy sensor power. 3-pin Phoenix connector: Digital I/O port for an occupancy sensor. 3-pin Phoenix connector: Contact closure. 5. POWER Barrel Din connector: DC 24V power supply connection. USER MANUAL / DL-SCU33-SW...
- Page 4 Female USB-A 3.0 port. Connect up to four USB peripherals such as cameras and microphones. 3. DISPLAY-OUT Female HDMI outputs 4. SHARE-OUT Female HDMI output 5. AUDIO-OUT Female 3.5 audio jack 6. EDID Dip switch for setting EDID settings 7. RESET Push button for resetting the device USER MANUAL / DL-SCU33-SW...
-
Page 5: Switching Between Modes
MODES The DL-SCU33-SW collaboration switcher provides two modes to select from which allows users to choose from either a dedicated in-room PC running software or from their own laptop that they brought into the meeting space. The switcher is NOT a matrix switcher, and does not allow for custom routing of AV and USB signals. - Page 6 Using any software application USB PERIPHERALS Cameras, microphones, DSP The diagrams within this section are conceptual. The switcher can be installed in various locations such as underneath the table, equipment rack, lectern or behind a display. USER MANUAL / DL-SCU33-SW...
- Page 7 Route audio to your displays or convert to an analog output SINGLE OR DUAL SCREEN DEDICATED PC Using any software application DEDICATED PC Wired content sharing using an HDMI to USB capture device USB PERIPHERALS Cameras, microphones, DSP USER MANUAL / DL-SCU33-SW...
- Page 8 AUDIO EXTRACTION Route audio to your displays or convert to an analog output SINGLE OR DUAL SCREEN DEDICATED PC No longer part of the system BYOM Takes over the room assets USB PERIPHERALS Cameras, microphones, DSP USER MANUAL / DL-SCU33-SW...
- Page 9 The default IP settings are: IP Address: 192.168.0.178 Subnet Mask: 255.255.255.0 Type 192.168.0.178 in the web browser, and you will see the Welcome webpage: Click on the “Get Started” button and you will be sent to the Operation Page USER MANUAL / DL-SCU33-SW...
- Page 10 Web View Mobile View The predefined GUI provides the following functionality: • Mode Selection: Select between BYOM or Standard. • Audio Boost: Boost the HDMI output TV via CEC. • Power: Turn on/off the unit. USER MANUAL / DL-SCU33-SW...
- Page 11 2. Choose a QR code generator -Free options: qr-code-generator.com QR Code Monkey 3. Paste URL of the switcher into the generator (using dynamic updates, if asked) 4. Print, promote and publish this unique QR code for use. Example USER MANUAL / DL-SCU33-SW...
- Page 12 Click the “Settings” icon in the bottom right-hand corner to access the admin page to configure the device. A login pop-up will appear asking for login information. Default username: admin Default password: admin Here one can update the credentials for enhanced security. USER MANUAL / DL-SCU33-SW...
- Page 13 In fact, triggering an event can activate any number of actions, enabling an automated experience for the user. Actions: are events you can force to occur in reaction to a trigger enabling a range of possibilities to automate the user experience. USER MANUAL / DL-SCU33-SW...
- Page 14 Manage Events Event list: 6 events list here, click the pencil for event setting. Here you will be able to update the event name, and set CEC commands to be sent when the event is triggered. USER MANUAL / DL-SCU33-SW...
- Page 15 WEB GUI INTERFACE: SCHEDULE Schedule • Current date/ time setting. • System on/off setting. Network Setting • IPv4 and IPv6 setting. USER MANUAL / DL-SCU33-SW...
- Page 16 • Room name, welcome message and logo setting. • Time setting: 1. Auto/ Manual setting. 2. Daylight saving time. • System Configuration: 1. Upload or download configuration file. 2. Firmware update. 3. Factory reset. Login credentials USER MANUAL / DL-SCU33-SW...
- Page 17 The interface of the control software is shown as below: Please set the parameters of COM number, bound rate, data bit, stop bit and the parity bit correctly, and then you are able to send command in command sending area. USER MANUAL / DL-SCU33-SW...
-
Page 18: Rs232 Control Commands
07 - 3840x2160@60Hz Deep Color HDR LPCM 6CH 08 - copy EDID from Share output 09 - copy EDID from HDMI L output 10 - copy EDID from HDMI R output 11 - EDID passthrough(follow HDMI share) USER MANUAL / DL-SCU33-SW... - Page 19 >SetTime <2020,1,1,1,1,1> <Param,Param1,Para Param = 1970 ~ 2099(year) <SetTime <2020,1,1,1,1,1> m2,Param3,Param4,P Param1 = 1 ~ 12(month) aram5> Param2 = 1 ~ 31(date) Param3 = 0 ~ 24(hour) Param4 = 0 ~ 60(min) Param5 = 0 ~ 60(sec) USER MANUAL / DL-SCU33-SW...
- Page 20 1 - HOSTA HDMI 2 - HOSTB(L) HDMI 3 - HOSTB(R) HDMI >SetCecSrcOn Param Send CEC ON command to source >SetCecSrcOn 1 Param = 1~3 <CecSrcOn 1 1 - HOSTA HDMI 2 - HOSTB(L) HDMI 3 - HOSTB(R) HDMI USER MANUAL / DL-SCU33-SW...
- Page 21 3 - HOSTB(R) HDMI >SetCecDisplayOn Send CEC ON command to displayer >SetCecDisplayOn 1 Param Param = 1~3 <CecDisplayOn 1 1 - Display HDMI OUT L 2 - Display HDMI OUT R 3 - HDMI SHARE OUT USER MANUAL / DL-SCU33-SW...
- Page 22 3 - HDMI SHARE OUT >SetCecDisplayVOL Send CEC volume minus command to >SetCecDisplayVOLMinus 1 Minus Param displayer <CecDisplayVOLMinus 1 Param = 1~3 1 - Display HDMI OUT L 2 - Display HDMI OUT R 3 - HDMI SHARE OUT USER MANUAL / DL-SCU33-SW...
-
Page 23: Edid Settings
Copy EDID from SHARE-OUT 1001 Copy EDID from DISPLAY-OUT-1 1010 Copy EDID from DISPLAY-OUT-2 1011 EDID pass-through (follow SHARE-OUT) Note: If the unit fails to copy the EDID of HDMI output, default EDID will be used. USER MANUAL / DL-SCU33-SW... -
Page 24: Firmware Upgrade
3. Use the firmware upgrade software, click browser to choose the latest upgrade file. 4. Click the UpgradeStart button to upgrade. 5. After firmware is upgraded successfully, the switcher should be restarted by unplugging and plugging the power adapter. USER MANUAL / DL-SCU33-SW... -
Page 25: Technical Specifications
-25 to +70°C (-13° to +158°F) Relative humidity 10% to 90%, Non-condensing External power supply Input: AC 100~240V, 50/60Hz; Output: 24V DC 5A Power consumption 70W (Max) Dimension (W*H*D) 220mm x 21.5mm x 110mm Net weight 0.55KG USER MANUAL / DL-SCU33-SW... - Page 26 Thank you for your purchase. For technical support please call our toll-free number at 800-530-8998 or email us at supportlibav@libav.com www.libav.com 800-530-8998...
Need help?
Do you have a question about the DL-SCU33-SW and is the answer not in the manual?
Questions and answers