
Subscribe to Our Youtube Channel
Related Manuals for LIBERTY AV SOLUTIONS DIGITALINX DL-SC31U-BX


Summary of Contents for LIBERTY AV SOLUTIONS DIGITALINX DL-SC31U-BX
- Page 1 DL-SC31U-BX Owners Manual A/V and USB Auto Switchers Rev 200920 11675 Ridgeline Drive Phone: 719-260-0061 Colorado Springs, CO Toll-Free: 800-530-8998 80921 Fax: 719-260-0075...
- Page 2 DL-SC31U-BX Owners Manual Important Safety Instructions » Please completely read and verify you understand all instructions in this manual before operating this equipment. » Keep these instructions in a safe, accessible place for future reference. » Heed all warnings. » Follow all instructions. »...
-
Page 3: Table Of Contents
DL-SC31U-BX Installation Guide Table of Contents Product Overview ��������������������������������������������������������������������������������������������������������������������������������������� Product Contents ���������������������������������������������������������������������������������������������������������������������������������������� Top and Bottom Panels ������������������������������������������������������������������������������������������������������������������������������� Top Panel ������������������������������������������������������������������������������������������������������������������������������������������������������� Bottom Panel ������������������������������������������������������������������������������������������������������������������������������������������������ Installation Instructions ������������������������������������������������������������������������������������������������������������������������������ Install Table Pocket ���������������������������������������������������������������������������������������������������������������������������������������� Connect A/V Sources ������������������������������������������������������������������������������������������������������������������������������������� Video Inputs ............................Connect Display �������������������������������������������������������������������������������������������������������������������������������������������� HDMI Output ............................ -
Page 4: Product Overview
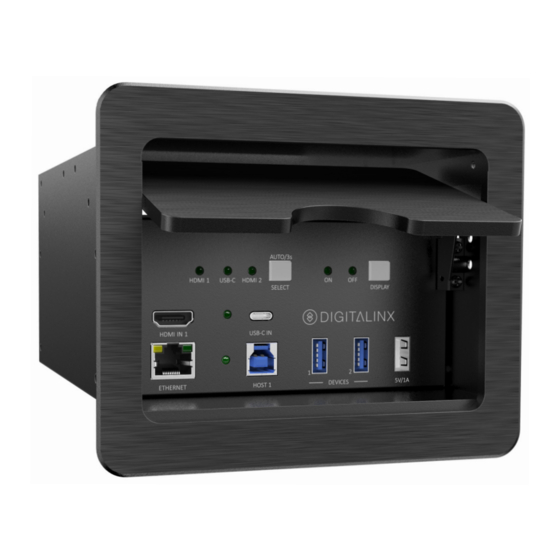
DL-SC31U-BX Owners Manual Product Overview The DigitaLinx DL-SC31U-BX is a 3x1 multi format A/V and USB conference auto switcher and table pocket that supports video resolutions up to 4K@60Hz 4:4:4 8bit deep color and has a built in 4 port USB 3.x hub for integration of USB devices such as USB cameras and microphones that can switched... -
Page 5: Top And Bottom Panels
DL-SC31U-BX Installation Guide Top and Bottom Panels Top Panel 1. INPUT LED’S AND SELECTOR - A/V input source selector and corresponding LEDs • INPUT - Input selection button, hold down this button for 3 seconds to enter and exit automatic switching mode 2. -
Page 6: Bottom Panel
DL-SC31U-BX Owners Manual Bottom Panel 1. HDMI 2 - HDMI input 2 2. HDMI OUT - HDMI output 3. TCP/IP CONTROL - RJ45 connector for Ethernet control and to access the internal web GUI 4. ETHERNET PASS THROUGH - RJ45 connector for Ethernet pass through (to ETHERNET on top panel) 5. -
Page 7: Installation Instructions
DL-SC31U-BX Installation Guide Installation Instructions Install Table Pocket A table cut out template has been provided in the package contents of the DL-SC31-BX that is printed to the correct scale of the device dimensions. Before cutting into the table top, confirm that the product you are installing is the DL-SC31U-BX as the provided template is only for this product. -
Page 8: Connect Display
DL-SC31U-BX Installation Guide Connect Display HDMI Output Connect display device to the HDMI output using a High Speed HDMI cable that is less than or equal to 5 meters in length for 4k60 signals and 8 meters for 1080p signals. Connect USB Hosts / Devices Host Inputs Connect a PC USB port to either the PC/HOST 1 or PC/HOST 2 (bottom) to connect to devices connected to the... -
Page 9: Connecting Control
DL-SC31U-BX Installation Guide Connecting Control RS232 Port Wiring Connect a control system or display to the DL-SC31U-BX via RS232 for switcher control or for display control. TX RX G DL-SC31U-BX RS232 Port RS232 Wiring Connect the system controller or display RX signal to TX on the D , then L-SC31U-BX... -
Page 10: Connect Ethernet (Web Browser) Control (Optional)
DL-SC31U-BX Installation Guide Connect Ethernet (Web Browser) Control (Optional) The DL-SC31U-BX can be controlled via Ethernet through a web browser interface. The TCP/IP port requires a standard straight-through Category 5 or greater cable with the TIA/EIA-568B crimp pattern for optimal operation. -
Page 11: A/V Diagram
DL-SC31U-BX Installation Guide A/V Diagram... -
Page 12: Web Gui Control / System Settings
DL-SC31U-BX Installation Guide Web GUI Control / System Settings Switcher Control Connecting to Web GUI Control Network a PC computer and the DL-SC31U-BX then open a web browser and type in IP address of the DL-SC31U- BX . The default IP address is 192.168.0.178. -
Page 13: A/V Switching
DL-SC31U-BX Installation Guide A/V Switching The CONTROL menu allows you to route A/V signals from the video inputs to the HDMI output of the switcher and enable / disable auto switching mode. To enable / disable auto switching mode, check the ON/OFF button in the Auto Switching option. When auto switching is disabled, the switcher must be switched manually by either using the front panel buttons, the embedded web GUI or with the API. -
Page 14: Rs232 Display Control Settings
DL-SC31U-BX Installation Guide RS232 Display Control Settings The Display Setting menu allows you to configure RS232 serial strings to be transmitted to a connected display to the DL-SC31U-BX RS232 port. An RS232 / serial connection must be made from either device to a display for this option to work. -
Page 15: Auto Display On/Off Settings
DL-SC31U-BX Installation Guide Auto Display ON/OFF Settings The DISPLAY SETTING > DISPLAY menu allows you to enable / disable automatic display ON/OFF control. When display control is ON, the DL-SC31U-BX can turn the display or projector ON using the stored RS232 commands previously set up in the DISPLAY SETTING >... -
Page 16: Usb Host Switching Settings
DL-SC31U-BX Installation Guide USB Host Switching Settings In the DL-SC31U-BX there are three USB hosts that can be switched either automatically, manually or they can be set to follow the video input automatically when the AV input is selected. By default, PC / HOST 1 USB host follows HDMI 1, PC / HOST 2 host follows HDMI 2 and when connecting USB C device it also switches to this input as a host. -
Page 17: Edid Management
DL-SC31U-BX Installation Guide Edid Management EDID can be set for each A/V input using the EDID menu. To adjust an inputs EDID option, click on the desired input channel then click on the desired resolution, then click CONFIRM. When uploading a USER DEFINED EDID option, click the open field to locate the .bin EDID file on your local computer, then click APPLY. -
Page 18: Renaming Inputs
DL-SC31U-BX Installation Guide Renaming Inputs The Tags menu allows you to set user defined names for inputs that will be displayed on the VIDEO tab for easy system control Navigate to the Tags menu, enter in the desired names for the INPUTS, then click CONFIRM. -
Page 19: Network Settings
DL-SC31U-BX Installation Guide Network Settings The Network menu allows you to set the network settings for the device. Navigate to the Network menu, select either DHCP or STATIC IP as the desired IP mode. If choosing DHCP, make sure the DL-SC31U-BX is connected to a router / network switch with DHCP server support. When choosing the STATIC IP option, manually enter in the desired IP ADDRESS, SUBNET MASK and GATEWAY information, then click CONFIRM for changes to take place. -
Page 20: Security Settings
DL-SC31U-BX Installation Guide Security Settings The PASSWORD menu allows you to set the admin password to a user defined password Navigate to the PASSWORD menu, enter in a user defined password in the password field, then click CONFIRM. -
Page 21: System Settings
DL-SC31U-BX Installation Guide System Settings The CONTROL menu allows you to change the DL-SC31U-BX switcher to factory default the unit or turn the POWER OFF to the switcher... -
Page 22: Rs232 And Tcp/Ip Control
DL-SC31U-BX Installation Guide RS232 and TCP/IP Control RS232 Settings: 9600 baud, 8 Data bits, 1 Stop bit, Parity = None Telnet Settings: User defined IP address (default IP address:192.168.0.178), port 4001 The commands are case sensitive and must be terminated with a carriage return <CR> and line feed <LF> A/V Routing Description Command... -
Page 23: Usb Host Routing
DL-SC31U-BX Installation Guide USB Host Routing Description Command Examples #SET_USB_SWITCH_MODE {m} Command: Set USB switching mode to manual #SET_USB_SWITCH_MODE 0 switching or to auto switching or to {m} = 0 (AUTO) follow video inputs 1 (MANUAL) Response: 2 (FOLLOW VIDEO) @USB_SWITCH_MODE 0 NOTE: When using the manual switching commands in this API the... -
Page 24: Cec / Rs232 Display Control
DL-SC31U-BX Installation Guide CEC / RS232 Display Control Description Command Examples #SET_DISPLAY {S} Command: Send TV ON/OFF display commands #SET_DISPLAY ON using CEC (HDMI) or RS232 {S} = ON, OFF Response: NOTE: The RS232 commands can be @SET_HDMI_ ON configured and stored in the web GUI, see page 14... -
Page 25: System Commands
DL-SC31U-BX Installation Guide System Commands Description Command Examples #SET_POWER {M} Command: Set switcher in standby mode #SET_POWER 0 {M} = 0 (STANDBY) 1 (ON) Response: @POWER 0 #GET_POWER Command: Query standby status #GET_RELAY_AUTO_TIME Response: @POWER 0 #SET_RS232_BAUD {B} Command: Set baud rate of switcher #SET_RS232_BAUD 4 {B} = 0 (115200) 1 (57600) -
Page 26: Technical Specifications
DL-SC31U-BX Installation Guide Technical Specifications Video Video Inputs (2) HDMI, (1) USB-C Video Input Connector (2) HDMI type A, (1) USB TYPE C Input Video Signal HDMI for HDMI input, Display Port Alternate Mode for USB-C Video Output (1) HDMI Video Output Connector (1) HDMI type A Input Resolution Support... -
Page 27: Device Dimensions
Device Dimensions... - Page 28 Thank you for your purchase. For Technical Support please call our toll free number at 800-530-8998 or email us at supportlibav@libav.com www.libav.com Digitalinx is a brand of:...
Need help?
Do you have a question about the DIGITALINX DL-SC31U-BX and is the answer not in the manual?
Questions and answers