
Subscribe to Our Youtube Channel
Related Manuals for LIBERTY AV SOLUTIONS DL-PSMV62


Summary of Contents for LIBERTY AV SOLUTIONS DL-PSMV62
- Page 1 USER MANUAL 6x1 4K Presentation Switcher with Multi-view DL-PSMV62 Rev 220109 www.libav.com 800.530.8998...
-
Page 2: Table Of Contents
RS232 Communication ������������������������������������������������������������������������������������������������������������������������������������� 36 RS232 and TCP/IP Control ������������������������������������������������������������������������������������������������������������������������������� 37 Video Switching ������������������������������������������������������������������������������������������������������������������������������������������������� 37 Audio Switching / Control ��������������������������������������������������������������������������������������������������������������������������������� 38 Multi-view Switching ����������������������������������������������������������������������������������������������������������������������������������������� 40 CEC Control ������������������������������������������������������������������������������������������������������������������������������������������������������� 41 System Commands �������������������������������������������������������������������������������������������������������������������������������������������� 42 Technical Specifications ��������������������������������������������������������������������������������������������������������������������������������� 44 USER MANUAL / DL-PSMV62... - Page 3 » power supply cord or plug is damaged, liquid has been spilled or objects have fallen into the apparatus, the apparatus has been exposed to rain or moisture, does not operate normally, or has been dropped. USER MANUAL / DL-PSMV62...
- Page 4 USER MANUAL / DL-PSMV62...
-
Page 5: Product Overview
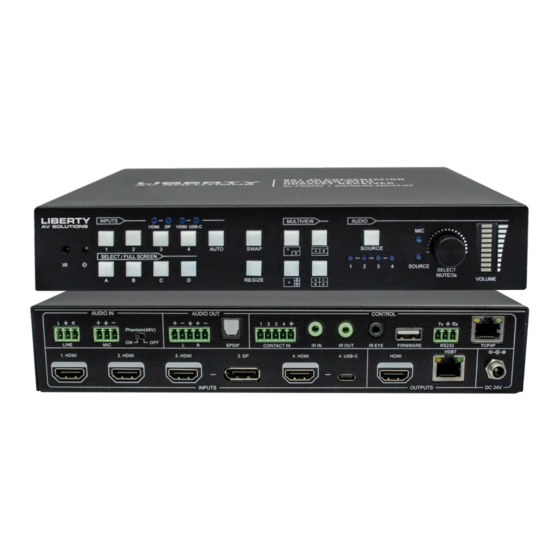
The DigitaLinx Series is a family of extension, routing, and switching products designed to allow digital signals to extend beyond their limitations. Liberty’s latest addition, DL-PSMV62, is an HDMI 1.4 and HDCP 2.2 compliant presentation switcher that offers four HDMI, one display port and one USB-C input with power charging capability along with mirrored HDMI and HDBaseT outputs. - Page 6 • Press the volume knob to select microphone or source audio control. • Rotate the knob to increase or decrease the volume of the selected audio. • Press and hold the knob at least 3 seconds to mute the selected audio, rotate the knob to unmute. USER MANUAL / DL-PSMV62...
- Page 7 • IR EYE: Connects to IR receiver for local switcher control. • FIRMWARE: Type-A USB for firmware upgrade. • RS232: 3-pin terminal block for RS232 control. • TCP/IP: RJ45 port to control the switcher via GUI and over network. USER MANUAL / DL-PSMV62...
-
Page 8: Installation Instructions
Attach the supplied mounting clamps to the sides of the DL-PSMV62 matrix. The switcher requires one rack unit (1 RU) of space. It is recommended that you leave an empty rack space above and below the DL-PSMV62 for additional cooling. -
Page 9: Connect Displays
(up to 10Gbps) and 70m/232’ for 1080p signals using CAT6 F/UTP cable HDBaseT Cabling To ensure proper performance of the DL-PSMV62, it is recommended that you use solid core, shielded Category 6 F/UTP cabling at a minimum. Category 5e F/UTP may perform well but may not support power over HDBaseT reliably over longer distances. -
Page 10: Connect Audio Inputs
Connect Audio Inputs The DL-PSMV62 supports a stereo unbalanced (LINE) and a balanced (MIC) audio input. Unbalanced - TRS 3.5mm Connect an unbalanced line level audio source to the switchers LINE input with the following TRS 3.5 pin-out. LEFT RIGHT... -
Page 11: Connect Audio Outputs
The DL-PSMV62 supports stereo unbalanced and a balanced analog and outputs as well as digital audio outputs via SPDIF. Connect an audio amplifier to the audio output of the DL-PSMV62, the switcher features a left and right balanced audio output and a digital SPDIF output. -
Page 12: Connecting Control
Connecting Control Contact Closures The contact closures changes the input of the DL-PSMV62. Use the following pin-out configuration with any standard normally open, momentary switch. These contact closure inputs are intended to be connected directly to relays or switches. To activate simply short the associated terminal to the ground terminal. -
Page 13: Connecting Ethernet Control
Web Browser Control The DL-PSMV62 includes a web portal to allow control of the matrix via a standard web browser. The IP address is the same address that is used for TCP/IP control. Connecting IR Control Use only the supplied IR receiver or emitter to the switcher for IR control. -
Page 14: Applying Power
Applying Power Connect the included power supply to the DL-PSMV62 power port, connect the IEC power cord connected to power supply to a power source. USER MANUAL / DL-PSMV62... -
Page 15: Front Panel Control
Press and hold a windows button (A-D) at least 3 seconds. Inputs LEDs not assigned to the window button will go out, the corresponding input source LED will illuminate blue. After 3 seconds, Window A, B, C and D LED illuminate blue. USER MANUAL / DL-PSMV62... -
Page 16: Multi-View Mode Selection
Press FULL SCREEN A~D button to select the corresponding window to display in full- screen mode. The corresponding input source button LED and FULL SCREEN button LED will illuminate blue, other window buttons and previous multi-view mode button LED goes out. USER MANUAL / DL-PSMV62... -
Page 17: Swap Setting
SWAP button is pressed repeatably. Window Size Setting The window A/B/C/D size can be adjusted by repeatedly pressing the RESIZE button, the button LED illuminates once when press its button once. USER MANUAL / DL-PSMV62... -
Page 18: Audio Control
Press the volume knob to select microphone or source audio control. Rotate the knob to increase or decrease the volume of the selected audio. Press and hold the knob at least 3 seconds to mute the selected audio, rotate the knob to unmute. USER MANUAL / DL-PSMV62... -
Page 19: Ir Remote Control
The user-defined multiview modes can be set via GUI. 5. AUDIO SOURCE: Four buttons for audio source selection. 6. VOLUME: • Microphone audio: Mute, volume up and volume down. • Source audio: Mute, volume up and volume down. USER MANUAL / DL-PSMV62... -
Page 20: Web Gui Control / System Settings
Web GUI Control / System Settings Connecting to Web GUI Network a PC computer and the DL-PSMV62 then open a web browser and type in IP address of the DL-PSMV62. The default IP address is 192.168.0.178. Be sure the computer you are using to connect... -
Page 21: Switching
1. Click the menu Control. 2. Click Video sub menu. 3. The source selection buttons, Auto button and full screen window A~D buttons operate the same as the buttons of front panel buttons. See Front Panel Control for reference. USER MANUAL / DL-PSMV62... - Page 22 1. Click the menu Control. 2. Click Display sub menu. 3. Click On or Off for Display control. 4. Type command in this box to be send to control the display device, and then click Send. USER MANUAL / DL-PSMV62...
- Page 23 3. Select audio source for both audio HDMI and HDBaseT outputs. 4. Set the delay time of audio output to 0-150ms. 5. Turn on or off the microphone input. 6. Volume bar, volume up, volume down and mute buttons for microphone audio control. USER MANUAL / DL-PSMV62...
-
Page 24: Multi-View Configuration
5. RESIZE: Click the button to adjust the window size in a layout. Note that only Layout 2, Layout 5-Layout 8 and Layout 9~Layout 12 can be adjusted. 6. SWAP: Click the button to cycle swap the video source of window display in counter clockwise fashion. USER MANUAL / DL-PSMV62... - Page 25 Pre-defined Layout Continued..7. Click the menu Settings COG . 8. Choose what inputs you will use for the multi-view windows in the layout. 9. Click Confirm. USER MANUAL / DL-PSMV62...
- Page 26 2. Click User-defined sub menu. 3. Choose a layout number. 4. Enter in the pixel starting and end position for each window. 5. Choose what inputs you will use for the multi-view windows in the layout. 6. Click Confirm. USER MANUAL / DL-PSMV62...
-
Page 27: Auto Display Control
9. Enter RS232 command to turn OFF display device, and then click Save. Select x2 to send the command twice. 10. Set the delay time of sending the Display Off command again, and then click Save. 11. Type the RS232 command to select the desired input for the display device. USER MANUAL / DL-PSMV62... -
Page 28: Output Resolution
Output Resolution 1. Click the menu Resolution. 2. Select the output resolution for HDMI and HDBaseT outputs. • Select “Auto for Rx” to have the output resolution sync to compatible resolution of connected display. 3. Click Confirm. USER MANUAL / DL-PSMV62... -
Page 29: Cec Control
CEC Control Source Control 1. Click the menu CEC. 2. Click Source sub menu. 3. Choose an input. 4. Click the desired function. USER MANUAL / DL-PSMV62... - Page 30 CEC Control Continued..Display Control 1. Click the menu CEC. 2. Click Display sub menu. 3. Choose an output. 4. Click the desired function. USER MANUAL / DL-PSMV62...
-
Page 31: Edid
EDID Pre-defined EDID Setting 1. Click the menu EDID. 2. Choose Setting. 3. Select an input. 4. Choose an EDID configuration. 5. Click Confirm. USER MANUAL / DL-PSMV62... - Page 32 EDID Continued..User-defined EDID Setting 1. Click the menu EDID. 2. Choose Upload. 3. Select an input. 4. Choose an EDID .bin file configuration from PC. 5. Click Apply. USER MANUAL / DL-PSMV62...
-
Page 33: Network Settings
Network Settings 1. Click the menu Network. 2. Choose from DHCP or Static IP mode. 3. If entering in a Static IP, enter in the IP address, subnet mask and gateway manually. 4. Click Confirm. USER MANUAL / DL-PSMV62... -
Page 34: Multi-View Layout Naming
Multi-view Layout Naming 1. Click the menu Tags. 2. Choose a name for the various layouts. 3. Click Confirm. USER MANUAL / DL-PSMV62... -
Page 35: Security
Security 1. Click the menu Security. 2. Choose a password, then click Confirm. 3. Enable Front Panel Lock if desired. USER MANUAL / DL-PSMV62... -
Page 36: Rs232 Communication
RS232 Communication 1. Click the menu Additional. 2. Choose desired Baud Rate of the DL-PSMV62, then click Save. 3. Check Factory Default to set switcher back to factory settings. Note: The baud rate listed here changes the baud rate of the switcher and passes any command (besides a DL-PSMV62 switcher API command) through to the HDBaseT RS232 output. -
Page 37: Rs232 And Tcp/Ip Control
>SetAV <in> Command: Switches video input source. >SetAV 1<cr><lf> <in> = 1-6 Response: <AV 1 >GetAV Command: Queries current input. >GetAV<cr><lf> Response: <Video OUT A B C D IN 1 2 3 4 <AudioSource 1 <Video 1,A USER MANUAL / DL-PSMV62... -
Page 38: Audio Switching / Control
Queries current source >GetSourceVOL<cr><lf> volume level. Response: <SourceVOL 6 >SetSourceAudioMute <m> Command: Mutes/unmutes source >SetSourceAudioMute EN<cr><lf> audio. <m> = EN (Enable), Dis Response: (Disable <SourceAudioMute True >GetSourceAudioMute Command: Queries current mute status. >GetSourceAudioMute<cr><lf> Response: <AutoSwitch True USER MANUAL / DL-PSMV62... - Page 39 Queries current source >GetMicVOL<cr><lf> volume level. Response: <MicVOL 6 >SetMicAudioMute <m> Command: Mutes/unmutes source >SetMicAudioMute EN<cr><lf> audio. <m> = EN (Enable), Dis Response: (Disable <MicAudioMute True >GetMicAudioMute Command: Queries current mute status. >GetMicAudioMute<cr><lf> Response: <MicAudioMute False USER MANUAL / DL-PSMV62...
-
Page 40: Multi-View Switching
OUT A B C D IN 2 3 4 1 <AudioSource 1 >SetResizeWin Command: Adjusts the window size in a >SetResizeWin <cr><lf> layout. Note that only Layout 2, Layout 5-Layout 8 and Response: Layout 9~Layout 12 can be <ResizeWin adjusted. USER MANUAL / DL-PSMV62... -
Page 41: Cec Control
HDMI and HDBaseT outputs. Response: [2 = HDBaseT] <SetCecDisplayOn 1 >SetCecDisplayOff <o> Command: Turns OFF display devices >SetCecDisplayOff 1<cr><lf> connected to either the HDMI and HDBaseT outputs. <o> = [1 = HDMI] Response: [2 = HDBaseT] <SetCecDisplayOff 1 USER MANUAL / DL-PSMV62... -
Page 42: System Commands
<Video OUT A B C D IN 1 2 3 5 <AudioSource 1 >GetIpAddress Command: Queries switcher IP address. >GetIpAddress<cr><lf> Response: <IpAddress: 192.168.0.178 <SubNetMask: 255.255.255.0 <GateWay: 192.168.0.1 >GetFirewareVersion Command: Queries current firmware >GetFirewareVersion<cr><lf> version. Response: <V1.0.0 USER MANUAL / DL-PSMV62... - Page 43 APPLICATION EXAMPLE Line Wall Plate Control Audio Control System Audio Audio Contact Closure Optional up to 70m / 232’ DL-HD70RX Receiver HDMI Laptop Laptop Source Source Source HDMI CATx USB-C AUDIO RS232 Display Display USER MANUAL / DL-PSMV62...
-
Page 44: Technical Specifications
< 0.05%, 20Hz ~ 20kHz bandwidth, 1kHz sine at 0dBFS level (or max level) Signal to Noise Ratio Analog: > 80dB, 20Hz ~ 20kHz bandwidth, Toslink: > 90dB, 20Hz ~ 20kHz bandwidth Output Impedance 70Ω Audio Format PCM 2.0 USER MANUAL / DL-PSMV62... - Page 45 Power Supply Regulatory CE, RoHS Other Standard Warranty 5 years Compatible Transmitters DL-HD70RX Distances and picture quality may be affected by cable grade, cable quality, source and destination equipment, RF and electrical interference, and cable patches. USER MANUAL / DL-PSMV62...
- Page 46 Thank you for your purchase. For technical support please call our toll-free number at 800-530-8998 or email us at supportlibav@libav.com www.libav.com 800-530-8998...
Need help?
Do you have a question about the DL-PSMV62 and is the answer not in the manual?
Questions and answers