Table of Contents
Advertisement
InteliLite 4
MRS16
Copyright © 2021 ComAp a.s.
Written by Jan Liptak
Prague, Czech Republic
ComAp a.s., U Uranie 1612/14a,
170 00 Prague 7, Czech Republic
Tel: +420 246 012 111
E-mail: info@comap-control.com, www.comap-
control.com
Controller for single gen-set
Operator Guide
applications
2
4
17
19
22
24
26
28
30
Advertisement
Table of Contents

Related Manuals for ComAp InteliLite 4 MRS16


Summary of Contents for ComAp InteliLite 4 MRS16
-
Page 1: Table Of Contents
5 Logout 6 Production mode 7 Information screen 8 Language selection 9 Display contrast adjustment Copyright © 2021 ComAp a.s. Written by Jan Liptak Prague, Czech Republic ComAp a.s., U Uranie 1612/14a, 170 00 Prague 7, Czech Republic Tel: +420 246 012 111 Operator Guide E-mail: info@comap-control.com, www.comap-... -
Page 2: Front Panel Elements
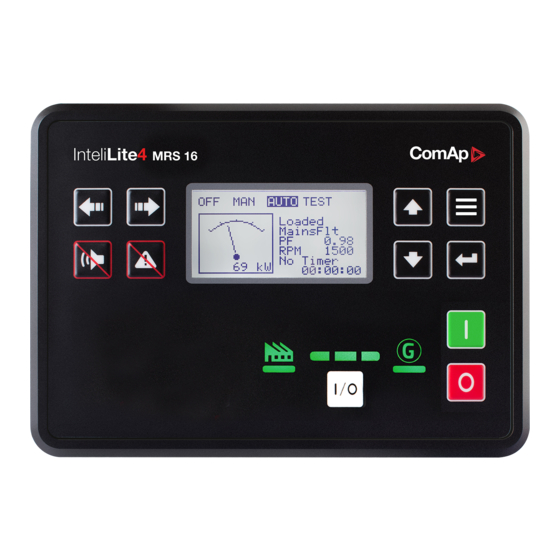
1 Front panel elements Image 1.1 Operator interface of InteliLite 4 MRS16 Control buttons Position Picture Description LEFT button. Use this button to move left or to change the mode. The button can change the mode only if the main screen with the indicator of currently selected mode is displayed. - Page 3 GCB Status. Consists of 3 green LEDs. The middle green LED is on if GCB is closed. It is driven by GCB CLOSE/OPEN output or by GCB feedback signal. Side green LEDs are on in case the generator status indicator is ok. InteliLite 4 MRS16 Operator Guide...
-
Page 4: Display Screens And Pages Structure
Exclamation mark – active when there is any alarm in alarmlist 2.1.2 Optional Value can be chosen via setpoints Main Screen Line 1 (page 1) Main Screen Line 2 (page Posibilities are: RPM, PF, Run Hours, ATT, AIN1 InteliLite 4 MRS16 Operator Guide... - Page 5 Note: Use Up and Down button to move between measurement pages. Note: Use Up and Down button to move between measurement pages. Note: Use Up and Down button to move between measurement pages. Note: Use Up and Down button to move between measurement pages. InteliLite 4 MRS16 Operator Guide...
- Page 6 Note: Use Up and Down button to move between measurement pages. Note: Use Up and Down button to move between measurement pages. Note: Use Up and Down button to move between measurement pages. Note: Use Up and Down button to move between measurement pages. InteliLite 4 MRS16 Operator Guide...
- Page 7 Note: Use Up and Down button to move between measurement pages. Note: Available only with plug-in module. Note: Use Up and Down button to move between measurement pages. Note: Available only with plug-in module. Note: Use Up and Down button to move between measurement pages. InteliLite 4 MRS16 Operator Guide...
- Page 8 Note: Use Up and Down button to move between measurement pages. Note: Use Up and Down button to move between measurement pages. Note: Use Up and Down button to move between measurement pages. Note: Available only with plug-in module. InteliLite 4 MRS16 Operator Guide...
- Page 9 Note: Available only with plug-in module. Note: Use Up and Down button to move between measurement pages. Note: Available only with plug-in module. Note: Use Up and Down button to move between measurement pages. Note: Available only with plug-in module. InteliLite 4 MRS16 Operator Guide...
- Page 10 Note: From all of these pages it is possible to switch seamlessly to the setpoint group page by pressing Page button. Note: There can be some additional screens and also some screens can be hidden. Screen’s visibility depends on actual configuration (usage of extension or communication modules, ECU etc.). InteliLite 4 MRS16 Operator Guide...
- Page 11 Note: Use Enter button to enter selected setpoint group. Note: Use Up and Down button to select required setpoint. Note: Use Left and Right button to select required setpoint. Note: Use Enter button to enter selected setpoint. InteliLite 4 MRS16 Operator Guide...
- Page 12 Note: From all measurement pages we can fluently go to the setpoint group page by pressing Page button. Note: From setpoint group page we can fluently go to the history log pages by pressing Page button. InteliLite 4 MRS16 Operator Guide...
- Page 13 Note: Use Enter button to move to the next page of history log. Note: Use Up and Down button to select required alarm reason. Note: Use Enter button to move to the next page of history log. InteliLite 4 MRS16 Operator Guide...
- Page 14 Note: Use Enter button to move to the next page of history log. Note: Use Up and Down button to select required alarm reason. Note: Use Enter button to move to the next page of history log. InteliLite 4 MRS16 Operator Guide...
- Page 15 Note: Use Enter button to move to the first page of history log. IMPORTANT: The records are numbered in reverse order, i.e. the latest (newest) record is "0" and older records have "-1", "-2" etc. InteliLite 4 MRS16 Operator Guide...
- Page 16 Note: This is only basic history record. There can be some additional screens in case that in controller is extension module or ECU is configured. Also it depends on connection type. 6 back to Display screens and pages structure InteliLite 4 MRS16 Operator Guide...
-
Page 17: Browsing Alarms
Not confirmed alarms are displayed with an asterisk. It means the alarm is still not acknowledged (confirmed). ECU alarms: SPN/FMI/OC/SC SPN – Suspect parameter number FMI – type of protection OC – number of errors SC – source of error InteliLite 4 MRS16 Operator Guide... - Page 18 Password reset procedure cannot be performed without filled email address. To fill out email address, the administrator password is required. 6 back to Browsing alarms InteliLite 4 MRS16 Operator Guide...
-
Page 19: Login
Note: Use Up and Down button to select setpoint group Login. Note: Use Enter button to enter setpoint group Login. Note: Use Up and Down Button to select Login. Note: Use Enter button to enter Login. InteliLite 4 MRS16 Operator Guide... - Page 20 Note: Use Enter button to confirm the UserID or Page button to cancel entering Login. PIN Edit Note: Use Up and Down Button to change the digit. Note: Use Left and Right button to move between digits. InteliLite 4 MRS16 Operator Guide...
- Page 21 The purpose of alarm is to inform that the controller might be or is connected to the untrusted interface and cybersecurity rules are not fulfilled cause there is default administrator password. InteliLite 4 MRS16 Operator Guide...
-
Page 22: Logout
Note: Use Enter button to enter setpoint group Login. Note: Use Up and Down Button to select Login. Note: Use Enter button to enter Login. Note: Use wrong credentials – wrong UserID or PIN. Note: Use Enter button to accept the inputs. InteliLite 4 MRS16 Operator Guide... - Page 23 Note: Use Page button to return to the Main screen. 6 back to Logout InteliLite 4 MRS16 Operator Guide...
-
Page 24: Production Mode
Note: From all measurement pages we can fluently go to the setpoint group page by pressing Page button. Note: Use Enter button to enter setpoint group Login. Note: Use Up and Down Button to select Production Mode Note: Use Enter button to enter Production Mode. InteliLite 4 MRS16 Operator Guide... - Page 25 Note: Once Disabled is confirmed by Enter button the option Enabled is no longer on the screen and therefore it is not possible to enable Production mode by HMI display screen. Use InteliConfig to enable the Production mode. 6 back to Production mode InteliLite 4 MRS16 Operator Guide...
-
Page 26: Information Screen
Note: On Main measurement screen press Enter and Page button together. Enter button has to be pressed first. Note: Use Page button to move to the next page. Note: Use Page button to move to the next page. Note: Use Up button to move back to main measurement screen. InteliLite 4 MRS16 Operator Guide... - Page 27 6 back to Information screen InteliLite 4 MRS16 Operator Guide...
-
Page 28: Language Selection
Note: On Main measurement screen press Enter and Page button together. Enter button has to be pressed first. Note: Use Page button to move to the next page. Note: Use Page button to move to the next page. Note: Use Page button to move to the next page. InteliLite 4 MRS16 Operator Guide... - Page 29 Note: Use Up and down button to select required language. Note: Use Enter button to confirm selected language. 6 back to Language selection InteliLite 4 MRS16 Operator Guide...
-
Page 30: Display Contrast Adjustment
Note: On any measurement screen press Enter and Up button together for higher contrast. Down button together for lower contrast. Note: After setting a contrast, no another action is needed. 6 back to Display contrast adjustment InteliLite 4 MRS16 Operator Guide...
Need help?
Do you have a question about the InteliLite 4 MRS16 and is the answer not in the manual?
Questions and answers