Table of Contents
Advertisement
Available languages
Available languages
Quick Links
Advertisement
Chapters
Table of Contents

Related Manuals for Kärcher BD 38/12 C Bp


Summary of Contents for Kärcher BD 38/12 C Bp
- Page 1 BD 38/12 C Bp English Español 59655290 03/18...
-
Page 3: Table Of Contents
Please read and comply with Information on battery these original instructions prior (accumulator) and charger to the initial operation of your appliance and Lithium-ion batteries are installed in the ap- store them for later use or subsequent own- pliance. These are subject to special crite- ers. -
Page 4: Function
CAUTION Proper use – These operating instructions must be This appliance is suited for the commercial observed unconditionally. Observe rec- use, e.g. in hotels, schools, hospitals, fac- ommendations of the lawmaker for han- tories, shops, offices, and rental compa- dling batteries. nies. -
Page 5: Operating Elements
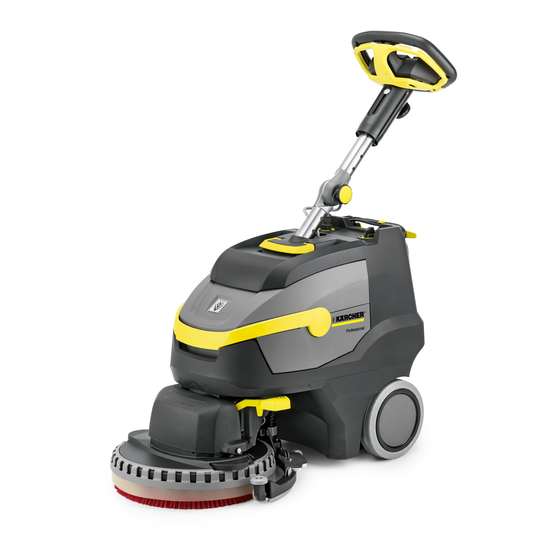
Operating elements 1 Fresh water tank cover 19 Safety button 2 Fluff filter Colour coding 3 Push handle – The operating elements for the cleaning 4 Star knob, height adjustment of the process are yellow. push rod – The controls for the maintenance and 5 Star knob, transport position of the push service are light gray. -
Page 6: Before Startup
Battery charging display 1 Battery is charged (green) 2 Battery is being charged (yellow, flash- 1 Dosage cleaning solution ing) 2 Switch for detergent solution 3 Malfunction (red) 3 Control lamp to apply detergent solution 4 Indicator lamp vacuuming Operation Green: Suction turbine in operation ... - Page 7 Recommended detergents: Set the appliance switch to "I". Switch on "Detergent" button. Application Detergent Push the pedal of the suction bar lifting Regular cleaning RM 745 device simultaneously down and to the (even for floors sensitive RM 746 left and allow it to go up in order to lower to alkalies) the suction bar.
-
Page 8: Transport
Emptying the Fresh Water Tank Shutting down WARNING Completely charge the battery prior to Please observe the local provisions regard- longer operational breaks extending ing the wastewater treatment. over several weeks. Set the appliance switch to "0". ATTENTION Risk of damage to the battery due to total discharge. - Page 9 Clean the vacuum lips, check for wear and replace them if required. Clean brush. Check the brush for wear and replace if required (see "Maintenance tasks"). Charge battery if required. Weekly Remove the vacuum lips from the hold- Note: Thanks to the perforation pattern the vacu- um lips cannot be mixed up.
-
Page 10: Disposal
Replace splash guard Disposal Removing the battery DANGER The removal of the battery may only be per- formed by the Kärcher aftersales service or a specialist. The evaluation, whether the battery is dam- aged or not, is done by an authorised after- sales technician The Chapter "Safety instructions"... -
Page 11: Faults
Faults DANGER ATTENTION Risk of injury. Turn the appliance switch to Risk of damage for the appliance due to "0" and pull the mains plug of the charger leaking water. Drain the wastewater and re- prior to performing any work on the appli- maining fresh water prior to performing ance. -
Page 12: Accessories
Accessories The appliance can be equipped with vari- task. Please request our catalogue or visit ous accessories depending on the cleaning us on the Internet at www.kaercher.com. Description Part no.: Description Disk brush, white 6.907-154.0 For polishing and cleaning sensitive floors. Disk brush, red (medium, 6.907-151.0 For cleaning slightly dirtied or sensitive floors. -
Page 13: Technical Specifications
Technical specifications Power Nominal voltage 25,2 Battery capacity Ah (5h) 21 Battery type Li-ion Average power consumption Suction engine output Brush engine output Operating temperature range °C 0...40 Vacuuming Cleaning power, air quantity Cleaning power, negative pressure Cleaning brushes Working width Brush diameter Brush speed 1/min... -
Page 14: Eu Declaration Of Conformity . En
EU Declaration of Conformity Warranty We hereby declare that the machine de- The warranty terms published by our com- scribed below complies with the relevant petent sales company are applicable in basic safety and health requirements of the each country. We will repair potential fail- EU Directives, both in its basic design and ures of your accessory within the warranty construction as well as in the version put... - Page 15 Antes del primer uso de su apa- CUIDADO rato, lea este manual original, Aviso sobre una situación probablemente actúe de acuerdo a sus indicaciones y peligrosa que puede provocar daños mate- guárdelo para un uso posterior o para otro riales. propietario posterior.
-
Page 16: Función
– Evitar entrar en contacto con el líquido Uso previsto que sale de baterías defectuosas. Si Este aparato es apto para el uso en aplica- entra en contacto con el líquido, enjua- ciones industriales, como en hoteles, es- gar con agua. Si entra en contacto con cuelas, hospitales, fábricas, tiendas, ofici- los ojos consultar también a un médico. -
Page 17: Elementos De Mando
Elementos de mando 1 Tapa depósito de agua limpia 18 Gancho de cable, giratorio 2 Filtro de pelusas 19 Interruptor de seguridad 3 Estribo de empuje Identificación por colores 4 Mango en estrella, ajuste de la altura de – Los elementos de control para el proce- la barra de empuje so de limpieza son amarillos. -
Page 18: Antes De La Puesta En Marcha Es
Si es necesario, el aparato también se pue- de volver a utilizar antes de que la batería se haya cargado totalmente. Enchufar la clavija de red a una toma de corriente. Indicador de carga de batería 1 Dosis solución detergente 2 Interruptor solución de limpieza 3 Piloto de control aplicar solución de de- tergente... - Page 19 Girar hacia arriba el asa de transporte Eco: El aparato trabaja con velocidad del depósito de agua sucia. de cepillo y potencia de aspiración re- Extraer el depósito de agua sucia y co- ducidas. Al hacerlo se reduce también locar a un lado.
-
Page 20: Transporte
Poner el aparato en funcionamiento brevemente con el depósito de agua limpia para que se vacíe también el sis- tema de agua del aparato. Guarde el aparato en un lugar protegi- do de las heladas. Desmontar la barra de empuje Para ahorrar espacio al transportar y alma- cenar la barra de empuje, se puede des- montar. - Page 21 CUIDADO Mensualmente Si se sale agua se puede dañar el aparato. Compruebe el estado de las juntas si- Purgar el agua sucia y el resto de agua lim- tuadas entre el depósito de agua sucia pia antes de trabajar en el aparato. y la tapa y, en caso necesario, cámbie- ...
-
Page 22: Eliminación De Desechos
Soltar la protección antisalpicaduras Recambio del cepillo desgastada del anillo de sujeción y eli- Vaciado del depósito de agua limpia minarla. Extraer el depósito de agua sucia. Presionar la nueva protección antisalpi- Inclinar hacia atrás el aparato y colocar caduras contra la chapa del anillo de sobre el estribo de empuje. -
Page 23: Averías
Averías PELIGRO CUIDADO Peligro de lesiones. Antes de realizar cual- Si se sale agua se puede dañar el aparato. quier tipo de trabajo en el aparato colocar Purgar el agua sucia y el resto de agua lim- el interruptor a "0" y desenchufar el carga- pia antes de trabajar en el aparato. -
Page 24: Accesorios
Accesorios En función de la tarea de limpieza de que tro catálogo o visítenos en la página de in- se desee realizar, es posible dotar al apa- ternet www.kaercher.com. rato de distintos accesorios. Solicite nues- denominación No. de pieza Descripción Cepillo de disco, blanco 6.907-154.0 Para pulido y limpieza de mantenimiento de pavimentos delicados. -
Page 25: Datos Técnicos
Datos técnicos Potencia Tensión nominal 25,2 Capacidad de batería Ah (5h) 21 Tipo de batería Li-Iones Consumo medio de potencia Potencia del motor de aspiración Potencia del motor de barrido Rango de temperatura de servicio °C 0...40 Aspirar Potencia de aspiración, caudal de aire Potencia de aspiración, depresión Cepillos de limpieza Anchura de trabajo... -
Page 26: Declaración Ue De Conformidades
Declaración UE de Garantía conformidad En todos los países rigen las condiciones de garantía establecidas por nuestra em- Por la presente declaramos que la máquina presa distribuidora. Las averías del acce- designada a continuación cumple, tanto en lo sorio serán subsanadas gratuitamente que respecta a su diseño y tipo constructivo dentro del periodo de garantía, siempre como a la versión puesta a la venta por noso-... - Page 27 اﻟﺒﻴﺎﻧﺎت اﻟﻔﻨﻴﺔ اﻟﻘﺪرة 25,2 ﺳﻤﻲ اﻟﺠﻬﺪ اﻟﻜﻬﺮﺑﺎﺋﻲ اﻻ أﻣﺒﻴﺮ ﻗﺪرة اﻟﺒﻄﺎرﻳﺔ ) ﺳﺎﻋﺔ (ﺳﺎﻋﺎت أﻳﻮﻧﺎت اﻟﻠﻴﺜﻴﻮم ﻧﻮع اﻟﺒﻄﺎرﻳﺔ ك اﻟﻄﺎﻗﺔ ﻣﺘﻮﺳﻂ اﺳﺘﻬﻼ ﻗﺪرة ﻣﺤﺮك اﻟﺸﻔﻂ ﻗﺪرة ﻣﺤﺮك اﻟﻔﺮﺷﺎة 0...40 °C ﺳﺘﺨﺪام ﻧﻄﺎق درﺟﺔ ﺣﺮارة اﻻ اﻟﺸﻔﻂ ﻗﺪرة اﻟﺸﻔﻂ، ﻛﻤﻴﺔ اﻟﻬﻮاء ﻗﺪرة...
- Page 28 اﻟﻤﻠﺤﻘﺎت اﻟﺘﻜﻤﻴﻠﻴﺔ اﺳﺄل ﻋﻠﻰ اﻟﻜﺘﺎﻟﻮج اﻟﺨﺎص ﺑﻨﺎ أو ﺗﻔﻀﻞ ﺑﺰﻳﺎرة ﻳﻤﻜﻦ ﺗﺰوﻳﺪ اﻟﺠﻬﺎز ﺑﻤﻠﺤﻘﺎت ﻣﺨﺘﻠﻔﺔ ﺣﺴﺐ ﻛﻞ ﻣﻬﻤﺔ www.kaercher.com ﻟﻜﺘﺮوﻧﻲ ﻣﻮﻗﻌﻨﺎ اﻹ .ﺗﻨﻈﻴﻒ اﻟﻮﺻﻒ رﻗﻢ اﻟﺠﺰء اﻟﻤﻠﺼﻖ .ﺎ ً رﺿﻴﺎت اﻟﺤﺴﺎﺳﺔ وﻟﺘﻨﻈﻴﻔﻬﺎ دور ﻳ ﻟﺘﻠﻤﻴﻊ اﻷ 6.907-154.0 اﻟﻔﺮﺷﺎة اﻟﻘﺮﺻﻴﺔ، أﺑﻴﺾ .رﺿﻴﺎت...
- Page 29 ﻋﻄﺎل اﻷ .ﺧﻄﺮ إﻟﺤﺎق أﺿﺮار ﺑﺎﻟﺠﻬﺎز ﺟﺮاء ﺗﺴﺮب اﻟﻤﺎء ﺧﻄﺮ اﺣﺮص ﻋﻠﻰ ﺗﺼﺮﻳﻒ اﻟﻤﻴﺎه اﻟﻤﺘﺴﺨﺔ واﻟﻤﻴﺎه اﻟﻨﻈﻴﻔﺔ ﺻﺎﺑﺔ. ﻗﺒﻞ إﺟﺮاء أﻳﺔ أﻋﻤﺎل ﻋﻠﻰ اﻟﺠﻬﺎز ﺧﻄﺮ اﻹ .اﻟﻤﺘﺒﻘﻴﺔ ﻗﺒﻞ إﺟﺮاء أﻳﺔ أﻋﻤﺎل ﻋﻠﻰ اﻟﺠﻬﺎز " وﺧﻠﻊ " اﺣﺮص ﻋﻠﻰ إدارة ﻣﻔﺘﺎح اﻟﺠﻬﺎز إﻟﻰ اﻟﻮﺿﻊ .ﻗﺎﺑﺲ...
- Page 30 اﺳﺘﺒﺪل وﺳﻴﻠﺔ اﻟﺤﻤﺎﻳﺔ ﻣﻦ اﻟﺮذاذ اﻟﺘﺨﻠﺺ ﻣﻦ اﻟﺠﻬﺎز وﻣﻠﺤﻘﺎﺗﻪ ﻓﻚ اﻟﺒﻄﺎرﻳﺔ ﺧﻄﺮ ء ل ﺧﺪﻣﺔ ﻋﻤﻼ ﻣﻦ ﺧﻼ ﻳﺴﻤﺢ ﺑﻔﻚ اﻟﺒﻄﺎرﻳﺔ إﻻ ﻻ .أو ﻣﻦ ﻗﺒﻞ ﻓﻨﻲ ﻣﺘﺨﺼﺺ KARCHER ء ﻣﻌﺘﻤﺪ ﺑﻔﺤﺺ اﻟﺒﻄﺎرﻳﺔ ﻳﻘﻮم ﺧﺒﻴﺮ ﺧﺪﻣﺔ ﻋﻤﻼ .ﺿﺮار وﺗﺤﺪﻳﺪ ﻣﺎ إذا ﻛﺎﻧﺖ ﻣﺘﻌﺮﺿﺔ ﻷ "ﻣﺔ...
- Page 31 ﻒ ﻣﻨﻔﺬ اﻟﺸﻔﻂ واﻓﺤﺼﻪ ﻣﻦ ﺣﻴﺚ ﺗﻌﺮﺿﻪ ّ ﻧ ﻈ .ﻟﻠﺒﻠﻰ واﺳﺘﺒﺪﻟﻪ ﻋﻨﺪ اﻟﺤﺎﺟﺔ .ﻗﻢ ﺑﺘﻨﻈﻴﻒ اﻟﻔﺮﺷﺎة اﻓﺤﺺ اﻟﻔﺮﺷﺎة ﻣﻦ ﺣﻴﺚ اﻟﺘﺂﻛﻞ وﻗﻢ ﺑﺘﻐﻴﻴﺮﻫﺎ .(ﻣﺮ )اﻧﻈﺮ ;أﻋﻤﺎل اﻟﺼﻴﺎﻧﺔ إذا ﻟﺰم اﻷ .اﺷﺤﻦ اﻟﺒﻄﺎرﻳﺔ ﻋﻨﺪ اﻟﻠﺰوم أﺳﺒﻮﻋﻴﴼ .ﻗﻢ...
- Page 32 اﻟﻨﻘﻞ إﻓﺮاغ ﺧﺰان اﻟﻤﻴﺎه اﻟﻨﻈﻴﻔﺔ ﺗﺤﺬﻳﺮ ﺗﻨﻮﻳﻪ اﺣﺮص ﻋﻠﻰ ﻣﺮاﻋﺎة اﻟﺘﻌﻠﻴﻤﺎت اﻟﻤﺤﻠﻴﺔ اﻟﺴﺎرﻳﺔ ﺻﺎﺑﺔ واﻟﺘﻌﺮض ﻟﻠﻀﺮر! ﻳﺮﺟﻰ ﻣﺮاﻋﺎة وزن ﺧﻄﺮ اﻹ .ﻟﻤﻌﺎﻟﺠﺔ اﻟﻤﻴﺎه اﻟﻤﺘﺴﺨﺔ .اﻟﺠﻬﺎز ﻋﻨﺪ اﻟﻨﻘﻞ ﻋﻨﺪ ﻧﻘﻞ اﻟﺠﻬﺎز ﻓﻲ ﺳﻴﺎرة، اﺣﺮص ﻋﻠﻰ ﺗﺄﻣﻴﻦ ﻟﻠﺘﻌﻠﻴﻤﺎت ب ﻃﺒﻘﴼ ﻧﻘﻼ ق...
- Page 33 :ﻣﻠﺤﻮﻇﺔ اﻟﺘﻨﻈﻴﻒ .ﺗﺴﺘﺨﺪم أﻳﺔ ﻣﻮاد ﺗﻨﻈﻴﻒ ﺷﺪﻳﺪة اﻟﺮﻏﻮة ﻻ ﺗﻨﺒﻴﻪ .ﻳﺮﺟﻰ ﻣﺮاﻋﺎة إرﺷﺎدات اﻟﻤﻌﺎﻳﺮة ﺗﻘﻢ ﺑﺘﺸﻐﻴﻞ اﻟﺠﻬﺎز رﺿﻴﺔ. ﻻ ﺿﺮار ﺑﻔﺮش اﻷ ﺧﻄﺮ اﻹ .ارﻓﻊ ﻣﻘﺒﺾ ﺣﻤﻞ ﺧﺰان اﻟﻤﻴﺎه اﻟﻤﺘﺴﺨﺔ .ﻋﻠﻰ اﻟﻔﻮر ﺧﺮاﺟﻪ ﺛﻢ ﺿﻌﻪ ﻗﻢ ﺑﺮﻓﻊ ﺧﺰان اﻟﻤﻴﺎه اﻟﻤﺘﺴﺨﺔ ﻹ ...
- Page 34 ﻗﺒﻞ اﻟﺘﺸﻐﻴﻞ اﻟﺘﻤﻴﻴﺰ اﻟﻠﻮﻧﻲ ﺳﺘﻌﻤﺎل اﻟﺨﺎﺻﺔ ﺑﻌﻤﻠﻴﺔ اﻟﺘﻨﻈﻴﻒ ذات ﻋﻨﺎﺻﺮ اﻻ – ﺷﺤﻦ اﻟﺒﻄﺎرﻳﺔ .ﻟﻮن أﺻﻔﺮ :ﻣﻠﺤﻮﻇﺔ ﺳﺘﻌﻤﺎل اﻟﺨﺎﺻﺔ ﺑﺎﻟﺼﻴﺎﻧﺔ واﻟﺨﺪﻣﺔ ﻋﻨﺎﺻﺮ اﻻ – ﺗﻢ ﺗﺰوﻳﺪ ﻫﺬا اﻟﺠﻬﺎز ﺑﻮﺳﻴﻠﺔ ﻟﻠﺤﻤﺎﻳﺔ ﻣﻦ ﻓﺮاغ ﺷﺤﻦ .ذات ﻟﻮن رﻣﺎدي ﻓﺎﺗﺢ دﻧﻰ ﺎ، أي أﻧﻪ ﻋﻨﺪﻣﺎ ﻳﺘﻢ ﺑﻠﻮغ اﻟﺤﺪ اﻷ ً...
- Page 35 ﺳﺘﻌﻤﺎل ﻋﻨﺎﺻﺮ اﻻ ﻏﻄﺎء ﺧﺰان اﻟﻤﻴﺎه اﻟﻨﻘﻴﺔ ﻓﻠﺘﺮ اﻟﻮﺑﺮ ﺳﻨﺎدة دﻓﻌﻴﺔ ﻣﻘﺒﺾ ﻧﺠﻤﻲ، ﻟﺘﻌﺪﻳﻞ ارﺗﻔﺎع ﻋﻤﻮد اﻟﺪﻓﻊ ﻣﻘﺒﺾ ﻧﺠﻤﻲ، ﻟﻀﺒﻂ ﻋﻤﻮد اﻟﺪﻓﻊ ﻓﻲ وﺿﻊ اﻟﺘﻨﻘﻞ ﺗﺠﻬﻴﺰة ﺗﺤﺮﻳﺮ ﻏﻄﺎء ﺧﺰان اﻟﻤﻴﺎه اﻟﻤﺘﺴﺨﺔ ﻏﻄﺎء ﺧﺰان اﻟﻤﻴﺎه اﻟﻤﺘﺴﺨﺔ ﺧﺰان اﻟﻤﻴﺎه اﻟﻤﺘﺴﺨﺔ ﻣﻘﺒﺾ ﺣﻤﻞ ﺧﺰان اﻟﻤﻴﺎه اﻟﻤﺘﺴﺨﺔ دواﺳﺔ...
- Page 36 ﻳﺼﺪرﻫﺎ اﻟﻤﺸﺮع اﻟﻘﺎﻧﻮﻧﻲ ﻋﻨﺪ اﻟﺘﻌﺎﻣﻞ ﻣﻊ ﺳﺘﺨﺪام اﻟﻤﻄﺎﺑﻖ ﻟﻠﺘﻌﻠﻴﻤﺎت اﻻ .اﻟﺒﻄﺎرﻳﺎت ﻟﻠﺒﻴﺎﻧﺎت اﻟﻮاردة وﻓﻘﴼ ﻳﺠﺐ اﺳﺘﺨﺪام ﻫﺬا اﻟﺠﻬﺎز إﻻ ﻻ ﺎ ﻣﻊ ﻗﻴﻤﺔ اﻟﺠﻬﺪ ً ﻳﺠﺐ أن ﻳﻜﻮن ﺟﻬﺪ اﻟﺘﻴﺎر ﻣﺘﻮاﻓ ﻘ – .ﻓﻲ دﻟﻴﻞ اﻟﺘﺸﻐﻴﻞ ﻫﺬا .اﻟﻤﺪوﻧﺔ ﻋﻠﻰ ﻟﻮﺣﺔ ﺻﻨﻊ اﻟﺠﻬﺎز رﺿﻴﺎت...
- Page 37 ﺻﻠﻲ ﻫﺬا ﻳﺮﺟﻰ ﻗﺮاءة دﻟﻴﻞ اﻟﺘﺸﻐﻴﻞ اﻷ إرﺷﺎدات ﺧﺎﺻﺔ ﺑﺎﻟﺒﻄﺎرﻳﺔ وﺟﻬﺎز اﻟﺸﺤﻦ ﻗﺒﻞ أول اﺳﺘﺨﺪام ﻟﺠﻬﺎزﻛﻢ، ﺛﻢ اﻟﺘﻌﺎﻣﻞ اﻟﺠﻬﺎز ﻣﺮﻛﺐ ﺑﻪ ﺑﻄﺎرﻳﺎت ﺑﺄﻳﻮﻧﺎت اﻟﻠﻴﺜﻴﻮم. وﻫﺬا اﻟﻨﻮع ﺣﺘﻔﺎظ ﻟﺘﻌﻠﻴﻤﺎت ﻫﺬا اﻟﺪﻟﻴﻞ واﻻ ﻣﻊ اﻟﺠﻬﺎز وﻓﻘﴼ ﻳﺴﻤﺢ ﺑﻔﻚ ﻣﻦ اﻟﺒﻄﺎرﻳﺎت ﻳﺨﻀﻊ ﻟﻤﻌﺎﻳﻴﺮ ﺧﺎﺻﺔ. ﻻ ي...
- Page 40 http://www.kaercher.com/dealersearch...
Need help?
Do you have a question about the BD 38/12 C Bp and is the answer not in the manual?
Questions and answers