Table of Contents
Advertisement
Quick Links
Advertisement
Table of Contents

Related Manuals for Drive DeVilbiss Healthcare Sidhil CHE03


Summary of Contents for Drive DeVilbiss Healthcare Sidhil CHE03
- Page 1 Doherty Treatment Chair Range Instructions for use...
-
Page 2: Table Of Contents
CONTENTS 1. INTRODUCTION ....................3 1.1 Features .........................3 1.2 Warnings & Cautions ..................3 2. USE .........................4 2.1Typical Use ......................4 2.2 Risk Assessment ....................4 2.3 Chair Load ......................4 2.4 Transport & Storage Conditions ..............5 3. SYMBOL DEFINITION ...................6 4. PARTS IDENTIFICATION ................7 5. -
Page 3: Introduction
1. INTRODUCTION Thank you for purchasing this product. These instructions for use should be read carefully before operating the chair. Please ensure that you understand all instructions, if you have any questions concerning the operation or maintenance of the chair please contact your provider. 1.1 Features •... -
Page 4: Use
2. USE 2.1 Typical Use Your chair is intended for use within a clinical environment. It has been designed to provide users with optimum independence and freedom of movement through the use of a touch button handset. The chair offers greatly reduced manual handling requirements for the operator by providing a profiling platform and electrical height adjustment capability. -
Page 5: Transport & Storage Conditions
2.4 Transport & Storage Conditions The following conditions should be followed when transporting and storing the treatment and phlebotomy chairs. • Chair set to lowest height • Leg sections must be raised to the highest angle (parallel with the seat section) •... -
Page 6: Symbol Definition
3. SYMBOL DEFINITION Warning Do not sit on sections Refer to instructions for use Maximum patient weight Safe working load Place of Manufacture W.E.E.E Label (Do not discard in general waste, follow local recycling policy) Type B Applied part Class II... -
Page 7: Parts Identification
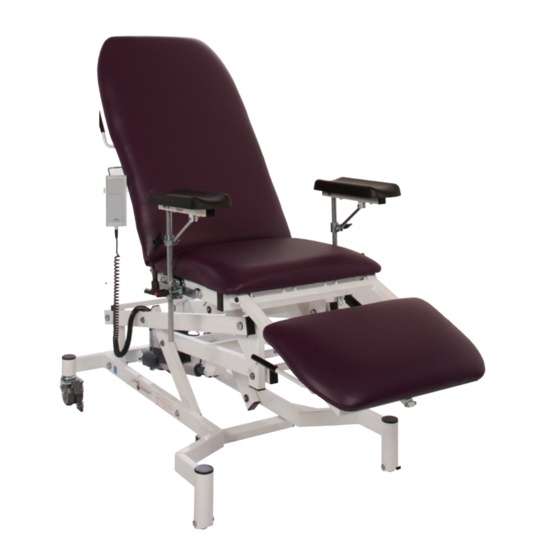
4. PARTS IDENTIFICATION Treatment Chair - CHE03 Phlebotomy Chair - CHE04 1. Backrest 8. Extending leg 2. Padded arm rest 9. Leg section release handle 3. Split extending leg 10. Main lift actuator and control box 4. Mobile base 11. Brake castor 5. -
Page 8: Preparing For Use
5. PREPARING FOR USE Warning Before attempting to use the functions of the chair, ensure these instructions have been read and fully understood. 5.1 Positioning the Chair • Clear the intended area for the chair of any obstructions and ensure the surface is level. -
Page 9: Operation Of The Chair
6. OPERATION OF THE CHAIR 6.1 General Safety • Before the chair is in operation, ensure that obstacles such as side tables and other furniture are not causing an obstruction. • Ensure the electrical cables are not in tension. • Before operating the chair ensure the patient is positioned appropriately •... -
Page 10: Electrical Operation
6.3 Electrical Operation The chair is supplied with an easy to use handset, the handset is intended to be operated by the carer only. Before operating the handset, always inform the patient of the action about to take place. Lower Chair Raise Chair •... -
Page 11: Operating The Leg Section Angle
6.4 Operating the Leg Section Angle Note: The following diagrams show the split leg variant, however the functionality is identical for the single leg. Warning With no load on the leg section it may move unexpectedly if the • release handle is operated. With weight on the leg section it will need to be supported when •... -
Page 12: Operating The Leg Extension
6.5 Operating the Leg Extension • Place both hands either side of the section (indicated by number 1 on the figure on the right) and pull the upholstered section in a parallel direction with the leg frame (2). • The section will extend and lock in 5 pre-set positions. -
Page 13: Adjusting The Backrest Angle
6.7 Adjusting the Backrest Angle The backrest (as with the leg sections) is supported by the use of a lift mechanism and mcan be adjusted to suit the patient. • The release handle is located on the back of the backrest frame. Pull the release handle towards the upholstered section to release the lift mechanism. -
Page 14: Operating The Arm Rail
6.8 Operating the Arm Rail The arm rail provides an amount of adjustability for the accessories that come with each treatment chair variant. The handle is used to adjust the height of the arm/accessory. • Loosen the handle to open up the aperture and allow the accessory shaft to fit between the jaws (making sure the shaft... -
Page 15: Operating The Tilt Arm (If Supplied)
6.9 Operating the Tilt Arm (if supplied) The following instructions are for use with the phlebotomy tilt arm (CHA04). • Loosen the collar by turning the hand-wheel at the back of the component in an anti-clockwise direction. • Once the hand-wheel is loosened, the collar will be able to move up and down which in turn changes the angle of the phlebotomy arm... -
Page 16: Decontamination
7. DECONTAMINATION Infection control and routine cleaning must be carried out in accordance with your local infection control policy or regulatory body. Warning • It is advisable to remove any accessories that are fastened to the product. • Always disconnect the product from mains before cleaning procedure (if applicable). - Page 17 Drive DeVilbiss Healthcare also recommend the use of Chlor-clean tablets. Follow the product documentation for concentration guidelines and instructions for use. Refer to the Drive DeVilbiss Healthcare infection control policy, copies are available from Drive DeVilbiss Healthcare Ltd. Contact details can be found on the back of this booklet.
-
Page 18: Maintenance
Failure to do so may result in the manufacturer’s warranty becoming void. The chair must be serviced at least once yearly, as a minimum. Drive DeVilbiss Healthcare also recommends the carer performs frequent visual and operational inspections. If there are any signs of damage, or if the chair is not performing as it should withdraw it from service until repaired and determined ‘fit for use’. - Page 19 Drive DeVilbiss Healthcare recommends that the list of ‘checks’ on the previous page are followed as a minimum when performing the annual service procedure. For more detailed service information please refer to the service manual. Copies are available from Drive DeVilbiss Healthcare Ltd.
-
Page 20: Fault Finding
8.1 Fault Finding Listed in the table are a set of faults that may occur within the service life of the treatment chair. If the fault is not listed please contact your supplier for further assistance. If a fault does occur please try the following suggestions, as these may help in diagnosing the fault. -
Page 21: Specification
9. SPECIFICATION 9.1 Chair Data Overall extended length: 1840mm Overall section width: 532mm Seat section length: 440mm Leg section length: 324mm Backrest length: 871mm Height range: 472mm - 874mm Under chair clearance: 104mm (to underside of frame) Under chair clearance: 66mm (to underside of cable bracket) Leg configuration:... - Page 22 Phlebotomy Chair - CHE03 Treatment Chair - CHE04...
-
Page 23: Electrical Data
9.2 Electrical Data Voltage in: 230V±10%, ~50/60Hz. Current in: 1,25A Mains cable fuse: 3-5A *Duty cycle 2 mins of continuous use followed by 18 mins not in use. *Electrically operated chairs are intended to be operated intermittently rather than continuously. If the chair is operated continuously for up to 2 minutes it must then be left for at least 18 minutes before re-use to allow the electrical system to cool sufficiently. -
Page 24: Accessories
10. ACCESSORIES CHA02 – Towel Rail CHE04/306/COLOUR*/1 – Padded Arm Rest (* various colours available, please contact your supplier for colour options) CHA04/1 – Phlebotomy Tilt Arm Note: Characteristics of the towel rail can be found in the specific instructions for use. -
Page 25: Warranty
This limited 3 year warranty gives you specific legal rights and you may also have other rights. Drive DeVilbiss Healthcare Ltd cannot be held responsible for any injury or incident which relates to the use of this chair in conjunction with accessories manufactured by companies other than Drive DeVilbiss Healthcare Ltd. - Page 26 NOTES...
- Page 28 Tel: +44 (0) 845 0600 333 Fax: +44 (0) 845 0600 334 Email: info@drivedevilbiss.co.uk www.drivedevilbiss.co.uk Drive DeVilbiss Healthcare Ltd., Sidhil Business Park, Holmfield, Halifax, West Yorkshire, HX2 9TN, United Kingdom A member of the Drive DeVilbiss Group of Companies INSTRUC/CHE03 & CHE04, 2020/11 - Rev3...
Need help?
Do you have a question about the Sidhil CHE03 and is the answer not in the manual?
Questions and answers