Advertisement
Harness Operation Manual
1. PARTS DESCRIPTION
2. ASSEMBLY PROCESS
3. REPAIR PROCESS
4. HANDLING OF COMPONENTS
COUNT
DESCRIPTION OF REVISIONS
△
0
名 称
TITLE
GT50 Series Harness Operation Manual
技 術 指 定 書
FORM HC0011-9-1
GT50 Series
TECHICAL SPECIFICATION
DESIGNED
HIROSE ELECTRIC CO.,LTD.
APPROVED
CHECKED
DESIGNED
WRITTEN
ETAD-T0930-00
CHECKED
HK.UMEHARA
20220210
OM.MIYAMOTO
20220210
YT.TAKANASHI
20220210
RS.TAKAGI
20220210
△
1 / 6
0
DATE
Advertisement
Table of Contents

Related Manuals for HRS GT50 Series


Summary of Contents for HRS GT50 Series
- Page 1 3. REPAIR PROCESS 4. HANDLING OF COMPONENTS COUNT DESCRIPTION OF REVISIONS DESIGNED CHECKED DATE △ 名 称 TITLE HIROSE ELECTRIC CO.,LTD. APPROVED GT50 Series Harness Operation Manual HK.UMEHARA 20220210 CHECKED OM.MIYAMOTO 20220210 DESIGNED YT.TAKANASHI 20220210 WRITTEN RS.TAKAGI 20220210 技 術 指 定 書...
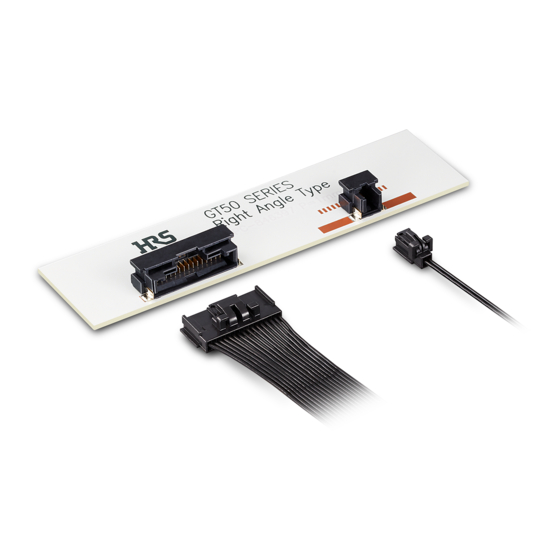
- Page 2 1. PARTS DESCRIPTION List of Part Numbers Part No. Description HRS Product Name Crimp Contact GT50-28SCFA Socket GT50-*S-1C Cable(AWG #28) ― *=No. of Pos. △ 2 / 6 HIROSE ELECTRIC CO.,LTD. ETAD-T0930-00 FORM HC0011-9-2...
- Page 3 Note:Please refer to the Crimp Quality Standard for details on strip length. ② Crimp the Cable in to the Contact List of Crimp Tool Number Crimp Contact HRS Crimp Tool GT50-28SCFA AP105-GT50-28S Note 1: Please use the Hirose crimp tool.
- Page 4 Angled Insertion (Incorrect) Up-down Direction (Incorrect) Right-left Direction (Incorrect) Scoop and Twisted Insertion (Incorrect) Note:Do not use excessive scooping or twisting when inserting terminals. Scoop Insertion (Incorrect) Twisted (Incorrect) <Precautions When Inserting Terminals> When inserting terminals, hold the socket and insert the terminal without touching the lock lever (circles in red on the picture below).
- Page 5 ④ Make sure that the contact lance is hooked by the housing lance of the socket. Insertion Direction Contact Lance Housing Lance △ 5 / 6 HIROSE ELECTRIC CO.,LTD. ETAD-T0930-00 FORM HC0011-9-2...
- Page 6 3. REPAIR PROCESS For removing the inserted contact from the socket, lift up the housing lance by using a pointed needle, and pull out the cable. One removed, socket cannot be re-used. Please use a new part after repair is completed.
Need help?
Do you have a question about the GT50 Series and is the answer not in the manual?
Questions and answers