
Related Manuals for sidhil Freedom II


Summary of Contents for sidhil Freedom II
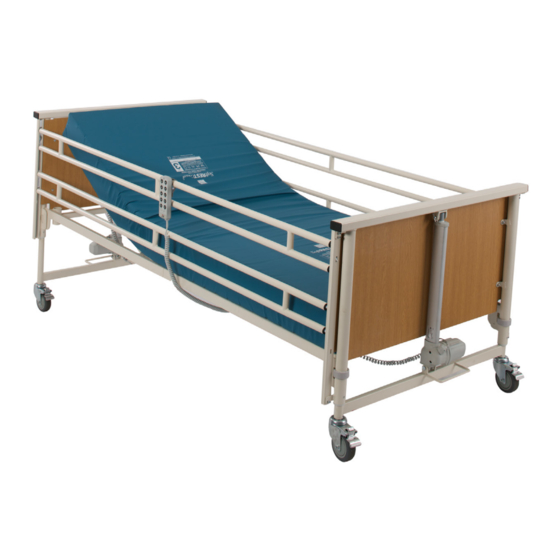
- Page 1 Freedom II 4 Section Profiling Bed Freedom II Electrically Operated Profiling Bed Instructions for use...
- Page 3 Corporate social responsibility customer service and logistics is also an issue for Sidhil. We to provide clear benefits for have now received accreditation our customers in terms of to ISO 14001, underlining our...
-
Page 4: Table Of Contents
CONTENTS 1. INTRODUCTION ................5 1.1 Features ....................5 1.2 Warnings and Cautions ................ 5 2. USE..................... 6 2.1 Typical Use ..................6 2.2 Risk Assessment ................. .6 2.3 Bed Load ..................... 6 2.4 General Warning ................. 6 3. SYMBOL DEFINITION ..............7 4. -
Page 5: Introduction
1. INTRODUCTION Thank you for purchasing this product. These instructions for use should be read carefully before operating the bed. Please ensure that you understand all instructions, if you have any questions concerning the operation or maintenance of the bed please contact your provider / supplier who will provide you with expert professional advice. -
Page 6: Use
2. USE 2.1 Typical Use Your bed is intended for use within the home environment. It has been designed to provide users with optimum independence and freedom of movement through the use of a touch button handset. The bed offers greatly reduced manual handling requirements for the carer by providing a bed with a fully profiling platform and electrical height adjustment capability. -
Page 7: Symbol Definition
3. SYMBOL DEFINITION The following symbols are found on this bed: Warning Beware of potential hazard Refer to instructions for use - Recommended Failure to read the instructions for use could introduce a hazard Maximum patient weight & Safe working load Place of manufacture W.E.E.E Label - Found on individual parts of electrical system (Waste Electrical and Electrical Equipment) -
Page 8: Parts Identification
4. PARTS IDENTIFICATION 1. Head/foot end 2. Castor 3. Handset 4. Lockout fob 5. Control box & knee break actuator 6. Leg section 7. Locking collar 8. Hi/low actuator 9. Side rail 10. Backrest actuator 11. Backrest (Transport stand not shown) -
Page 9: Bed Assembly And Preparing For Use
5. BED ASSEMBLY AND PREPARING FOR USE • Before attempting to assemble the bed ensure these instructions have been read and fully understood. • It is advisable to assemble the bed with a second able bodied person. Warning • Take care when disassembling the bed from the transport stand, the sections are of considerable weight. 5.1 Removal From the Transport Stand No tools are necessary for the assembly of the bed. The assembly procedure is as follows: • Clear the area intended for the bed of any obstructions and ensure the surface is... -
Page 10: Assembling The Bed
Turn the locking collars into their locked position. Note: If this action is being undertaken by a single person Sidhil recommend that the castors are braked before assembly commences. Collar • Repeat for the remaining bed end and locked mattress platform halve. -
Page 11: Fitting The Electrical System
5.3 Fitting the Electrical System • Plug the actuator and handset cables into the control box. The cables are colour matched to the graphic on the control box so using this, plug the cables into the corresponding ports. Note, the plugs only fit into the ports in one orientation. Ensure the cables are plugged fully into the control box. Note: The two bed ends are identical but plugging them into the correct port is important. -
Page 12: Fitting The Side Rails
5.4 Fitting the Side Rails • Raise the bed to approximately the midpoint of its height range (see page 18 for operation of the handset). • Lower the finger assemblies to their ‘down’ position. (see page 17 for an explanation of how to lower the fingers). • Remove the hand-wheel from the side rail channel at the foot end of the bed. • Remove the entire finger assembly set from the channel (as per top right image). - Page 13 • Take the second side rail and fit this into the remaining lower set of fingers that are still located in the channel at the head end of the bed. Carefully rest the unattached end on the floor taking care to ensure that the other end is sufficiently far into the fingers so that it will not fall out.
-
Page 14: Checking The Bed
5.5 Checking the Bed The bed is now fully assembled. Before the bed is put into use ensure the bed is correctly assembled: • Are the locking collars on the corners of the bed correctly orientated in the locked position? • Are the 2 mattress platforms and 4 side rail channel hand wheels tight? • Has all packaging been removed e.g. cable ties/Velcro securing the platform sections? • Are the cables free of all moving parts of the bed and is there sufficient slack in the cables to allow for movement? • Is the bed clear of obstructions? • Has a risk assessment been performed on the suitability of the bed for the user? sections? -
Page 15: Operation Of The Bed
• Ensure the electrical cables are not in tension. • Ensure that any mattresses used are of the correct size and type and have been fitted correctly. A range of suitable pressure relieving and pressure reducing mattresses are available from Sidhil Ltd. • Before operating the bed ensure the patient is positioned appropriately. • When a patient is left unattended ensure the bed is set at its minimum height. Special care should be taken when fitting an air mattress to the bed as incorrect fitting could damage the bed frame. -
Page 16: Brake System
6.3 Brake System The bed has 4 braked castors. • To apply the brakes: Press the brake pedal down. • To release the brakes: Lift the brake pedal up. When the bed is in use ensure the brakes on the castors at the head end of the bed have been applied. • If the bed is to be pushed up/down a slope it is advised that two people move the bed, with one person at each end. -
Page 17: Operating The Side Rails
6.4.2 Operating the Side Rails • Ensure the side rails are locked in place at all times when in the raised position. • A risk assessment should be carried out to consider the age, condition and size of the patient to assess the suitability of side rails. • Side rails are not designed to act as restraints for patients. -
Page 18: Electrical Operation
6.5 Electrical Operation The bed will be supplied with one of two types of handset; a magnetic key model or a twist key model. The handset can either be operated by the occupant or carer. If the carer is to operate the bed ensure that the occupant is made aware of the action(s) about to take place. -
Page 19: Handset Functions (Magnetic Key Model)
6.5.3 Handset Functions (Magnetic Key Model) Illuminates green when function is operating Backrest Up / Down Knee Break Up/ Down Auto Contour Up/ Down (backrest & knee break) Raise / Lower Mattress Platform Foot Down Tilt Illuminates amber when the handset is unlocked Illuminates amber when (see below) there is a mains power... -
Page 20: Knee Break/Leg Section
The bed is not fitted with a battery backup facility. The bed must always be plugged into the mains supply during normal use. Warning 6.6 Knee Break/Leg Section Note: The operation of the knee break/leg section is dependent on the position of the ratchet as detailed below. -
Page 21: Assembly Onto The Transport Stand
7. ASSEMBLY ONTO THE TRANSPORT STAND • Before attempting to assemble the bed onto the transport stand ensure these instructions have been read and fully understood. • It is advisable to assemble the bed with a second able bodied person. • Take care when assembling the bed onto the transport stand, the Warning sections are of considerable weight. Electrics • Flatten and lower the bed to its minimum height (see page 18 for operation of the handset). - Page 22 • Carefully remove the lower side rail. • Whilst holding the upper side rail press the release catch and carefully slide the upper finger assembly out of the channel. • Carefully remove the upper side rail. • Relocate the finger assemblies into the channel (see page 12 for assembly order). • Refit the hand-wheel into the channel.
-
Page 23: Power Failures
8. POWER FAILURES The bed does not have battery backup functionality. In the event of a power failure the bed will not function, resulting in the backrest and/or knee break remaining up, if previously raised. The backrest and knee break are operated via two individual actuators that are located underneath the mattress platform. -
Page 24: Decontamination
9. DECONTAMINATION 9.1 Cleaning and Disinfection Guidelines Infection control and routine cleaning must be carried out in accordance with your local Infection control policy or regulatory body. • Always disconnect the bed from the main power supply prior to cleaning. • Ensure all ports on the electrical system (control box and actuators) have cable plugs inserted to maintain the IP rating. • Regular cleaning and disinfection of the bed frame and relevant accessories will help to prevent the risk of infection to the occupant Warning... -
Page 25: Steam Cleaning
Sidhil also recommend the use of Chlor-clean tablets. Follow the product documentation instructions for concentration guidelines and instructions for use. Refer to the Sidhil infection control policy, copies are available from Sidhil Ltd. Contact details can be found on the back of this booklet. -
Page 26: Maintenance
Only authorised service personnel or Sidhil service engineers should carry out repairs or service activities. Failure to do so may result in the manufacturer’s warranty becoming void. The bed must be serviced once yearly, as a minimum. Sidhil also recommends that the carer performs frequent visual and operational inspections. If there are any signs of damage or the bed is not performing as it should withdraw it from service until the bed has been repaired and is fit for use again. -
Page 27: Fault Finding
10.1 Fault Finding Listed below are a set of electrical faults that may occur within the service life of the bed. If a fault does occur please try the following suggestions, as these may help in diagnosing the fault. Fault Possible Cause Remedy Electrical function(s) -
Page 28: General Maintenance
10.2 General Maintenance Sidhil recommend that the following maintenance procedure is performed every 12 months. Always disconnect the bed from the main power supply prior to performing any maintenance procedures. Warning • Check that all electrical functions operate correctly on the handset. -
Page 29: Specification
11. SPECIFICATION 11.1 Bed Data Overall length 2230mm Overall width 980mm Mattress platform height 400mm – 800mm (+/-10mm) Under bed clearance (to underside of frame) 360mm (+/-10mm) Under bed clearance (to underside of actuator) 210mm (+/-10mm) Mattress platform length 2010mm Mattress platform width 870mm Foot down tilt 0 - 11° Mattress platform angles (max) 75° 27° 23° Safe working load 213kgs (33 stone) Maximum patient weight 178kgs (28 stone) Product weight:... -
Page 30: Electrical Data
11.2 Electrical Data 11.2 Electrical Data Voltage in: 100-240V, ~50/60Hz. Current in: Max. 3,15A Duty cycle* 2 mins of continuous use followed by 18 mins not in use. *Electrically operated beds are intended to be operated intermittently rather than continuously. If the bed is operated continuously for up to 2 minutes it must then be left for at least 18 minutes before re-use to allow the electrical system to cool sufficiently. -
Page 31: Warranty
This limited 1 year warranty gives you specific legal rights and you may also have other rights. Sidhil Ltd cannot be held responsible for any injury or incident which relates to the use of this bed in conjunction with accessories manufactured by companies other than Sidhil Ltd. - Page 32 CONTACT INFORMATION Tel: +44 (0) 01422 233000 Fax: +44 (0) 01422 233010 Email: sales@sidhil.com www.sidhil.com Sidhil Business Park, Holmfield, Halifax, HX2 9TN A member of the Siddall & Hilton Ltd. Group of Companies (93/42/EEC) Certificate No. FM14550 INSTRUC/BED01/NI, 22/06/2015 - Rev.4...
Need help?
Do you have a question about the Freedom II and is the answer not in the manual?
Questions and answers